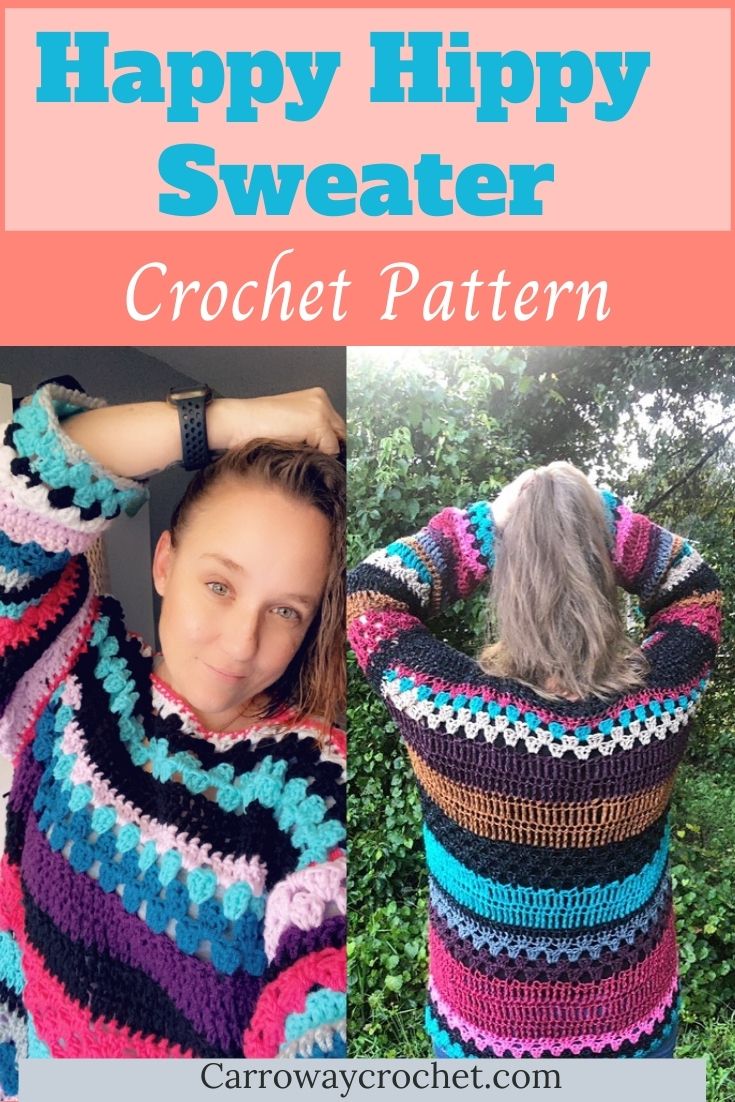
The Happy Hippy Sweater Pattern: Free Crochet Pattern

Need something to bring some joy and happiness into your world right now. The Happy Hippy Sweater is guaranteed to cheer you up the minute you put it on.
I am so excited to bring you the Happy Hippy Sweater Pattern.
The Happy Hippy Sweater Pattern is beginner friendly and makes up quickly due to working with a large hook.
You can make your Happy Hippy Sweater big and baggy or more of a fitted sweater. It is easy to customize and all the tips for that are in the pattern.
**This post contains affiliate links. If you make a purchase using some of my links I may receive a small commission at no extra cost to you.**


About the Happy Hippy Sweater Pattern.
“It is rightfully named because it makes me happy every time I put it on”
Nikki Holman (tester)
Have you hankered after something a little different. Something with a hippy vibe and some great colour and texture. Then the Happy Hippy Sweater Pattern is for you.
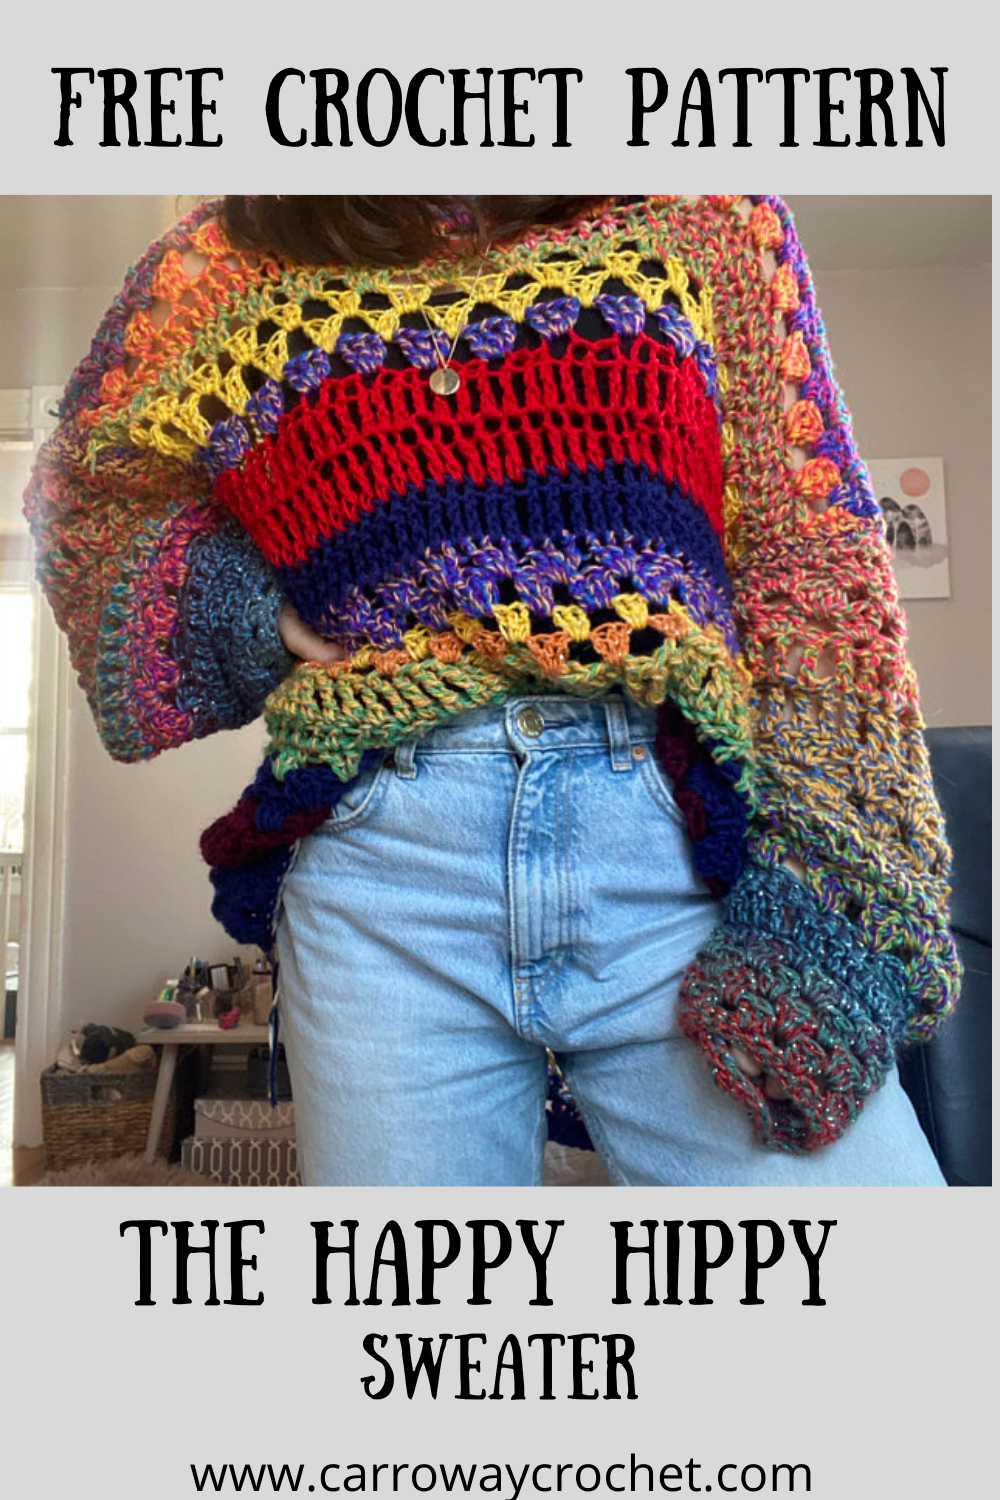
Don’t Forget to Pin This For Later.

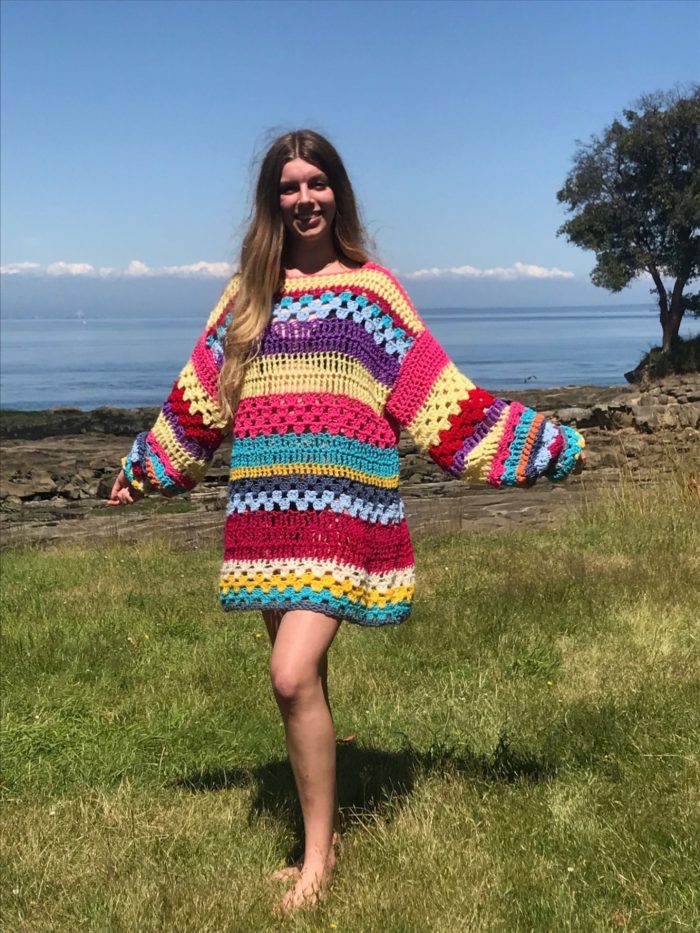
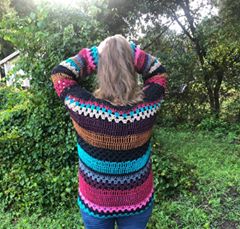
I was pretty happy with my own Happy Hippy Sweater which you can see me in here.
There are Video Tutorials for the Happy Hippy Sweater on my YouTube channel if you prefer to learn from videos.
Here is the Right Handed Version.
Here is the Left Handed Version
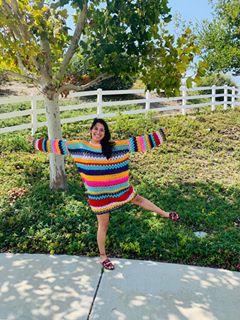
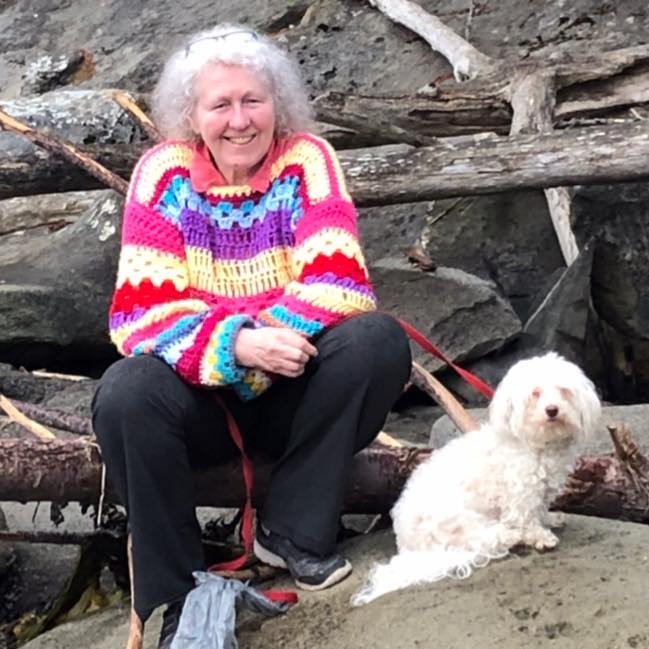
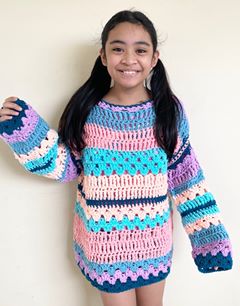
I sent the Happy Hippy Sweater pattern out to my testing group and you should see what they came up with. So many amazing colour choices and each was so special in its own way. You can really stamp your own personality on this sweater.

Check out my latest Video.
The Happy Hippy Sweater Pattern Comes in All The Sizes.
The other great thing about the Happy Hippy Sweater pattern is it is for sizes, XS/S, Med, Large, XL, 2XL, 3/4X and 5X. So no one is left out. It can even be made for a child.
There are also tips on how you can make it as long or as short as you want. Lots of room to make it fit the way you want it too.
Let me tell you what I love about the Happy Hippy Sweater Pattern.
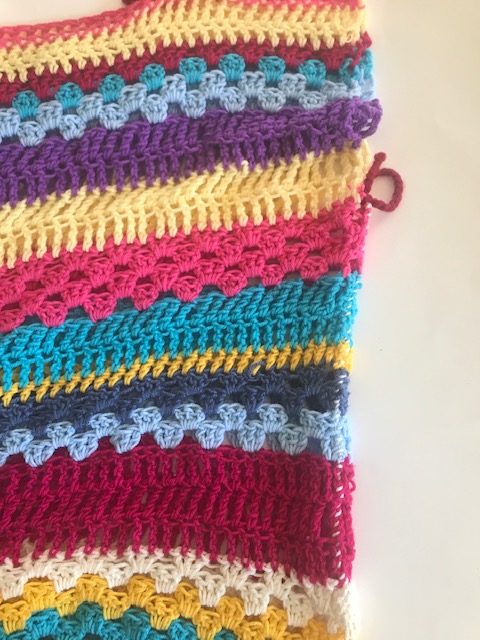
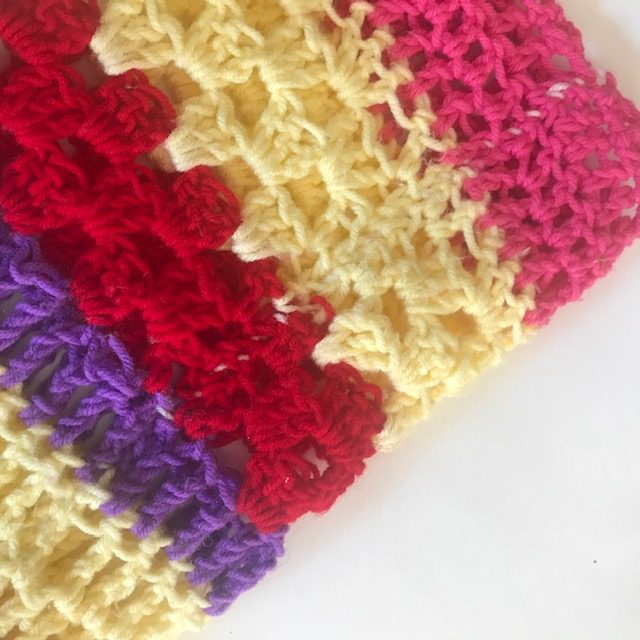
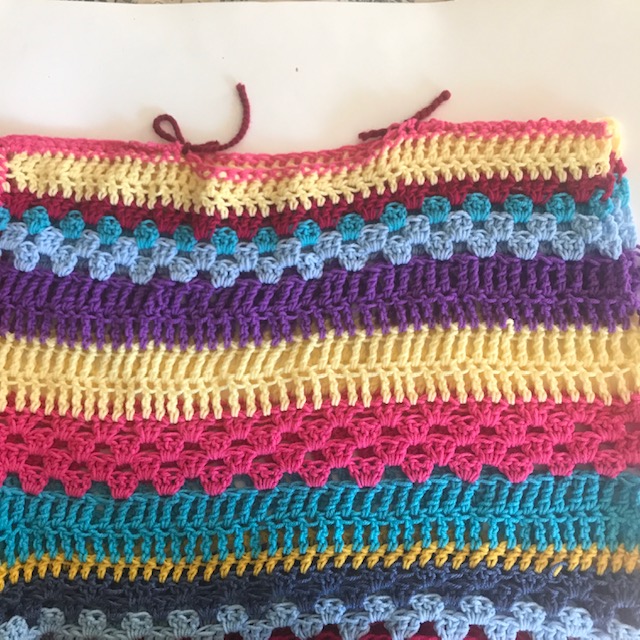
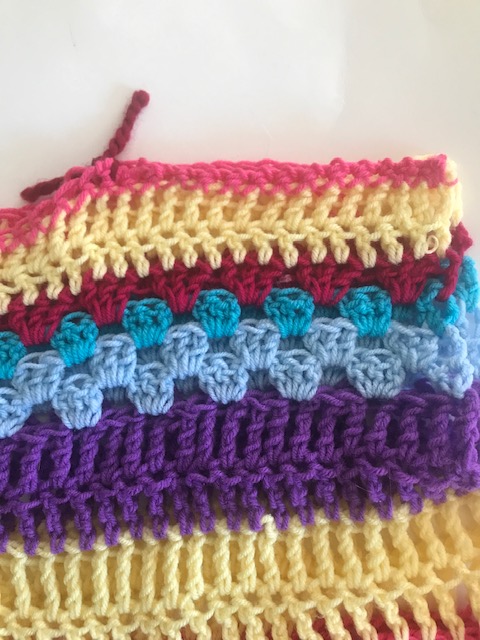
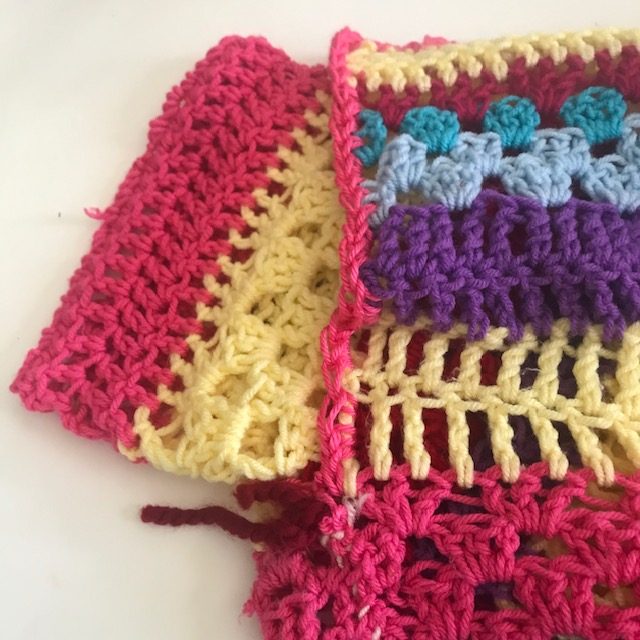
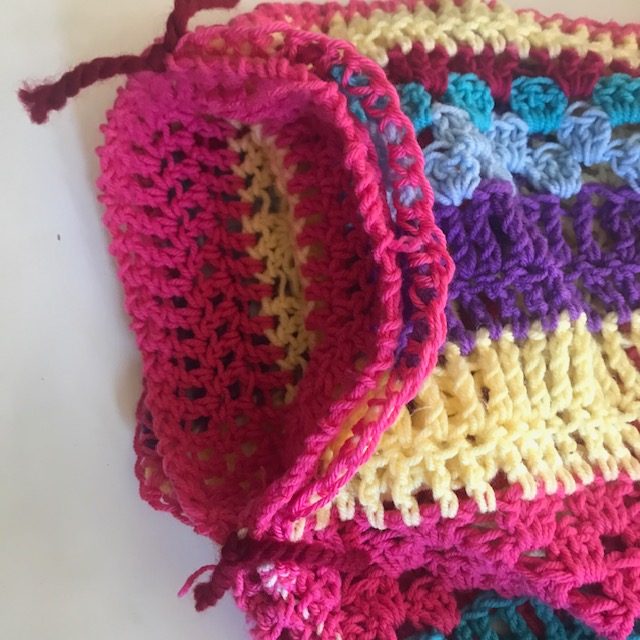
First, I love the stitch combinations and the colour combos working together in such a playful way. This is what makes this such a special sweater design.
Secondly, this sweater is super airy and this makes it ideal for all weather. The large hook makes the stitches used look so cool and almost lacy.
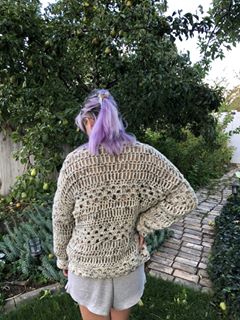
Thirdly, you can never go wrong with your colour choice(s) when you make your Happy Hippy Sweater. Some testers used up their stash and it was a ‘go with the flow’ experience. Others methodically planned out their colourway. Still others used a cake. One tester chose to make hers using just one neutral colour and it changed the whole feel of the sweater, creating a magically elegant garment.
Fourthly, the Happy Hippy Sweater pattern is a beginner friendly project as it uses basic stitches. If you know how to crochet double crochet, single crochet, treble crochet and chains then you can make a Happy Hippy Sweater. My testers all commented on this and that it worked up so quickly.
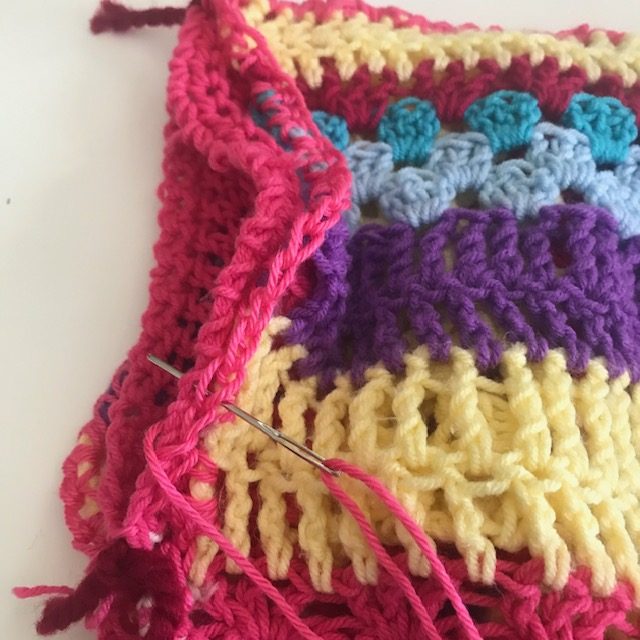
It is made with two rectangles for the body and I have added lots of pictures in the construction instructions portion of the pattern so putting it together is a breeze. There is sewing involved for the side seams and the sleeve seams, as well as attaching the sleeves to the body. But all the pics are there to explain everything clearly.
PIN MY FOR LATER.

If you prefer to have the pattern in front of you instead of on the screen you can get the ad free pdf .
Get the Pattern on Etsy.

Purchase the Happy Hippy Sweater Pattern on Ravelry.

The Happy Hippy Sweater Pattern.
Pam Carr 2020
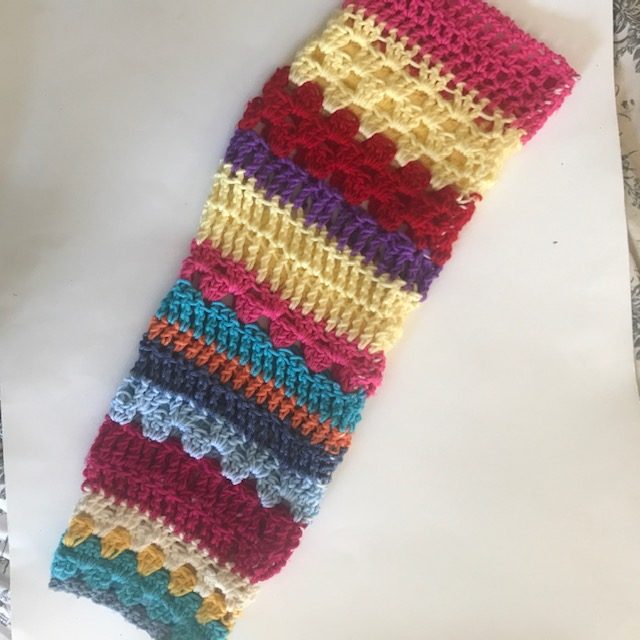
Introducing the Happy Hippy Sweater which is made with the Granny Stripe stitch, the double crochet stitch, the treble crochet stitch as well as the single crochet stitch for the trim. You are welcome to play around with colours as you make your sweater. I would love to see lots of inspired colourways and palettes in this top.
Supplies you will need:
Yarn: worsted weight yarn (4) The sweater in the pictures uses Red Heart Super Saver and some other worsted weight yarns from my stash.
You can use any worsted weight yarn. (4)
XS/S: approximately 750. yds,
Medium: approximately 900 yds,
Large: 1,092 yds.,
XL: approximately 1,300,
2X. 3/4X: approximately 1480 yds,
5x: approximately 1560yds
Hooks: Size N/15 – 10.00 mm, For body of sweater
Size L/11- 8mm hook, For sleeves
Size K/10.5-6.5mm For sleeves
Notions: Scissors, tapestry needle.
Gauge: 8 dc – 5 dc rows = 4” (10 cm) with a N./10mm hook
(Feel free to go down a hook size to get the correct gauge. You might find the L/8.00mm works for you)

Abbreviations (uses US conventions)
- Ch = chain
- st = stitch
- sc = single crochet
- dc = double crochet
- sl st = slip stitch
- Tr = treble crochet
- Sp = spac
Special stitch for this pattern.
The Granny Stripe Stitch.
The Granny Stripe Stitch is worked into a chain of multiples of 3 plus 2.
Row 1: Ch 3, DC into the same stitch, (This acts as two dc) *Skip 2 stitches, then work 3dcs into the next stitch*, (this is your first shell). Repeat between * and * until there are 3 stitches left, sk2 st, work 2 dc into the last st.
You should have a row that begins and ends with 2dc’s. on either side of all your shells.
For the next row you will be working into the spaces between the 3dc shells of the previous row.
Row 2: Chain 3, then work 3dc stitches (a shell) into the first sp between the 2dcs at the end of the previous row and the next 3 dc shell. Work a 3dc shell into each space across. At the end of the row, work 1 dc into the top of the ch3 made at start of previous row. Turn work.
Row 3: Ch 3, 1 dc in same space as the ch 3, work a 3dc shell into each space to the end of the row, work 2 dc into the top of the turning chain from the previous row. Turn work.
Row 4: Chain 3, then work 3dc stitches (a shell)) into the first sp between the 2dcs at the end of the previous row and the next 3 dc shell. Work a 3dc shell into each space across. At the end of the row, work 1 dc into the top of the ch3 made at start of previous row.
This pattern uses US terminology.
The US and UK crochet terms are different, but they use the same terms to describe different stitches. Here is a simple conversion chart for anyone in the UK.
| US
Double Crochet (dc) Single Crochet (sc) Treble (tr)
|
UK
Treble crochet (trc) Double Crochet (dc) Double treble (dtr) |
Sizes:
*If you like the super oversized look make the pattern for two sizes larger than your regular size.
To fit bust measurement
XS/S: 28”-34” [71-86.5]
Medium: 36-38″ [91.5-96.5 cm]
Large: 40-42″ [101.5-106.5 cm]
XL: 44-46″ [112-117 cm]
2X: 48-54″ [122-137 cm]
3/4 X: 52” [58” [132-147 cm]
5X: 60-62” [152-157cm]
This is an oversized sweater with generous positive ease. It is loosely crocheted so measuring the width varies according to the lay of the sweater and how it is stretched into shape when lying flat. So, these sizes may vary slightly.
NOTE: If you want to customize your sweater hold up the front panel to you and stop at the length you would like your sweater to be. Then add the sc trim as the final row as per the instructions.
Finished size for the front and back panel.
| Size | Width | Length | Arm Drop | Sleeve length |
| XS/S | 18” | 21” | 7.5-8” | 17” |
| M | 20” | 24” | 8.5” | 18” |
| L | 22” | 27” | 9.5” | 19” |
| XL | 24” | 30” | 10” | 20” |
| 2XL | 26” | 33” | 10.5” | 21” |
| 3/4XL | 29” | 36” | 12” | 22” |
| 5XL | 31” | 39” | 12.5” | 23” |
Instructions:
The Front and Back:
This top is made with two identical pieces which form the back and front of the garment.
Do not count the turning ch as a stitch for row 3 and 5 in the granny stripe stitch.
Note:
Shell or cluster are terms sometimes used to refer to the combination of 3 dc into one stitch or space.
With Blue/grey yarn.
Chain 35, (41, 47, 53, 59, 68, 74)
Row 1: sc into second ch from the hook and sc across 34 (40, 46, 52, 58, 67, 73)
Change to turquoise and start first Granny Stripe section
Row 2: Ch 3, DC into the same stitch, (This counts as two dcs) *Skip 2 stitches, then work 3dcs into the next stitch*, (this is your first shell). Repeat between * and * until there are 3 stitches left, sk2 st, work 2 dc into the last st. 34 (40,46, 52, 58, 67, 73) stitches
You should have a row that begins and ends with 2dc’s. on either side of all your shells.
Special Note.
For the next row you will be working into the spaces between the 3dc shells of the previous row.
Row 3: Chain 3, then work 3dc stitches (a shell) into the first sp between the 2dcs at the end of the previous row and the next 3 dc shell. Work a 3 dc shell into each space across. At the end of the row, work 1 dc into the top of the ch3 made at start of previous row. Turn work. 34 (40,46, 52, 58, 67, 73) stitches Note; Turning chain does not count as a stitch in this row.
Change to yellow
Row 4: Ch 3, 1 dc in same space as the ch 3, work a 3dc shell into each space to the end of the row, work 2 dc into the top of the turning chain from the previous row. Turn work.
Row 5: Chain 3, then work 3dc stitches (a shell)) into the first sp between the 2dcs at the end of the previous row and the next 3 dc shell. Work a 3dc shell into each space across. At the end of the row, work 1 dc into the top of the ch3 made at start of previous row. Turn work.
Change to white.
Row 6-7: Repeat rows 4 and 5
Change to cerise (optional red)
Row 8-10: Chain 4, Treble crochet into the first stitch and each stitch across, turn work. 34 (40,46, 52, 58, 67, 73) stitches
Change to pale blue.
Row 11-12: Repeat rows 2 and 3.
Change to blue/grey
Row 13-14: Repeat rows 4 and 5.
Change to yellow
Row 15: Chain 3, DC into the first stitch and into each stitch across. Turn work. 34 (40,46, 52, 58, 67, 73) stitches
Change to turquoise.
Row 16-17: Chain 4, Treble crochet into the first stitch and each stitch across, turn work. 34 (40,46, 52, 58, 67, 73) stitches
Change to hot pink.
Row 18-21: Repeat rows 2 through 5.
Change to yellow
Row 22-23: Chain 4, Treble crochet into the first stitch and each stitch across, turn work. 34 (40,46, 52, 58, 67, 73) stitches
Change to purple.
Row 24: Chain 4, Treble crochet into the first stitch and each stitch across, turn work. 34 (40,46, 52, 58, 67, 73) stitches
For the XS/S:
Change to hot pink and chain 1, sc into the first stitch and into each stitch across.
Fasten off and weave in the ends.
It is now time to make your second panel.
*For sizes M, L, XL, 2X, 3/4 X, 5X, continue on with these instructions.
Row25: Chain 4, Treble crochet into the first stitch and each stitch across, turn work. 34 (40,46, 52, 58, 67, 73) stitches
Change to light blue.
Row 26: Repeat row 2.
For the Medium size.
Change to hot pink and chain 1, sc into the first stitch and into each stitch across.
Fasten off and weave in the ends.
It is now time to make your second panel.
*For sizes L, XL, 2XL, 3/4 XL, 5XL plus, continue on with these instructions.
Row 27: Repeat Row 3.
Change to turquoise.
Row 28: Repeat row 4
Change to cerise (red)
Row 29: Repeat row 5
Change to yellow
Row 30-31: Ch 3, dc into the first stitch and each stitch across. Turn work. 34 (40,46, 52, 58, 67, 73) stitches
For the Large size.
Change to hot pink and chain 1, sc into the first stitch and into each stitch across.
Fasten off and weave in the ends.
It is now time to make your second panel.
*There will now be different instructions for the sizes XL, 2XL, 3/4 XL, 5XL plus.
Instructions for XL.
Rows 32-36: Repeat rows 2-6 of this pattern. 34 (40,46, 52, 58, 67, 73) stitches
Change to hot pink and chain 1, sc into the first stitch and into each stitch across.
Fasten off and weave in the ends.
It is now time to make your second panel.
Instructions for 2X.
Rows 32-36: Repeat rows 2-6 of this pattern. 34 (40,46, 52, 58, 67, 73) stitches
Change to Light Blue.
Rows 37-39: Ch 3, dc into the first stitch and each stitch across. Turn work. 34 (40,46, 52, 58, 67, 73) stitches
Change to hot pink and chain 1, sc into the first stitch and into each stitch across.
Fasten off and weave in the ends.
It is now time to make your second panel.
Instructions for 3/4X
Row 32-39: Repeat rows 2-9 of this pattern.
Change to yellow.
Row 40-41: Ch 3, dc into the first stitch and each stitch across. Turn work. 34 (40,46, 52, 58, 67, 73) stitches
Change to hot pink and chain 1, sc into the first stitch and into each stitch across.
Fasten off and weave in the ends.
It is now time to make your second panel.
Instructions for 5X
Row32-45: Repeat rows 2-15 of this pattern.
Change to hot pink and chain 1, sc into the first stitch and into each stitch across.
Fasten off and weave in the ends.
It is now time to make your second panel.
Sleeves. Make two.
*If you want super long sleeves you can add some extra rows.
While making the sleeves we will be starting with a K hook and changing to an L Hook and then an N hook as we work our way up the sleeve.
This sleeve is worked in the flat and seamed. It is not worked in the round.
We start with a K-6.50mm hook.
With Blue Grey yarn.
Row 1: Ch 32, (32, 35, 35, 38, 41, 44) and single crochet a row.
Change to turquoise. Start the first Granny Stripe section
Row 2: Ch 3, DC into the same stitch, (This acts as two dc) *Skip 2 stitches, then work 3dcs into the next stitch*, (this is your first shell). Repeat between * and * until there are 3 stitches left, sk2 st, work 2 dc into the last st. 31, (31, 34, 34, 37, 40, 43)
stitches
You should have a row that begins and ends with 2dc’s. on either side of all your shells.
For the next row you will be working into the spaces between the 3dc shells of the previous row.
Row 3: Ch 3, then work 3dc stitches (a shell) into the first sp between the 2dcs at the end of the previous row and the next 3 dc shell. Work a 3dc shell into each space across. At the end of the row, work 1 dc into the top of the ch3 made at start of previous row. Turn work.
Change to yellow.
Row 4: Ch 3, 1 dc in same space as the ch 3, work a 3dc shell into each space to the end of the row, work 2 dc into the top of the turning chain from the previous row. Turn work.
Change to white.
Row 5: Ch 3, then work 3dc stitches (a shell) into the first sp between the 2dcs at the end of the previous row and the next 3 dc shell. Work a 3dc shell into each space across. At the end of the row, work 1 dc into the top of the ch3 made at start of previous row. Turn work.
Row 6: Ch 3, 1 dc in same space as the ch 3, work a 3dc shell into each space to the end of the row, work 2 dc into the top of the turning chain from the previous row. Turn work.
Change to red or cerise.
Rows 7-8: Ch 4, Treble crochet into the first stitch and each stitch across, turn work.
Here is where you change to an L-8mm hook if you are doing the XS/S, Medium, Large and XL sizes.
Change to Light blue
Row 9-10: Repeat rows 2 and 3.
Here is where you change to an L- 8mm hook if you are doing the 2XL, 3 /4XL and 5XL+ sizes.
Change to blue/grey yarn
Row 11: Ch 4, Treble crochet into the first stitch and each stitch across. Turn work.
Change to orange.
Row 12: Ch 3, dc into the first stitch and each stitch across. Turn work.
Change to turquoise.
Row 13: Ch 4, Treble crochet into the first stitch and each stitch across. Turn work.
Change to pink.
Row 14: Repeat row 2.
Here is where you change to an N-10mm hook if you are doing the XS/S, Medium, Large and XL sizes.
Row 15: Repeat row 3.
Change to yellow.
Row 16: Ch 4, Treble crochet into the first stitch and each stitch across. Turn work.
Here is where you change to an N- 10mm hook if you are doing the 2X, 3/4X and 5X sizes.
Row 17: Ch 4, Treble crochet into the first stitch and each stitch across. Turn work.
Change to purple.
Row 18: Ch 4, Treble crochet into the first stitch and each stitch across. Turn work.
For Extra Small/Small stop here.
Change to pink and ch1, sc across to end.
Fasten off and weave in the ends
Change to red.
Row 19: Repeat row 2.
For Medium stop here.
Change to pink and ch1, sc across to end.
Fasten off and weave in the ends
Row 20: Repeat row 3.
For Large stop here.
Change to pink and ch1, sc across to end.
Fasten off and weave in the ends
Row 21: repeat row 4.
For Extra Large stop here.
Change to pink and ch1, sc across to end.
Fasten off and weave in the ends
Change to yellow.
Row 22: Repeat row 5.
For 2XL stop here.
Change to pink and ch1, sc across to end.
Fasten off and weave in the ends
Row 23: Repeat row 4.
For 3/4 XL stop here.
Change to pink and ch1, sc across to end.
Fasten off and weave in the ends
Row 24: Repeat row 5.
Row 25: Repeat row 4.
For 5 XL stop here.
Change to pink and ch1, sc across to end.
Fasten off and weave in the ends
Construction.
Sewing together the front and back panels.
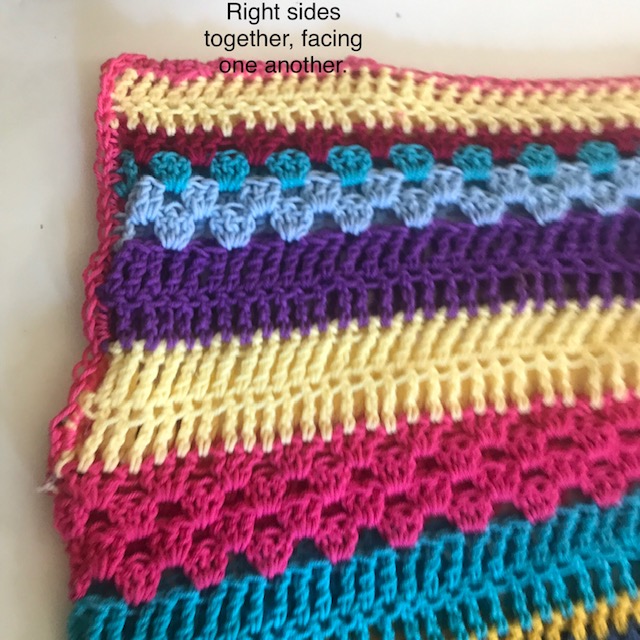
Place one panel with the right side facing up and lay the second panel on top of it with the right side facing down. (right sides together).
Side seams.
Measure down 7.5-8” (8.5”, 9.5”, 10”. 10.5”, 12”. 12.5”) from the top on each side sweater and mark with stitch markers or a short piece of yarn. This top opening will be where you attach the sleeves later.
Note: This measurement is a guide and you can adjust it to fit your sleeve if you need to.
Use pins or stitch markers to join the back and front as you go down the side seams matching up the colours and stitch sections until you get to the bottom edge of the panels.
Using the whip stitch or your preferred method, of sewing, start at the bottom and sew the back and the front sides together. Make sure you are matching the colours and stitch sections at you go. Stop when you get to the stitch marker at the bottom of the arm hole.
Finish off and weave in the ends.
Do the same on the other side of the sweater.
Finish off and weave in the ends.
Shoulders.
Measure in from each side 6” (7”, 7.5”, 8”, 9”, 9.5”, 10.5”) and place stitch markers to mark where the shoulders are to be sewn on either side of the neck space.
Note: This measurement is adjustable to fit your body type and how big you want the opening to be. Each body type is different. After sewing the shoulders, try it on and see how you like the fit.
Using yarn that matches the single crochet row of trim at the top of the panels, whip stitch across the shoulder to the neck opening, being sure to match the stitches from either side along the top of the panels.
Stop when you reach the neck opening and make a few extra stitches to secure the opening. Fasten off and weave in the ends.
Repeat for the other shoulder.
Fasten off and weave in the ends.
Arm holes.
Using the trim yarn and the 10 mm hook, (or the hook you used to maintain the correct gauge) join yarn to the bottom of the armhole.
Single crochet around the armhole, working 3sc into each treble crochet row, and 2sc into each granny stripe or double crochet row until you get to the shoulder.
Work 1sc into the trim on the top of each panel, (2sc).
Single crochet down the other side of the armhole, working 3sc into each treble crochet row and 2sc into each granny stripe or double crochet row. (some sizes do not have a treble crochet row in this section so don’t worry if you do not have one)
When you get back to the bottom of the armhole, sl st to join to the beginning of the armhole trim.
Fasten off and weave in the ends.
Repeat this on the second armhole.
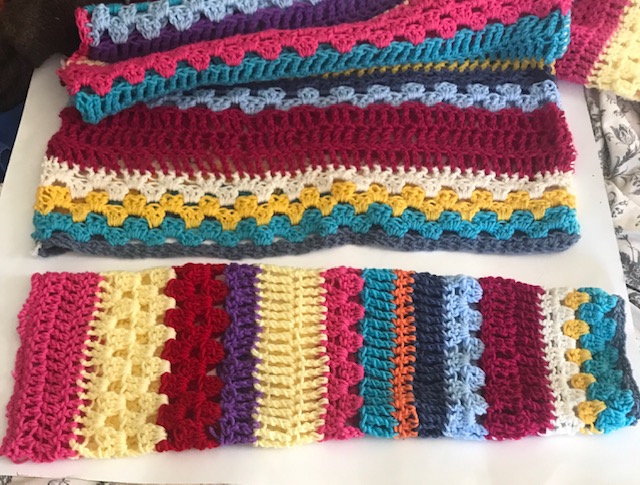
Sleeves.
Fold a sleeve with the right sides together and whip stitch up the seam from the wrist to the top of the sleeve. Be careful to match the colours and the stitch sections as you sew the seam.
Finish off and weave in the ends.
Repeat for the second sleeve.
Putting in the Sleeves.
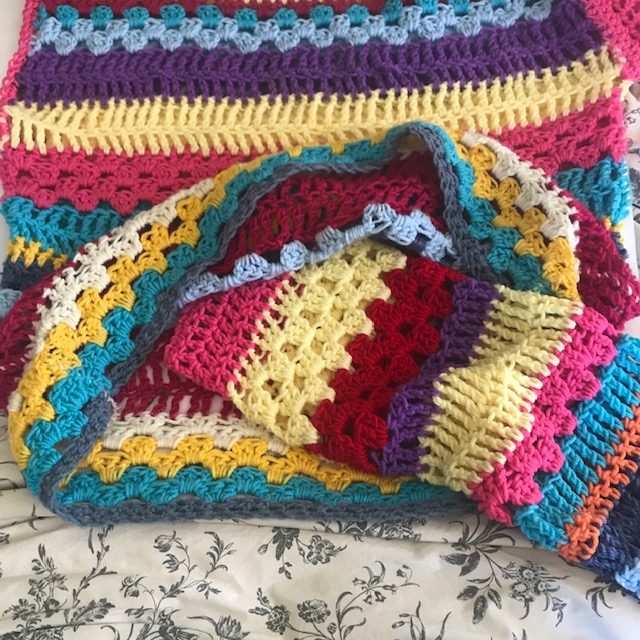
Turn the sweater so that the right side are facing each other as it lays flat. The wrong side is facing outwards. Lay it flat on a surface with the shoulders and neck at the top.
Turn one sleeve so that the right sides are facing outwards.
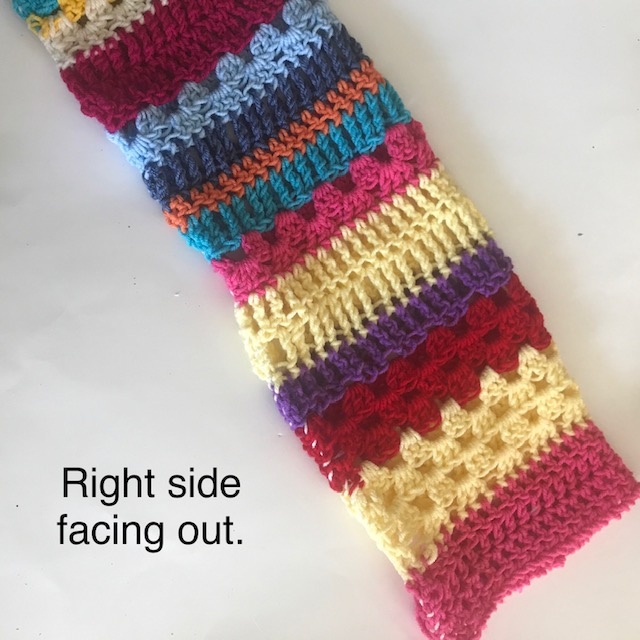
Turn the sleeve so the top opening is facing to the left side and the seam is at the bottom. The cuff is on the right side.
This is how the sweater body and sleeve look in preparation for fitting the sleeve.
Open the bottom of the sweater and slide the sleeve up to the left arm hole opening.
Position it so the underarm sleeve seam matches up with the side seam on the left of the sweater and the top of the sleeve matches up with the shoulder seam of the sweater. Fasten in place with stitch markers or pins.
Using yarn that matches the trim, start at the underarm seam and whip stitch the arm trim stitches to the matching trim stitches of the body of the sweater.
Fasten off and weave in the ends.
Now take the right arm making sure the right sides are facing outwards. Turn the sleeve so the top opening is facing to the right side and the seam is at the bottom. The cuff is on the left side.
Open the bottom of the sweater and slide the sleeve up to the right arm hole opening.
Position it so the underarm sleeve seam matches up with the side seam on the right of the sweater and the top of the sleeve matches up with the shoulder seam of the sweater. Fasten in place with stitch markers or pins.
Using yarn that matches the trim, start at the underarm seam and whip stitch the arm trim stitches to the matching trim stitches of the body of the sweater.
Fasten off and weave in the ends.
Turn the sweater inside out and you can admire your completed Happy Hippy Sweater.
I can’t wait to see all your Happy Hippy Sweaters. Remember to share your pics on Instagram and Facebook. Please tag me @carrowaycrochet so I can see them and #happyhippysweater.
OTHER FREE CROCHET PATTERNS YOU MIGHT LOVE!
More Places to Find Crochet Free Patterns:
If you love crochet, you can find over a thousand free crochet patterns including some for crop tops and bralettes over at All Free Crochet
I am honoured to have my free crochet bralette pattern, the Earth Mother Bralette Pattern added to the All Free Crochet site.
 It is a great resource for crochet lovers and I am proud to also have my Take Me Outside Infinity Scarf Pattern posted over on the All Free Crochet Site.

Selling items made from my patterns?
You are more than welcome to se items made from my pattern. Please do share my link and tag and help promote it on social media. Thank you.
If you have any questions or need help with the patterns, please email me at carrowaycrochet@outlook.com, and Iʼll be glad to help you.
Thank you again for trying y pattern, I hope you enjoy it! Please share pictures of your completed Gloves on Instagram and Facebook. Tag them @carrowaycrochet #carrowaycrochet #shortandchunkygloves on Instagram.
Find other patterns by Carroway Crochet in my Etsy Shop and on Ravelry.
Let’s Share and Connect!
Thank you for trying my free crochet bralette pattern, I hope you enjoyed it! Please share pictures of your completed Bralettes on Instagram and Facebook. Tag them @carrowaycrochet #carrowaycrochet and #ivorylacebralette on Instagram.
Thank you so much for visiting me here at Carroway Crochet .
Find other patterns by Carroway Crochet in my Etsy Shop and on Ravelry.
Other places you can find me are:
This design, written work and images are a copyright of
©CarrowayCrochet and may not be copied or reproduced in any way.
You have permission to sell finished products made from this pattern, but please leave a link to my blog, www.carrowaycrochet.com in your product listing specifying that I am the designer of this pattern.
Thank you.
3 thoughts on “The Happy Hippy Sweater Pattern: Free Crochet Pattern”
Comments are closed.