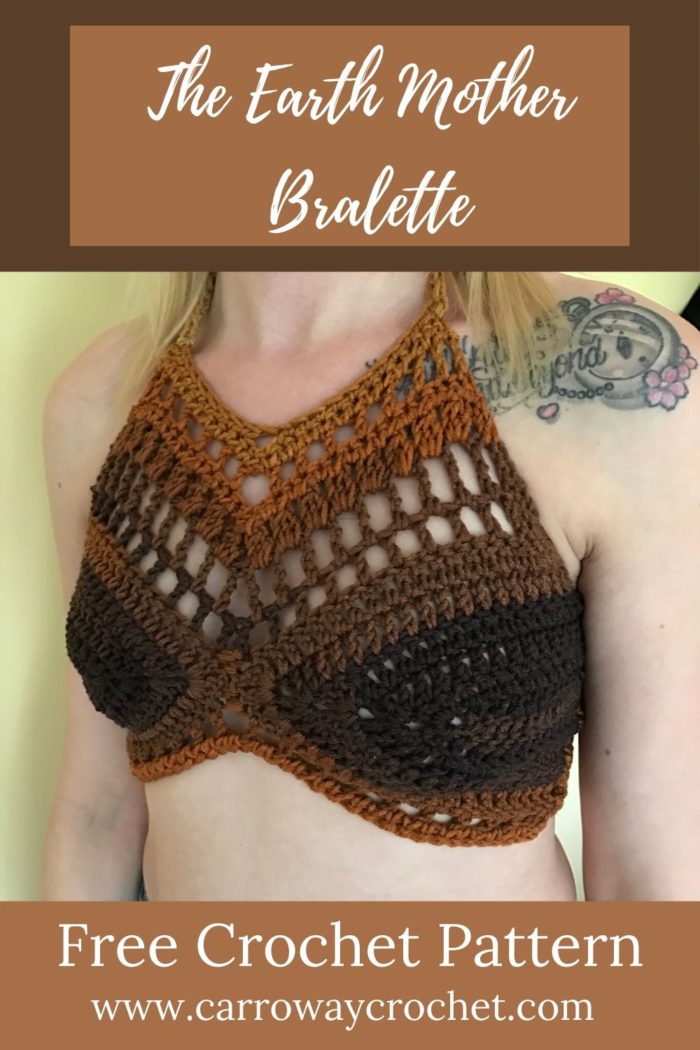
Crochet Bralette Pattern: The “Earth Mother” Bralette Crop Top

Crochet Bralette Pattern.
The “Earth Mother” Bralette Crop Top:
Summer may be a long way around the corner for us here on the West Coast of BC, but it is summer somewhere right now and I thought I’d share this crochet bralette pattern with you. The “Earth Mother” Bralette Crop Top is perfect for those living in warmer climes for outside wear. However it is also great for any weather when worn for inside events such as parties and nights out.
You can find the PDF version of this pattern by clicking here for my Etsy shop. It is ad free and printer friendly. :-).

It is also available on Ravelry.

The free pattern is posted below so just keep scrolling and you will find it.
This post contains affiliate links that support the content on carrowaycrochet.com. All opinions are my own.
My Crochet Bralette Pattern.Bralette Series.
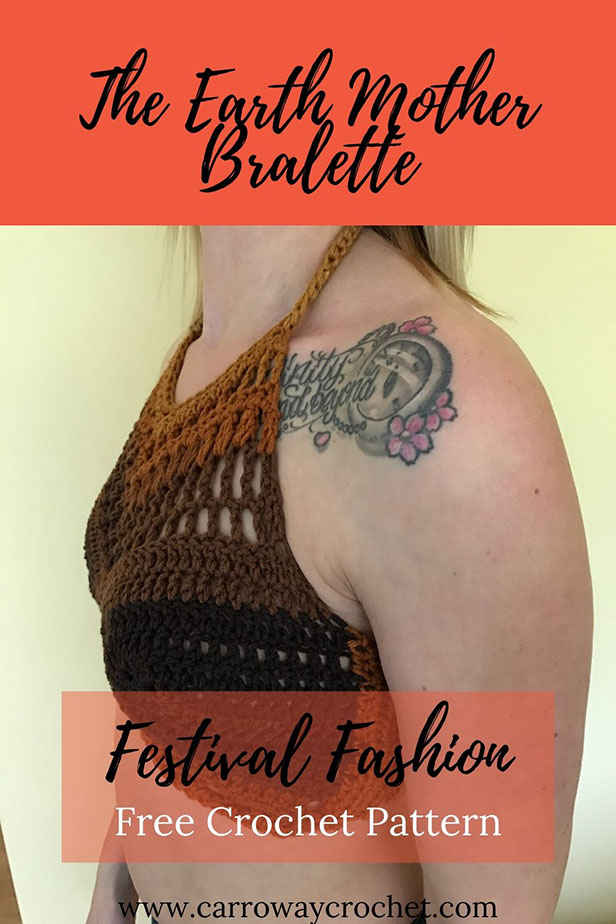
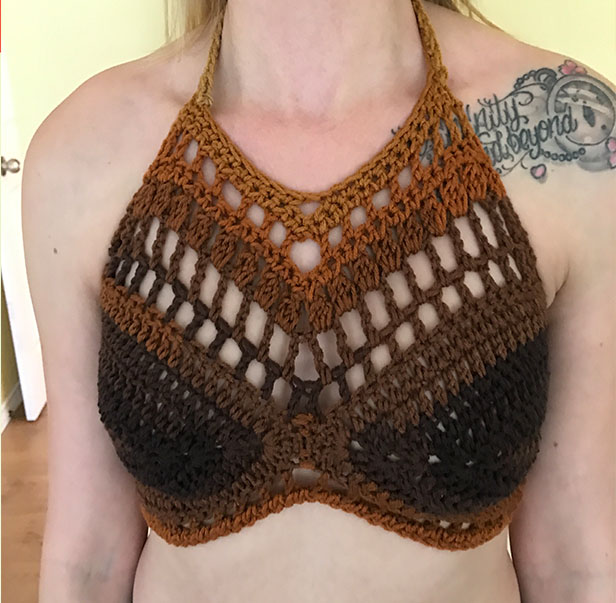
The “Earth Mother Crop Top” is one of a series of crochet bralette patterns I created for the summer festival crowd who love events like Coachella or Shambhala. If you love funky, retro sixties and seventies fashions then this is the top for you. I sell them on my market stall at the Farmers Market on Mayne Island, where I am building a natural home. We have the Mayne Island Music Festival there every summer and they even have a music stage down at the market so we can enjoy the music as the festival goers browse the stalls. These tops constantly capture the attention of the music lovers and they get snapped up along with my crochet shorts.
These trendy tops remind me so much of what we were wearing when I was living in England during that time. For all those in my generation it was a time of freedom, absolute creativity and wild fashion as well as the best music a generation could hope for. It was so much fun creating this series of summer halter crop top style bralettes for the new generation of boho style loving festival goers. This free crochet bralette pattern is the first one featured here on my blog.
Not only do these crochet bralette crop tops appeal to those into festival and boho fashion, but they are perfect for the beach and all round summer wear. I don’t recommend them for swimming, but they are perfect for sunny days on the beach. They are also great for a night out with friends or a date night. Being able to make one up using this free crochet bralette pattern is a great way to create your own individual Earth Mother bralette crop top. Choose any colours you choose to make it your own.
Pin this Crochet Bralette Pattern For Future Use.

Introducing the “Earth Mother Crop Top” Pattern by Carroway Crochet.
The Earth Mother Crop Top is perfect for summer days on the beach and for magical festival experiences.
The crochet bralette pattern is written for Extra Small, Small, Medium, Large and Extra Large, so everyone can have a beautiful crochet crop top
You can make this crop top with your choice of worsted weight yarn, either acrylic or cotton, just look for the number (4) on the yarn label.
It is an intermediate crochet pattern, with easy to follow instructions. It is in US terms.
Video Tutorials for the Earth Mother Bralette Crop Top.
For those who like to learn via video I have the tutorial up on YouTube.
Here is the right handed version.
Here is the Left Handed Version.
If you enjoy sharing your makes from patterns maybe you would like to share some of your finished projects or join our growing crochet community in my Facebook Group. It would be great to have you and see what you are up to.
Looking for More Great Bralette Patterns.
I have lots of beautiful crochet bralette patterns you might love.
There are so many different styles you can choose from. There is the Rainbow Fringe Bralette and the Freya Fringe Bralette if you love fringes. You can make them without the fringes as well of course.
Then there is the Ivory Lace Bralette and the Pretty Picot Bralette that have such beautiful lace or picot trim details.
The Feel the Love Bralette is styled with sideways cups like this Earth Mother Bralette, but the top detail is slightly different.
Sign up for my Newsletter
Get the latest info on free patterns and fun blog hops.
Join Me on Facebook.
Follow me on my Facebook Page for the latest video news and what I am up to.
Join the Carroway Crochet Community on Facebook.

The Earth Mother Bralette Crop Top Pattern
by Pam Carr ©2018
Supplies you will need:
Yarn: Any worsted weight yarn (4) The “Earth Mother Ombre Crop Top” pictured above uses Red Heart Super Saver Stripes, Latte Stripe. 5oz//141g 236yds/215m
Hook: Size US – H /8, 5.00 mm.
Notions: Scissors , tapestry needle.
Gauge: 13 sc – 14 rows = 4” (10 cm)
Abbreviations (uses US conventions)
-
Ch = chain
-
st = stitch
-
sp =space
-
ch1 sp = chain one space
-
sc = single crochet
-
hdc = half double crochet
-
dc = Double crochet
-
tr =Treble crochet
-
3DC CL = 3 Double Crochet Cluster
-
scdec = single crochet decrease
-
sk = skip
This crochet bralette pattern uses US terminology. The US and UK crochet terms are different, but they use the same terms to describe different stitches. Here is a simple conversion chart for anyone in the UK.
USSingle Crochet (sc)Half double crochet (hdc)Double crochet (dc)Treble (tr)3 Double Crochet Cluster (3dc cl) |
UKDouble crochet (dc)Half treble (htr)Treble (tr)Double Treble (dtr)3 Treble Crochet Cluster (3tr cl) |

Special Stitches for The Earth Mother Crop Top
3 Double Crochet Cluster:
Yo, insert hook in st, yo, pull through st, yo, pull through 2 lps on hook, (yo, insert hook in same st, yo, pull through st, yo, pull through 2 lps on hook) 2 times, yo, pull through all 4 lps on hook, ch 1.
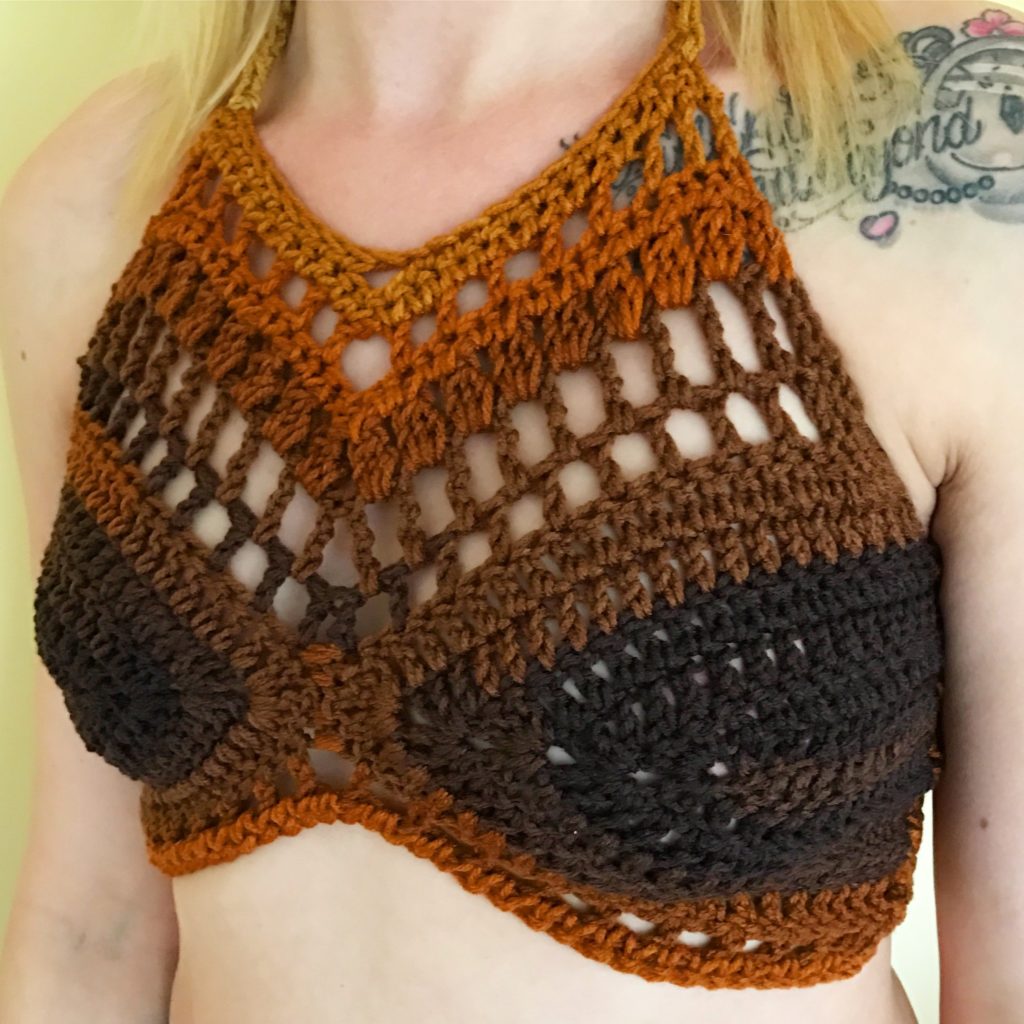
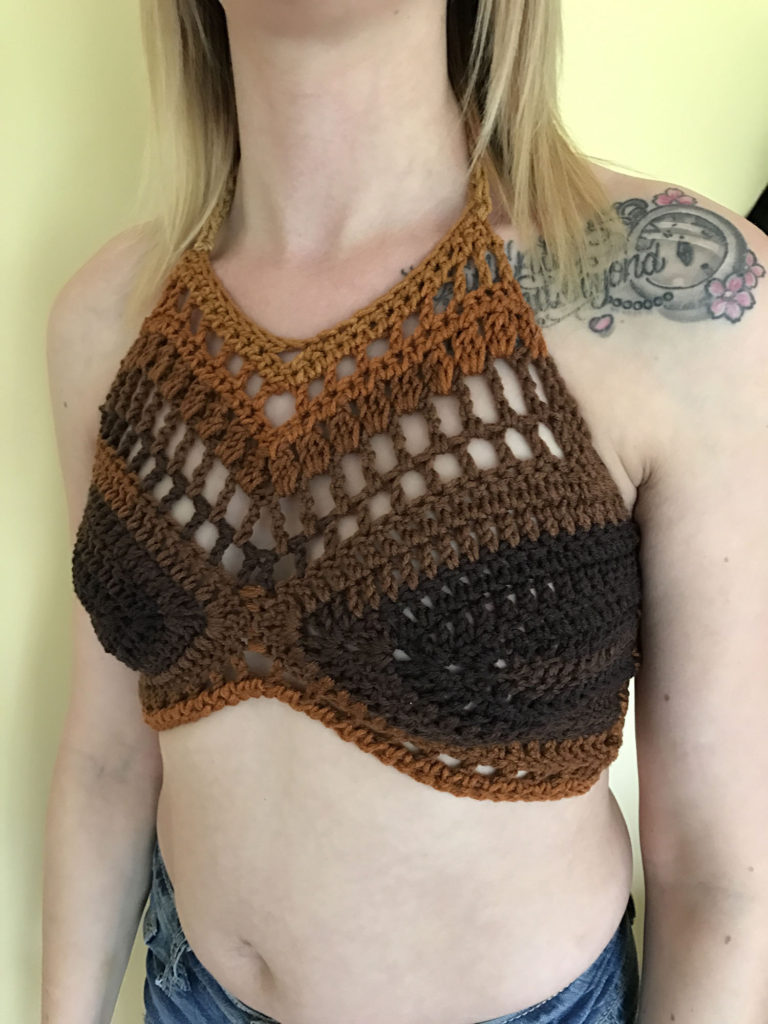
The top pictured above uses Red Heart Super Saver Stripes, Latte Stripe yarn.
While making this crochet bralette I had to cut the yarn so that I found a matching section to compete the cups ensuring they will match one another.
Using the dark brown section for when I started the first cup, I completed it and when starting the second cup, found a section of yarn that matched and used that to create the second cup.
The top and bottom are independent and can use whatever colours you desire.
Alternatively you can use any solid colour worsted weight yarn of your liking.

Sizes: -Extra Small, Small, Medium, Large, Extra Large
Instructions:
Cups, make two.
I have included the pattern for each of the different sizes mentioned above.
Ch 2 at start of each row does not count as a stitch.
Extra Small Cup:
Fits: 32A, 34A, 32B
Finished cup should measure 5″- 5.5” approx
Ch 9
Row 1: Dc into 3rd ch from the hook and into the next 5 chain stitches, (2 Dc, ch1, 2dc) into the last chain, dc down other side of the chain, (there will be 8 st each side of the ch1 space)
Row 2: Ch2 and turn, dc into next 8 st, (2dc, ch1, 2dc) into ch1 sp, dc 8 down other side, (10 stitches each side of the ch1 space)
Row 3: ch2, turn, dc into next 10 st, (2dc, ch1, 2dc) into ch1 sp, dc 10 down other side (12 stitches each side of the ch1 space)
Row 4: ch2, turn, dc into next 12 st, (2dc, ch1, 2dc) into ch1 sp, dc 12 down other side (14 stitches each side of the ch1 space)
Row 5: ch2, turn, hdc into next 14 st, ((2hdc, ch1, 2hdc) into ch1 sp, hdc 14 down other side (16 stitches each side of the ch1 space)
For small cups:
Fits: 36A, 34B, 36B, 32C, 34C, 32D
Finished cup should measure 6″- 6.5” approx.
Ch 11
Row 1: dc into 3rd ch from the hook and into the next 7 chain stitches, (2 dc, ch1, 2dc) into the last chain, dc 8 stitches down the other side of the chain, (there will be 10 st each side of the ch1 space)
Row 2: ch2 and turn, dc into next 10 st, (2dc, ch1, 2dc) into ch1 sp, dc 10 down other side, (12 stitches each side of the ch1 space)
Row 3: ch2, turn, dc into next 12 st, ((2dc, ch1, 2dc) into ch1 sp, dc 12 down other side (14 stitches each side of the ch1 space)
Row 4: ch2, turn, dc into next 14 st, ((2dc, ch1, 2dc) into ch1 sp, dc 14 down other side (16 stitches each side of the ch1 space)
Row 5: ch2, turn, dc into next 16 st, ((2dc, ch1, 2dc) into ch1 sp, dc 16 down other side (18 stitches each side of the ch1 space)

For medium cups:
Fits: 34C, 32D, 34D, 36D, 32DD
Finished cup should measure 7″- 7 ½” approx.
Ch 13
Row 1: dc into 3rd ch from the hook and next 9 chain stitches, (2 dc, ch1, 2dc) into the last chain. Then dc 10 stitches down the other side of the chain. There will be 12 st each side of the ch1 space
Row 2: ch2 and turn, dc 12 st, (2dc, ch1, 2dc) into ch1 sp, dc 12 down other side, (14 stitches each side)
Row 3: ch2, turn, dc into next 14 st, (2dc, ch1, 2dc) into ch1 sp, dc 14 down other side (16 stitches each side)
Row 4: ch2, turn, dc into next 16 st, (2dc, ch1, 2dc) into ch1 sp, dc 16 down other side (18 stitches each side)
Row 5: ch2, turn, dc into next 18 st, (2dc, ch1, 2dc) into ch1 sp, dc 18 down other side (20 stitches each side)
Row 6: ch2, turn, dc into next 20 st, (2dc, ch1, 2dc) into ch1 sp, dc 20 down other side (22 stitches each side)
For large cups:
Fit: 36C, 32D, 34D, 36D, 32DD, 38C
Finished cup should measure 8” – 8.5”
Ch 15
Row 1: dc into 3rd st from the hook and next 11st, (2 dc, ch1, 2dc) into the last chain, dc down other side. There will be 14 st each side of the ch1 space
Row 2: Ch2 and turn, dc 14 st, (2dc, ch1, 2dc) into ch1 sp, dc 14 down other side, (16 stitches each side)
Row 3: ch2, turn, dc into next 16 st, (2dc, ch1, 2dc) into ch1 sp, dc 16 down other side (18 stitches each side)
Row 4: ch2, turn, dc into next 18 st, (2dc, ch1, 2dc) into ch1 sp, dc 18 down other side (20 stitches each side)
Row 5: ch2, turn, dc into next 20 st, (2dc, ch1, 2dc) into ch1 sp, dc 20 down other side (22 stitches each side)
Row 6: ch2, turn, dc into next 22 st, (2dc, ch1, 2dc) into ch1 sp, dc 22 down other side (24 stitches each side)
Row 7: ch2, turn, dc into next 24 st, (2dc, ch1, 2dc) into ch1 sp, dc 24 down other side (26 stitches each side)
For extra large cups:
Fit: 36D, 38C or larger
Finished cup should measure 9” – 9.5” approx.
Ch 17
Row 1: dc into 3rd st from the hook and next 13st, (2 dc, ch1, 2dc) into the last chain, dc down other side, there will be 16 st each side of the ch1 space
Row 2: ch2 and turn, dc 16 st, (2dc, ch1, 2dc) into ch1 sp, dc 16 down other side, (18 stitches each side)
Row 3: ch2, turn, dc into next 18 st, (2dc, ch1, 2dc) into ch1 sp, dc 18 down other side (20 stitches each side)
Row 4: ch2, turn, dc into next 20 st, (2dc, ch1, 2dc) into ch1 sp, dc 20 down other side (22 stitches each side)
Row 5: ch2, turn, dc into next 22 st, (2dc, ch1, 2dc) into ch1 sp, dc 22 down other side (24 stitches each side)
Row 6: ch2, turn, dc into next 24 st, (2dc, ch1, 2dc) into ch1 sp, dc 24 down other side (26 stitches each side)
Row 7: ch2, turn, dc into next 26 st, (2dc, ch1, 2dc) into ch1 sp, dc 26 down other side (28 stitches each side)
Repeat extra rounds if necessary to make the cup larger.

To join cups:
Place the cups, one on top of the other, right sides facing one another. Join yarn in the stitch before the 2dc ch1 2dc section. Ch1, sl st into next 6 stitches, across the 2dc, ch2 2dc and next dc.
After cups are joined.
Top edge of crop top.
Join yarn to the top side edge.
Row 1: Ch2, dc into same st, (ch1, sk1 st, dc into next st,) repeat until you are 1st away from the centre, dc, sk 1 middle st , dc into next stitch going up the other side, (ch1, sk1 st, dc into next st,) repeat between ( ) to the end , ending with 2 dc.
Row 2: Ch 2, dc in next , ch1, tr into ch1 sp, ch 1, tr into ch1 sp, continue this pattern and tr into the last ch 1 sp before the middle, skip the centre sp, tr into first space going up other side. Continue the (ch1, tr into ch1 sp) pattern back to top, 1dc in each of the last 2 st in this row.
Row 3: Ch 2, dc into sp, ch 1, 3dc cl into sp, ch1, (3dc cl into next sp, ch1) till centre, 3dc cl into sp before centre, 3dc cl into sp after centre, ch 1, 3dc cl, ch1, continue to last sp, dc into sp, dc into top of previous ch2.
Row 4: Ch 1, sc in dc, sc next ch1 sp, (sc into top of 3dc cl, sc next ch1 sp), repeat until last 3dc cl before centre, sc into this 3dc cl before the centre, sk the centre ch 1 sp, and sc into 3dc cl after the centre. Continue to sc up to top as before.
Row 5: Ch2, dc into next st, (ch1, sk st, dc into next st,) repeat to just before the center, dc into the sc directly above the second to last 3dc cl before center, skip over 4 stitches at the centre and dc into sc above the second 3dc cl on the other side, (ch1, sk1, dc into next st) to the end of the row.
Row 6: Ch1, (sc in sp, sc into top of dc), repeat this pattern to just before the centre point. , sc into dc before the centre, sk the centre and sc into dc after the centre, and sc up the other side repeating the (sc in sp, sc into top of dc) pattern to the end of the row.
Row 7: Ch1, sk st, sc into next st, continue to sc but stop at the sc on top of the previous 2nd to the last dc before the centre , ch1, sk 4 st, sc in next st, sc to end, scdec at end of row.
Fasten off

Halter Straps/Ties:
You will need to make two halter-top straps/ties as seen below.
Join yarn to one topside edge of the crop top. Chain 60 for a 20” (approx) tie. You can leave the ties thin or SC back down the chain to make a more comfortable strap.
Do the same to the other side. Fasten off and weave in ends.
Bottom edge of crop top, below the cups.
Attach yarn to the side edge at the bottom of the cup with the right side facing up.
Row 1: Ch2, dc into next st, (ch1, sk1 st, dc into next st,) repeat until you are 1 stitch away from the centre, sk 3 stitches, dc into next stitch going up the other side, (ch1, sk1 st, dc into next st,) repeat between ( ) to the end , ending with 2 dc in last st.
Row 2: Ch 1, sc in dc, (sc in ch1sp, sc in top of previous dc), continue to centre, stop at sc into the top of the second dc before the centre, ch1, skip a ch1 space, 2 tops of dc and a ch1 sp then sc into the top of the next previous dc, continue up repeating the (sc in ch1sp, sc in top of previous dc) pattern.
Sides and Back Straps/Ties:
Attach yarn to the bottom outside edge of the side of the crop top.
Row 1: Ch 1 and sc up side of making sure to put 1 sc into each sc row and two sc into each dc row along the side of the cup ) counting stitches as you go so you can do the same on the other side. Stop approx. 2/3 of the way up the side of the cup.) Ch1 and turn.
Row 2: sk 1st st, sc into next st and sc down row, Ch1 and turn.
Row 3: sk 1st st , sc into next st and continue down to end
Repeat until one stitch is left creating a triangle shape.
Do not cut yarn.
Chain 60 for a 20” (approx) tie. Leave as is or sc back down the chain for a thicker tie. Fasten off.
Repeat for the other side.
I started the opposite side section from 2/3 of the way up the cup and worked down to the bottom of the side section. This make the stitches go the same way as the other side.
Fasten off and weave in all of your ends.
Congratulations. You now have a beautiful Earth Mother Crop Top to wear throughout the summer season. I hope you enjoyed this free crochet bralette pattern.
OTHER FREE CROCHET PATTERNS YOU MIGHT LOVE!
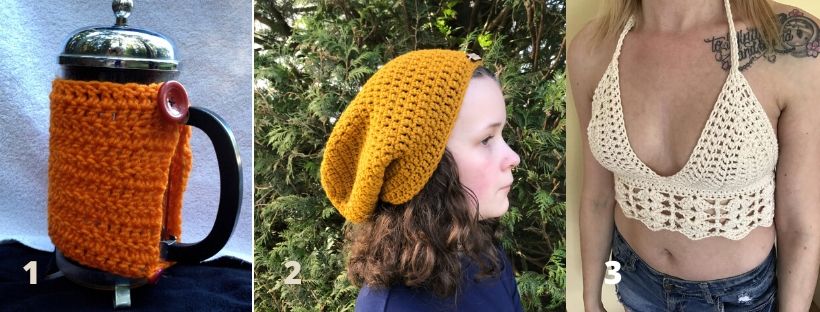
1. French Press Cozy
2. The Dreamer Beanie
3. The Ivory Lace Bralette
More Places to Find Crochet Free Patterns:
If you love crochet, you can find over a thousand free crochet patterns including some for crop tops and bralettes over at All Free Crochet
I am honoured to have my free crochet bralette pattern, the Earth Mother Bralette Pattern added to the All Free Crochet site.
 It is a great resource for crochet lovers and I am proud to also have my Take Me Outside Infinity Scarf Pattern posted over on the All Free Crochet Site.

Selling items made from my patterns?
You are more than welcome to se items made from my pattern. Please do share my link and tag and help promote it on social media. Thank you.
If you have any questions or need help with the patterns, please email me at carrowaycrochet@outlook.com, and Iʼll be glad to help you.
Find other patterns by Carroway Crochet in my Etsy Shop and on Ravelry.
Let’s Share and Connect!
Thank you so much for visiting me here at Carroway Crochet .
Find other patterns by Carroway Crochet in my Etsy Shop and on Ravelry.
Other places you can find me are:
This design, written work and images are a copyright of
©CarrowayCrochet and may not be copied or reproduced in any way.
You have permission to sell finished products made from this pattern, but please leave a link to my blog, www.carrowaycrochet.com in your product listing specifying that I am the designer of this pattern.
Thank you.
One thought on “Crochet Bralette Pattern: The “Earth Mother” Bralette Crop Top”
Comments are closed.