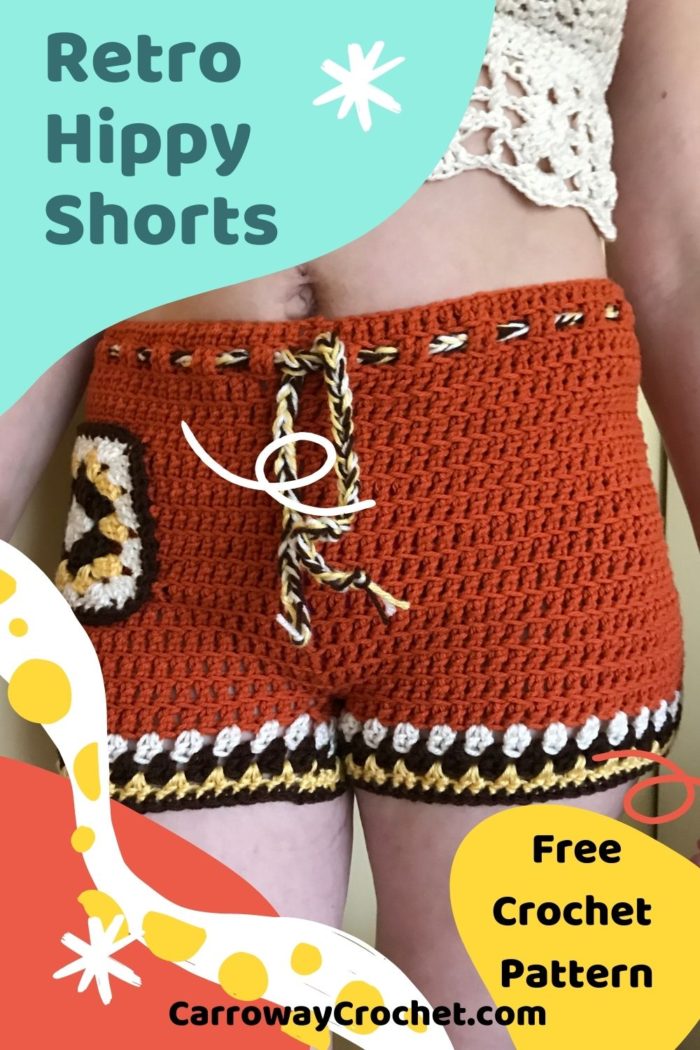
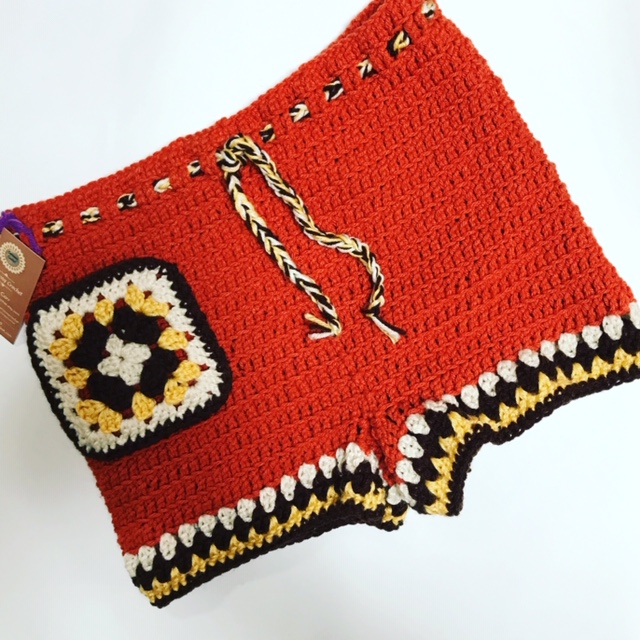
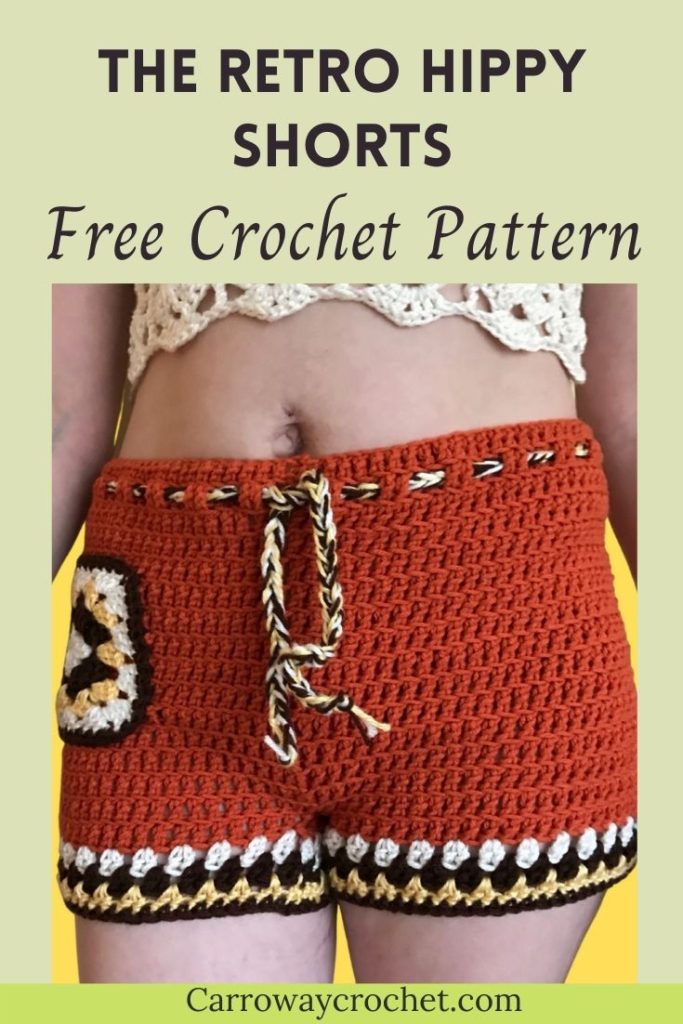
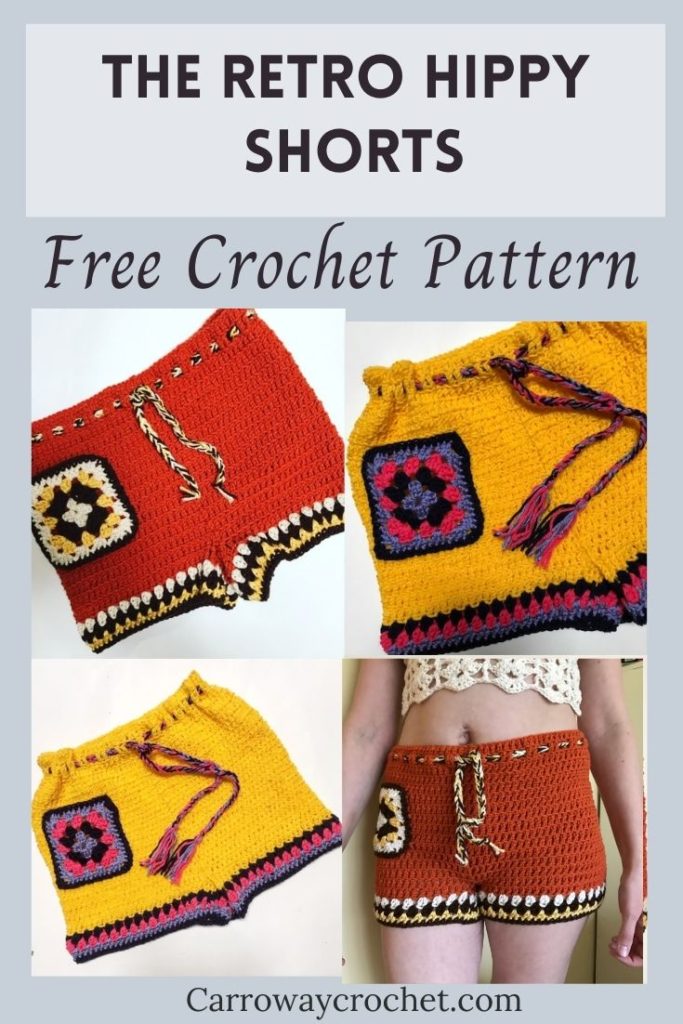
Retro Hippy Shorts

Hi everyone. I am so excited to share this new free crochet pattern with you. The Retro Hippy Shorts crochet pattern makes up so fast and is a quick and easy make for summer time fun. Make your Retro Hippy Shorts in a solid colour and use some colours from your yarn stash for the granny square pocket and the trim on the legs.
**This post contains affiliate links. If you make a purchase using some of my links I may receive a small commission at no extra cost to you.**

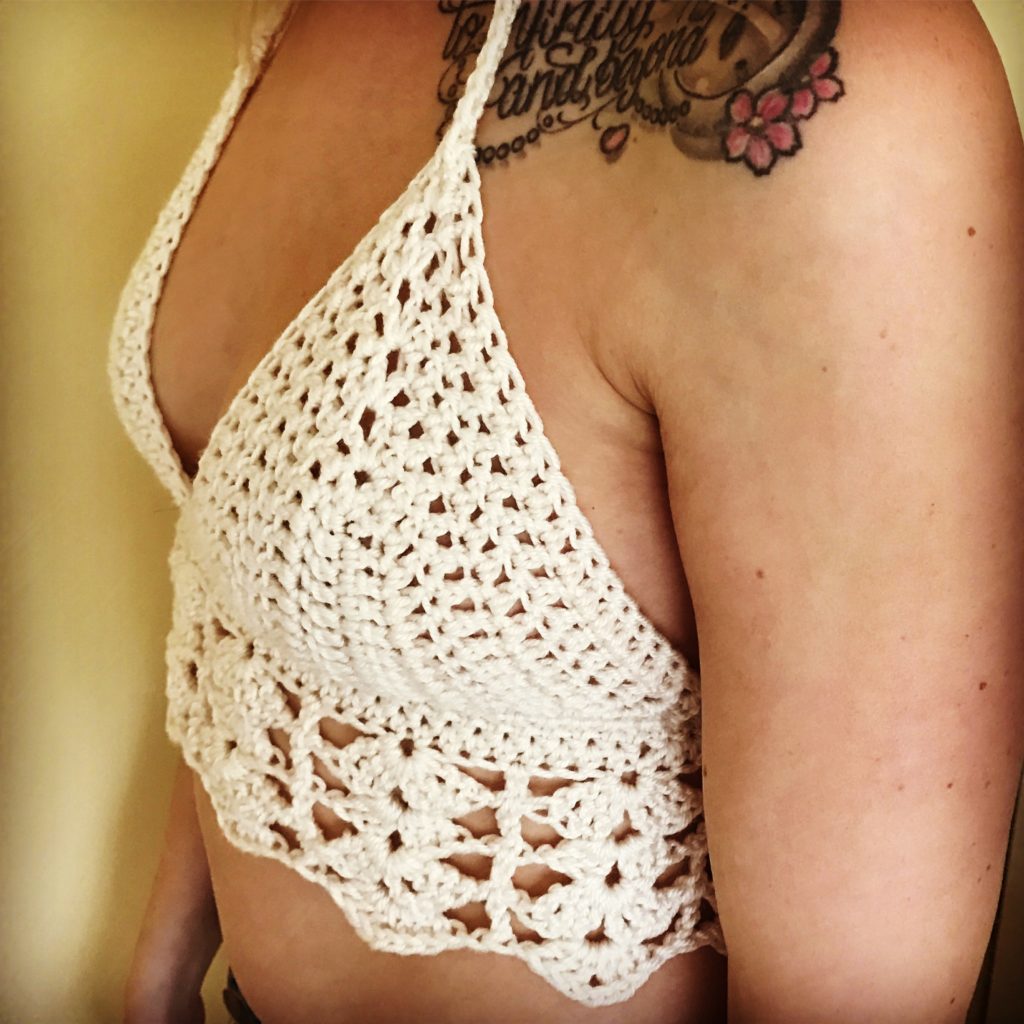
The Retro Hippy Shorts free crochet pattern is my latest shorts pattern and out just in time for those hot summer days. It takes no time at all to whip up a pair for yourself or a friend. The Retro Hippy Shorts free crochet pattern calls for either cotton or acrylic yarn, whatever you prefer. These shorts make a great swim suit cover up. They also go really well with my Freya Bralette, which I have recently added to my blog.
The Big Book Blog Tour.
If you are here for the Big Book Blog Tour, welcome! I’m glad you’re here!
This pattern is featured as part of the Big Book of Crochet Tips and Tricks Blog Tour. You can download it for free on October 12th.
What is the Big Book Blog Tour.This event starts with The Big Book of Crochet Tips & Tricks, an ebook put together by Blue Star Crochet with contributions from myself and several other designers and bloggers. My own contribution is a detailed written tutorial with an accompanying video tutorial about how to make a straight seam when you are crocheting in the round. My Retro Hippy Shorts crochet pattern, has a back seam for the shorts, so knowing how to make the seam straight and not a slanted one, is a great tip to have for any other projects you may make in the round where you want to avoid a slanted seam.
All of the free downloads in the Big Book Blog Tour use techniques and tips from the ebook. Get it with my affiliate link here, and you’ll have the opportunity to purchase a bundle of the blog tour crochet patterns as well.
If you’re just here for the free pattern, no problem. First, visit the roundup page to get today’s coupon code. Write down the code, come back here, and scroll to the bottom of this post for the download button.
Scroll down to the bottom of the pattern to find the download link for my pattern.
Description of my Retro Hippy Shorts Free Crochet Pattern:
The Retro Hippy Shorts are created in the round from the top down until you get to the crotch and then you have to work one leg at a time. The instructions are clearly written and so far all those trying this pattern have had no problems.
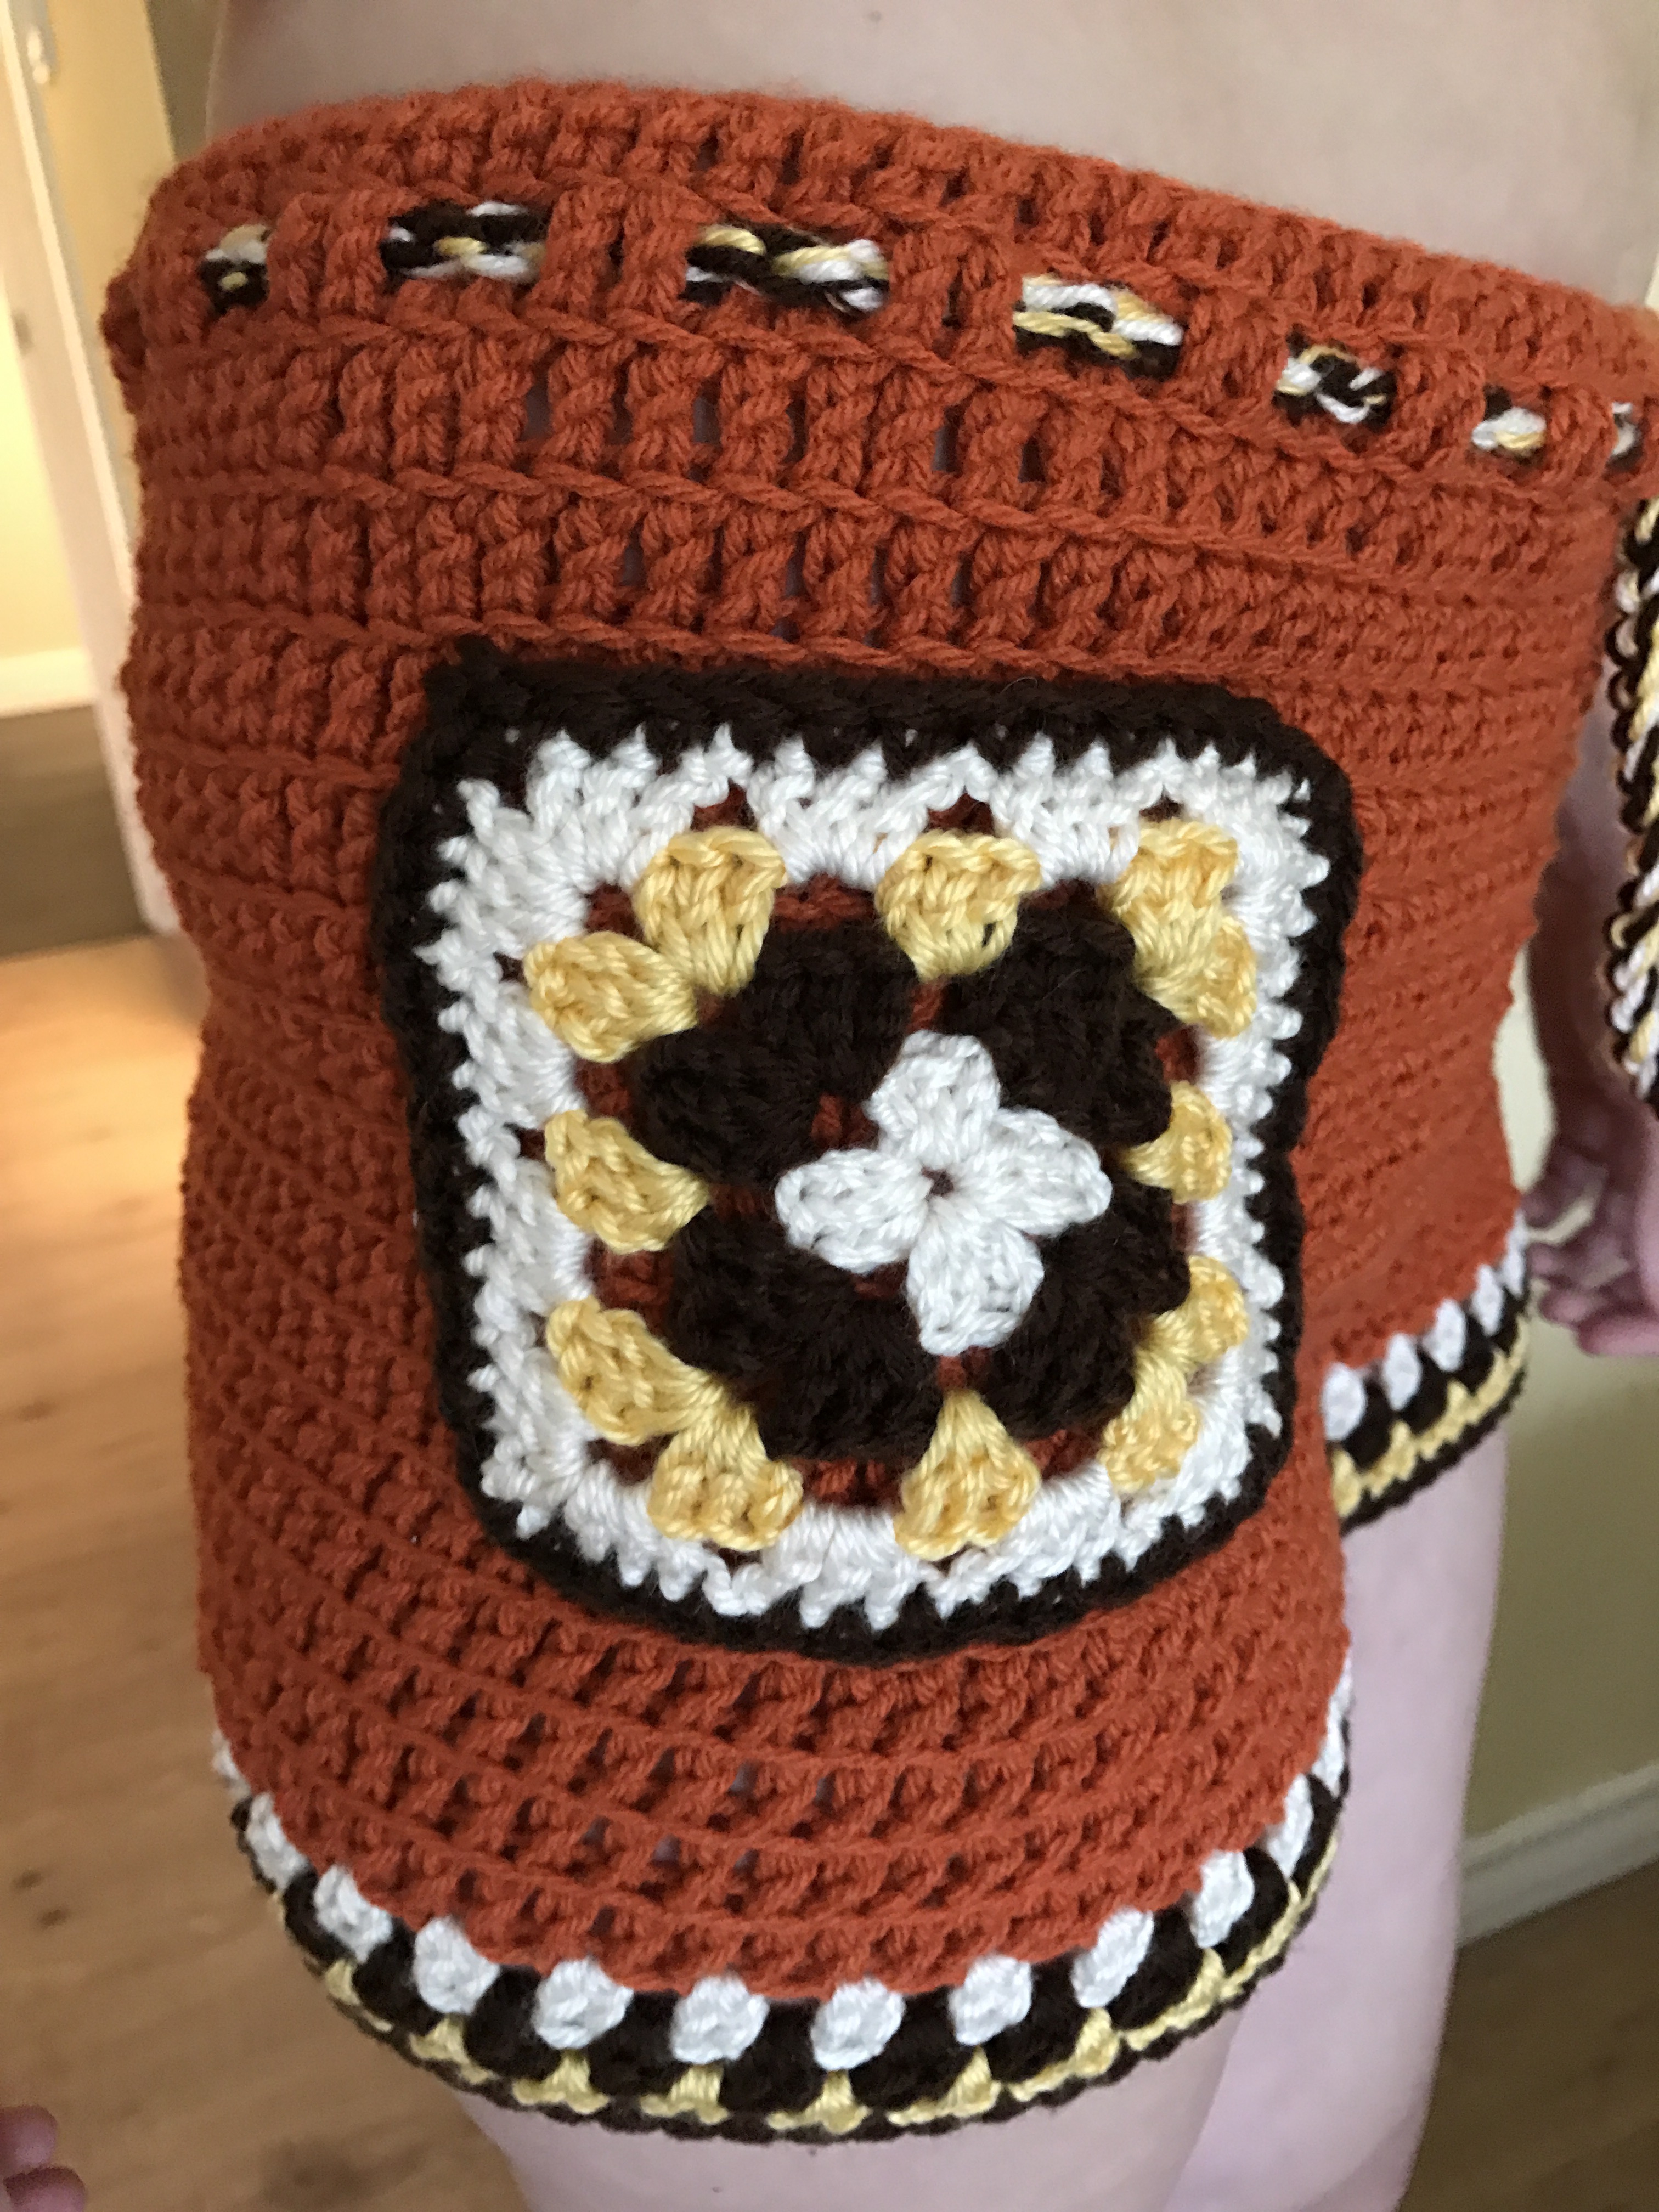
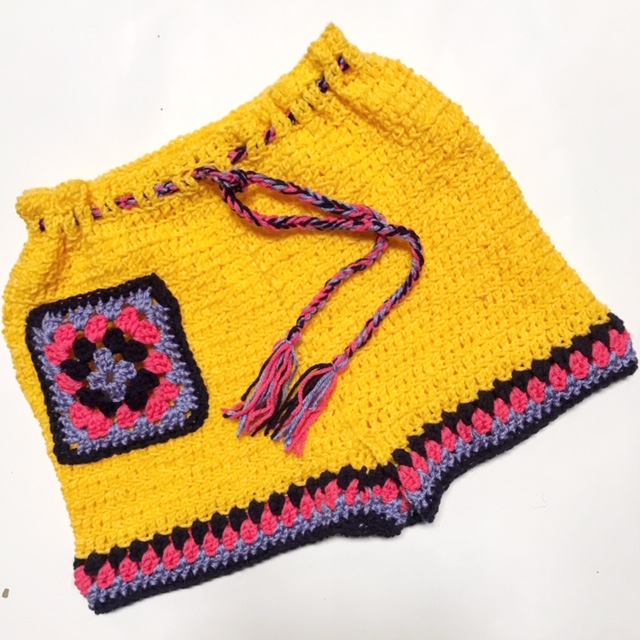
These Retro Hippy Shorts use only the double crochet stitch for the body of the shorts and are super beginner friendly. The stitches are made into the back loop only and this is what gives therm their unique look. I have video on my youtube channel showing how to do the back loop only technique. The only sewing is when you join the crotch area with one short seam.
Something fun about these shorts is the special trim around the leg with adds a funky feel to them. It is really easy to do and you will want to use this trim in other projects you try.
There is a chained crochet belt that is woven around the waist so you can tighten it for the perfect fit. I also have instructions on how to make a braided belt using the colours from the border and pocket, if you want that look.
If you prefer to work with a written pattern you can get the ad free, printer friendly PDF download pattern from my Etsy Shop.

Or the ad free pattern is also in my Ravelry Shop.


Don’t forget to pin it for later so you don’t lose it.
The Inspiration behind The Retro Hippy Shorts Pattern.
I live on a beautiful small island in the Southern Gulf Islands and we have lots of bays and beaches. It is a very laid back community and these shorts were just asking to be made. I made my Shell Shorts and Bella B Shorts that were fun to have at the market and sure enough they were a real conversation starter. People were looking for fun summer clothes and they really liked them.
When I was searching on Etsy for crochet shorts I found a retro shorts pattern and bought it. When I tried to make some, I discovered the yarn required was not sized as yarn is today and I had to guess what yarn to use and it ended up being more work that making my own design. So I decided to create my own pattern and use the style ideas for the leg border and granny square pocket as inspiration for my modern day design.
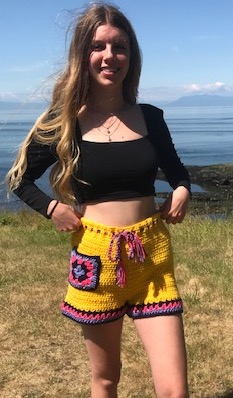
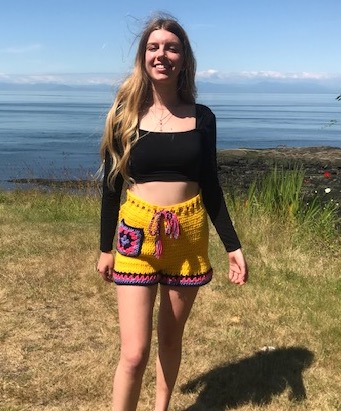
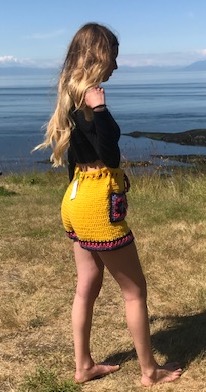
When I put a call out for models for my crochet clothes, I was blessed to have three beautiful island girls come out to Georgina Point where the light house is and we had a lot of fun taking shots of all my garments in this gorgeous setting. Bridget kindly modelled my Retro Hippy Shorts for me.

Here is a back view of the shorts for you.
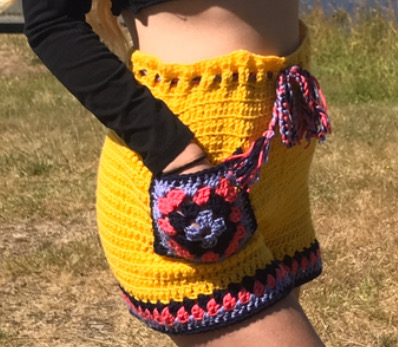
And a close up so you can see the detail of the stitch and how the pocket works.

Do you love video tutorials
There is a video tutorial for these shorts over on my YouTube channel for those who are visual learners.
These Retro Hippy Shorts would pair up beautifully with any of my bralettes. The Ivory Lace Bralette pattern and the Earth Mother Bralette would both work so well with these cute summer crochet shorts.
Also if you love crochet shorts you should be sure to check out my Bella B Shorts. You will be sure to love them too.
Have you checked out my youtube channel. There are lots of great tutorials with right and left handed versions.
PIN ME FOR LATER

The Retro Hippy Shorts
Free crochet pattern.
Pattern by Pam Carr ©2021
Introducing the Retro Hippy Shorts Pattern by Carroway Crochet. I have used acrylic yarn for mine, but they work well in cotton too.
The Retro Hippy Shorts are made as a swim suit cover up, or fun summer shorts. Perfect for festival outfits as well.
The Retro Hippy Shorts pattern is simple to make, and so on trend. You can make it with your choice of worsted weight yarn, either acrylic or cotton, just look for the number (4) on the yarn label.
It is an advanced beginner shorts pattern with easy to follow instructions. It uses the Double Crochet stitch with a granny square for the pocket. There are videos on my You Tube Channel to help you learn the double crochet stitch if needed. You are also more than welcome to contact me with any questions you have about the instructions.
Supplies you will need:
Yarn: This pattern uses any worsted weight yarn, (4)
You will need 1 skein of the main colour and three small amounts of contrasting colours for the trim at the bottom of each leg and for the granny square pocket. The contrasting colours will be Colour B, Colour C and Colour D when you read the instructions.
Hook: H/8 – 5.00 mm, Notions: Scissors, Yarn needle.
Gauge: 13dc – 6 rows = 4” (10 cm)
Sizes:
Extra Small/Small: 29” waist, 36” hip
Medium: 32” waist, 40” hip
Large: 34.5” waist, 44” hip
Extra Large: 36” waist, 46” hip
Abbreviations. (uses US terms)
st or sts – stitch or stitches sp -space
ch – chain stitch
dc – double crochet
rnd(s) – round(s)
sl st, – slip stitch
dcblo – double crochet through the back loop only.
This pattern is uses US terminology. The US and UK crochet terms are different, but they use the same terms to describe different stitches. Here is a simple conversion chart for anyone in the UK.
| US
double crochet (dc) |
UK
Treble (tr) |
Instructions:
These shorts are worked in the round.
Please note that the Ch 2 worked at the beginning of a round does not count as a stitch.
Do not turn at the end of each RoundSpecial Stitch: Double Crochet Black Loop
These shorts are made with the double crochet back loop only stitch.
Every stitch has two loops, a front and a back loop. Work a double crochet just as you normally would into both stitches, but only double crochet in the furthest stitch away from you. Here’s a link for a video showing how to single crochet through the back loop only. The back loop technique is the same for the double crochet stitch.
Note:
To avoid a slanted seam at the back I do my ch2 to start the new row and then put my first DC in the same stitch I slip stitched into, at the base of the ch2. Then when I sl st to join at the end of the row, I sl st into the top of this DC st.
I have posted a video on youtube to show how this is done.
What do the numbers mean.
This pattern is written for sizes XS/S, M, L, and XL.
In the written instructions you will see a string of numbers., eg 102, (110, 116, 124)
The first number is for the XS/S size, the second number is for the M,
etc, I hope this helps you follow the pattern easily.
Let’s Get Started.
Ch 102, (110, 116, 124) join with a sl st to create a circle/loop.
Round 1: ch 2. dc into each stitch around, join to the top of ch2 with a sl st, 102, (110, 116, 124) st
Round 2: ch2, dcblo into each stitch around, join to the top of the ch2 with a sl st. 102, (110, 116, 124)
Rounds 3-15, (17, 19, 21): dcblo into each stitch around, join to the top of the ch2 with a sl st. 102, (110, 116, 124)
To form crotch foundation:
Ch 12(14,16,18)
Count around 51 (55, 58, 62) dc and sl st 12(14,16,18) ch into top of the 51st (55th , 58th, 62nd) dc on the opposite side to complete the crotch., ch 2
Now you begin the first leg
Row 16 (18, 20, 22): dcblo around until you come to the 12(14,16,18) chain, dc across the 12(14,16,18) chain and join to the top of ch2 with a sl st 63, (67, 70, 74)
Creating the border.
Next you need to gather the three colours you want to use for your border. Colours B, C and D.
Lower Leg Border: With the right side facing. (you may change the orders of the colours to suit your style preference)
Cut main colour and join Colour B. (white)
Row 17 (19, 21, 23) Ch 2, dc in same ch, * sk next st, shell of 2 dc in next st, repeat from * around. Join with a sl st in top of ch 2.
Cut B; join Colour C (brown).
Row 18 (20, 22, 24) ch 2, Sl st in next dc, ch 2, dc in sp between shells, *make a shell of 2 dc in the sp between next 2 shells, repeat from * around, end sl st in top of ch 2.
Cut C, join D (yellow).
Row 19: (21, 23, 25) ch 2, Sl st in next dc, ch 2, dc in sp between shells, * shell of 2 dc in sp between next 2 shells, repeat from * around, end sl st in top of ch 2.
Cut D, join C (brown).
Row 20 (22, 24, 26): ch1, Sc in each st around. Join with a sl st in first sc. Finish off.
Now return to the crotch area and begin to work the crotch and second leg.
Reattach the main colour yarn to the ch 2 space and Ch 12 (14,16,18) for the other crotch chain. Attach it to the opposite side with a sl st, ch2
Row 16 (18, 20, 22): dcblo around until you come to the 12(14,16,18) chain, dc across the 12(14,16,18) chain and join to the top of ch2 with a sl st, 63, (67, 70, 74)
Next you need to gather the colours you want to use for your border. Colours B, C and D
Lower Leg Border: With the right side facing. (you may change the orders of the colours to suit your style preference)
Cut main colour and join Colour B. (white)
Row 17 (19, 21, 23) Ch 2, dc in same ch, * sk next st, shell of 2 dc in next st, repeat from * around. Join with a sl st in top of ch 2.
Cut B; join Colour C (brown).
Row 18 (20, 22, 24) ch 2, Sl st in next dc, ch 2, dc in sp between shells, *make a shell of 2 dc in the sp between next 2 shells, repeat from * around, sl st in top of ch 2.
Cut C, join D (yellow).
Row 19: (21, 23, 25) ch 2, Sl st in next dc, ch 2, dc in sp between shells, * shell of 2 dc in sp between next 2 shells, repeat from * around, sl st in top of ch 2.
Cut D, join C (brown).
Row 20 (22, 24, 26): ch1, Sc in each st around. Join with a sl st in first sc. Finish off and weave in the ends.
How to Complete the Crotch area
Attach yarn to the inside edge of crotch area, ch 2, dc down the Ch 12(14,16,18).
Sl st across to the other Ch 12(14,16,18), ch2, and dc down this chain, sl st across to where you attached the yarn to complete the crotch.
Cut of yarn leaving a long enough tail to sew the centre crotch seam.
Whip stitch the centre crotch seam together with the right sides facing each other.
Fasten off and weave in any loose ends.
Belt
Crochet Option
To make a crochet belt Ch, 140 for small, medium, ch150 for large, ch160 for extra large
Sl st down the chain to create a more substantial belt.
For an even wider belt you can single crochet down the chain.
Braided Option
For a braided Belt, (as seen in the pictures above.)
You will need two 40” (44”,48”, 52”) strands of each colour you used in your border.
Attach one end, (6 strands of yarn) to something to secure it so you can begin to braid your belt. I use a door handle or a chair, you can also pin it to a surface.
Braid the strands and tie off each end to secure the yarn.
Weave the belt into the second row down from the top of your shorts. Start and the centre front and go under two dc stitches and then over two dc stitches until you are back at the front of your shorts.
Decide how long you want the belt to hang down for a decorative feature and readjust your end knot leaving enough length to allow for a yarn tassel.
The Granny Square Pocket.
With colour B ch 4 and join with a sl st to form a small loop or ring.
This creates the ring (center of the granny square) and this is where all the work will be done for the first round.
The first round is made of four shells. You will need to chain 1 between each shell in this first round.
Chain 1 and make another shell by doing three double crochets into the ring (this is shell number 2).
Chain 1 and make another shell by doing three double crochets into the ring (this is shell number 3).
Chain 1 and make the last shell for round one.
You now have 4 shells and are ready to join them together. Chain 1 join with a sl st to the top of the chain 3.
Change to colour C. and attach yarn to a ch1 space.
Round 2: Ch 3, make 2dc into the same space, ch2, make 3 dc into the same ch1 sp, (this is your first corner) skip over the shell from the previous round and make 3 dc into the next ch1 sp, ch2, make 3 more dc into the same ch1 sp, (this is the second corner) skip over the shell from the previous round and make 3dc, ch2 and 3dc into the ch1 sp, (corner number 3) skip over the shell from the previous round and make 3dc, ch2 and 3dc into the ch 1 sp (the final
Round 1: ch3, make 2dc into the ring, ch1. This is the first “shell” of the granny square. (A “shell“ is when three double crochets are made into the same space. Please note that the chain 3 takes the place of a double crochet.)
corner) skip over the shell from the previous round and join with a sl st to the top of the beginning ch3.
Change to colour D Attach yarn to one of the ch2 corner spaces
Round 3: Ch 3, make 2dc into the same space, ch2, make 3 dc into the same space, (this is your first corner) skip over the shell from the previous round and make 3 dc into the sp, skip over the shell from the previous round and make 3 dc into the ch2 sp, ch2, make 3 more dc into the same ch2 sp, (this is the second corner) skip over the shell from the previous round and make 3 dc into the sp, skip over the shell from the previous round and make 3dc, ch2 and 3dc into the ch2 sp, (corner number 3) skip over the shell from the previous round and make 3 dc into the sp, skip over the shell from the previous round and make 3dc, ch2 and 3dc into the ch 2 sp (the final corner) skip over the shell from the previous round and make 3 dc into the sp, skip over the shell from the previous round and join with a sl st to the top of the beginning ch3.
Change to colour B. Attach yarn to one of the ch2 corner spaces
Round 4: Ch 3, make 2dc into the same space, ch2, make 3 dc into the same, (this is your first corner) skip over the shell from the previous round and make 3 dc into the sp, skip over the shell from the previous round and make 3 dc into the sp, skip over the shell from the previous round and make 3 dc into the ch2 sp, ch2, make 3 more dc into the same ch2 sp, (this is the second corner) skip over the shell from the previous round and make 3 dc into the sp, skip over the shell from the previous round and make 3 dc into the sp, skip over the shell from the previous round and make 3dc, ch2 and 3dc into the ch2 sp, (corner number 3) skip over the shell from the previous round and make 3 dc into the sp, skip over the shell from the previous round and make 3 dc into the sp, skip over the shell from the previous round and make 3dc, ch2 and 3dc into the ch 2 sp (the final corner) skip over the shell from the previous round and make 3 dc into the sp, skip over the shell from the previous round and make 3 dc into the sp, skip over the shell from the previous round and join with a sl st to the top of the beginning ch3.
Change to colour B. Attach yarn to one of the ch2 corner spaces
Round 5: ch2, make 2 hdc into the same space, hdc into each stitch across the side and make 3 hdc into the ch2 corner space, repeat around each side and join with a sl st to the top of the ch2 at the beginning of the round.
Fasten off and weave in the ends.
Attaching the Pocket to the Shorts.
Count down 5 rows from the top of the shorts and align the top of the pocket with the line created by the back loop only double crochet. I set my pocket on the right hand side of the shorts but it is up to you where you choose to put your pocket.
Pin the pocket in place and sew it on with the whip stitch or your preferred stitch.

You are now the owner of a fun and funky pair of Retro Hippy Shorts. I hope the sun shines on you as you enjoy the waves and beaches.
PS: To make your shorts longer you may add more double crochet rows to the legs.
If you have any questions or need help with the pattern, please email me atcarrowaycrochet@outlook.com, Iʼll be glad to help you.
The Big Book Blog Tour download
Got the coupon code? Great! Click the download button to visit Ravelry. Use the coupon code, and click apply coupon code and then download your free pattern pdf!

If you enjoy the patterns in this event maybe you would like to share some of your finished projects or join our growing crochet community in my Facebook Group. It would be great to have you and see what you are up to.
Join the Carroway Crochet Community on Facebook.

Thank you for trying my pattern, I hope you enjoy it! Please share pictures of your completed “Retro Hippy Shorts” on Instagram and Facebook. Tag them @carrowaycrochet #carrowaycrochet #retrohippyshorts on Instagram. Thank you so much. Pam ☺

OTHER FREE CROCHET PATTERNS YOU MIGHT LOVE!
More Places to Find Crochet Free Patterns:
If you love crochet, you can find over a thousand free crochet patterns including some for crop tops and bralettes over at All Free Crochet
I am honoured to have my free crochet bralette pattern, the Earth Mother Bralette Pattern added to the All Free Crochet site.
 It is a great resource for crochet lovers and I am proud to also have my Take Me Outside Infinity Scarf Pattern posted over on the All Free Crochet Site.

Selling items made from my patterns?
You are more than welcome to se items made from my pattern. Please do share my link and tag and help promote it on social media. Thank you.
If you have any questions or need help with the patterns, please email me at carrowaycrochet@outlook.com, and Iʼll be glad to help you.
Thank you again for trying y pattern, I hope you enjoy it! Please share pictures of your completed Gloves on Instagram and Facebook. Tag them @carrowaycrochet #carrowaycrochet #shortandchunkygloves on Instagram.
Find other patterns by Carroway Crochet in my Etsy Shop and on Ravelry.
Let’s Share and Connect!
Thank you for trying my free crochet bralette pattern, I hope you enjoyed it! Please share pictures of your completed Shorts on Instagram and Facebook. Tag them @carrowaycrochet #carrowaycrochet and #shellshorts on Instagram.
Thank you so much for visiting me here at Carroway Crochet .
Find other patterns by Carroway Crochet in my Etsy Shop and on Ravelry.
Other places you can find me are:
This design, written work and images are a copyright of
©CarrowayCrochet and may not be copied or reproduced in any way.
You have permission to sell finished products made from this pattern, but please leave a link to my blog, www.carrowaycrochet.com in your product listing specifying that I am the designer of this pattern.
Thank you.
Thank you.
One thought on “Retro Hippy Shorts”
Comments are closed.