
Cozy Crochet Cat Bed Free Crochet Cat Basket Beginner Crochet Pattern

How to Crochet a Cozy Cat Bed with this Easy Cat Basket Bed Free Crochet Pattern.
Today I am happy to share my new Cozy Cat Bed Free Crochet Pattern with you.
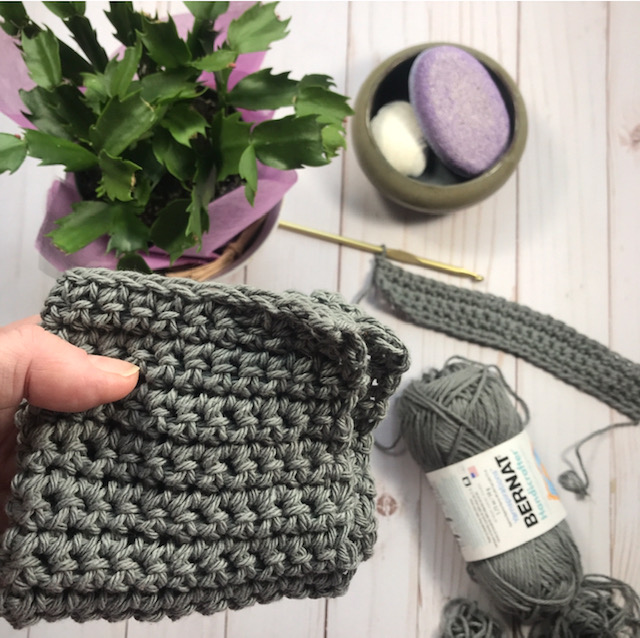
This Cozy Cat Bed is a beginner friendly cat basket style bed made with super bulky (6) Bernat Blanket yarn.
This Cozy Cat Bed is made using mainly the half double crochet stitch and has a beautiful texture. There is a single crochet trim around the top of the Cat Bed.
This modern contemporary design is a simple pattern for beginners.

For those new to crochet, I have a video tutorials on youtube that will demonstrate how to make the various crochet stitches. I have right and left-handed tutorials there.
Here is a close up of the sides so you can see the texture.
**This post contains affiliate links. If you make a purchase using some of my links I may receive a small commission at no extra cost to you.**
Please consider signing up for my newletter and joining me over on facebook so you are always in the loop for what is happening with Carroway Crochet.
Sign up for my Newsletter
Get the latest info on free patterns and fun blog hops.
Join Me on Facebook.
Follow me on my Facebook Page for the latest video news and what I am up to.
Join our Crochet Community Group.
Get the latest updates on my free patterns, latest pattern release and share your crochet projects with our Carroway Crochet Community on Facebook. You will also get the updates on new blog hops I host or new pattern releases.

If you prefer an ad free printable pattern pdf you can get one from my Ravelry Shop.

Why a Cozy Cat Bed?
If you know cats, you know that they love lying on things, often bits of paper you have lying around or on your crochet project as you are trying to work on it. So I thought it would be interesting to see if you would appreciate a soft and cozy cat bed.
My daughter is currently visiting with her cats and this was the perfect to time to test out this idea.
As you can see this mat was much appreciated by Abby. It is the perfect size for her to cozy up in and she loves it.

I also have a pattern for an Easy Cat Mat that you may enjoy for you pet.
Are you looking for some other small projects for your home.
If you enjoy making small and speedy crochet projects for your home, I have a pattern for a lovely Super Simple Dish Cloth. This can also double as a spa face cloth. Something else you can make for your kitchen is my Practically Perfect Potholder. These fun patterns are great as they are a nice sized project that you can pick up and make quite quickly and they don’t need much yarn.
Are You A Visual Learner.
For those new to crochet, I have video tutorials on my Carroway Crochet YouTube Channel that will demonstrate how to crochet the single and double crochet stitches as well as other beginner crochet stitches. I have both left and right handed version available to help beginner crocheters.
Here is a video tutorial for the Boho Mug Rug made with worsted weight yarn. Right Handed.
And here it is for those who are left handed.
So here is the Cozy Cat Bed pattern and I hope your pet gets lots of comfy use from it.
The Cozy Cat Bed Pattern.
Pattern by Pam Carr ©2025

Introducing The Cozy Cat Bed Pattern.
This crochet cat bed is a beginner friendly cat bed made with super bulky (6) Bernat Blanket yarn.
This easy cozy cat bed is made using the half double crochet stitch for the body of the bed and a row of single crochet for the final trim row. The walls of the bed are solid enough to provide support for your cat but also have some give so they seem to hug and provide security for your special pet.
This modern contemporary design is a simple pattern for beginners.
For those new to crochet, I have video tutorials on youtube that will demonstrate how to make the various crochet stitches. I have right and left-handed tutorials there.
So here we go, good luck.
Cozy Cat Bed Pattern.
Finished Size: 15″ in diameter and 5.5-6″ tall (30.5cm x 46cm) approximately.
Supplies you will need:
Yarn: I used Bernat Blanket Yarn weight (6) yarn. Each skein has (10.5 oz/300 g; 220 yds/201 m). I chose to use two contrasting colours but you can make yours just using one colour.
You will need approximately 250 yards of this yarn.
You can use up your stash super bulky yarn if you want a more eclectic look.
You can use any super bulky (6) yarn in your stash.
Hook: Size-H/8- 5.00 mm
Notions: Scissors, tapestry needle.
Gauge: 9 hdc – 8 hdc rows = 4” (10 cm)
Special Stitch for this project.
For this cat bed you need to do the half double crochet back loop only stitch. (hdcblo). This helps create the bottom edge of the basket as you start to create the sides of the basket.
You will be working the half double crochet stitch, but it is done into the back loop of the stitch.
I created a video showing how to do the back loop only technique using the single crochet stitch and posted it onto youtube for you. I hope this helps you understand how to work into the back loop of the stitch.
Abbreviations (uses US conventions)
-
Ch = chain
-
Sl st = slip stitch
-
st = stitch
-
sc = single crochet
-
hdc = half double crochet
-
hdcblo = half double crochet back loop only
-
dc = double crochet
This pattern uses US terminology. The US and UK crochet terms are different, but they use the same terms to describe different stitches. Here is a simple conversion chart for anyone in the UK.
USSingle Crochet (sc)Half double crochet (hdc)Double Crochet (dc) |
UKDouble crochet (dc)Half Treble Crochet (htc)Treble Crochet (tr) |
Instructions:
This Cozy Cat Bed is created in the round.
The chain at the start of a new round does not count as a stitch.
Chain 4 and sl st into first stitch to make a small circle. You may also begin with the magic loop if you prefer. Magic loops ensure a tighter closing.
Round 1: Ch 2, Make 12 dc into the small circle space. Join with sl st to the top of the chain 2. (12 dc stitches)
Round 2: Ch 1, Make 2 hdc into the next stitch and make 2hdc into every stitch around. Join with a sl st to the top of the ch1. (24 hdc)
Round 3: Ch1, *2 hdc into the next stitch, hdc in next stitch* repeat between * and * around. Join with sl st to the top of the chain 1. (36 hdc)
Round 4: Ch1, *2 hdc into the next stitch, hdc in each of the next two stitches* repeat between * and * around. Join with sl st to the top of the chain 1. (48 hdc)
Round 5: Ch1, *2 hdc into the next stitch, hdc in each of the next three stitches* repeat between * and * around. Join with sl st to the top of the chain 1. (60 hdc)
Round 6: Ch1, *2 hdc into the next stitch, hdc in each of the next four stitches* repeat between * and * around. Join with sl st to the top of the chain 1. (72 hdc)
Round 7: Ch1, *2 hdc into the next stitch, hdc in each of the next five stitches* repeat between * and * around. Join with sl st to the top of the chain 1. (84 hdc)
Round 8: Ch1, *2 hdc into the next stitch, hdc in each of the next six stitches* repeat between * and * around. Join with sl st to the top of the chain 1. (96 hdc)
Round 9: Ch1, *2 hdc into the next stitch, hdc in each of the next seven stitches* repeat between * and * around. Join with sl st to the top of the chain 1. (108 hdc)
Round 10: Ch1, *2 hdc into the next stitch, hdc in each of the next eight stitches* repeat between * and * around. Join with sl st to the top of the chain 1. (120 hdc)
Round 11: Ch1, *2 hdc into the next stitch, hdc in each of the next nine stitches* repeat between * and * around. Join with sl st to the top of the chain 1. (132 hdc)
Now we work up the sides of the basket

Round 12: Ch1, hdcblo into the first stitch, hdcblo into each stitch around, join with sl st to the top of the chain 1. (132 hdcblo)
Round 13: Ch 1, hdc into the first stitch, hdc into each stitch around, join with sl st to the top of the chain 1. (132 hdc)
Round 14: Ch 1, hdc into the first stitch, hdc into each stitch around, join with sl st to the top of the chain 1. (132 hdc)
Round 15: Ch 1, hdc into the first stitch, hdc into each stitch around, join with sl st to the top of the chain 1. (132 hdc)
Round 16: Ch 1, hdc into the first stitch, hdc into each stitch around, join with sl st to the top of the chain 1. (132 hdc)
Round 17: Ch 1, sc into the first stitch, sc into each stitch around, join with sl st to the top of the chain 1. (132 sc)
Fasten off and weave in your ends.
You now have a beautiful and cozy cat bed. Your cat will fall in love with it.
If you have any questions or problems, do not hesitate to contact me at carrowaycrochet@outlook.com
OTHER FREE CROCHET PATTERNS YOU MIGHT LOVE!
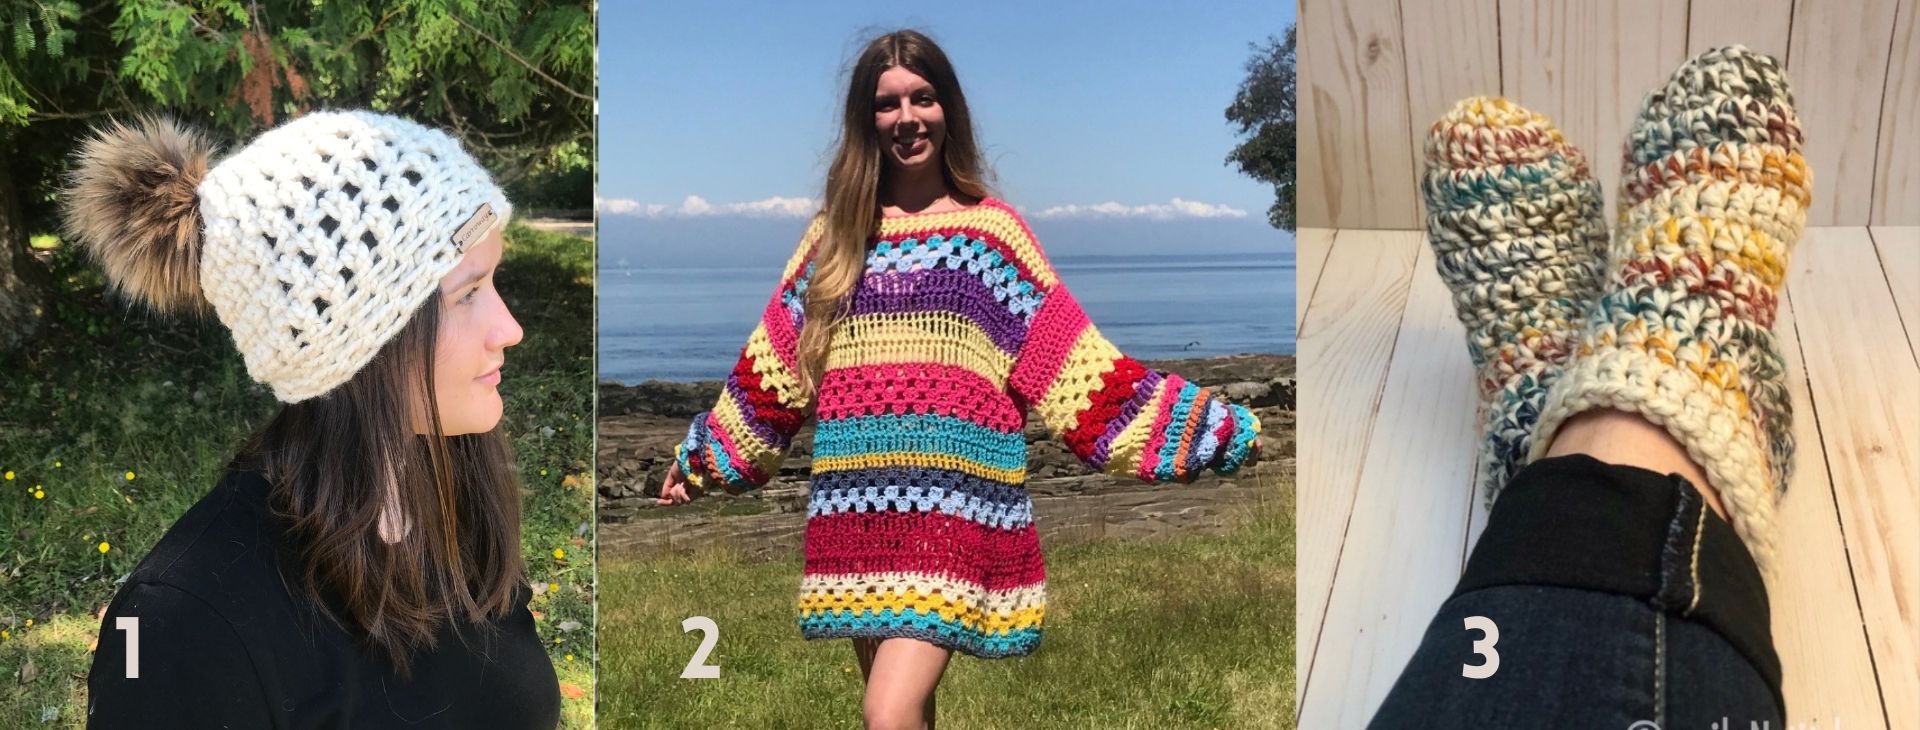
1. The Freedom Beanie.
2. The Happy Hippy Sweater
3. The Warmest Feet Ever Slipper Socks.
More Places to Find Crochet Free Patterns:
If you love crochet, you can find over a thousand free crochet patterns including some for crop tops and bralettes over at All Free Crochet
I am honoured to have my free crochet bralette pattern, the Earth Mother Bralette Pattern added to the All Free Crochet site.
 It is a great resource for crochet lovers and I am proud to also have my Take Me Outside Infinity Scarf Pattern posted over on the All Free Crochet Site.
 It is a great resource for crochet lovers and I am proud to also have my
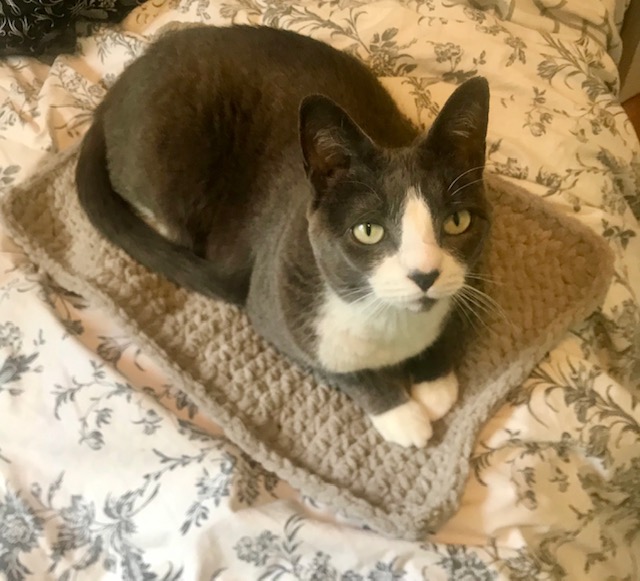

Selling items made from my patterns?
You are more than welcome to se items made from my pattern. Please do share my link and tag and help promote it on social media. Thank you.
If you have any questions or need help with the patterns, please email me at carrowaycrochet@outlook.com, and Iʼll be glad to help you.
Find other patterns by Carroway Crochet in my Etsy Shop and on Ravelry.
Let’s Share and Connect!
Thank you so much for visiting me here at Carroway Crochet .
Find other patterns by Carroway Crochet in my Etsy Shop and on Ravelry.
Other places you can find me are:
Ravelry
This design, written work and images are a copyright of
©CarrowayCrochet and may not be copied or reproduced in any way.
You have permission to sell finished products made from this pattern, but please leave a link to my blog, www.carrowaycrochet.com in your product listing specifying that I am the designer of this pattern.
Thank you.
Please follow and like us: