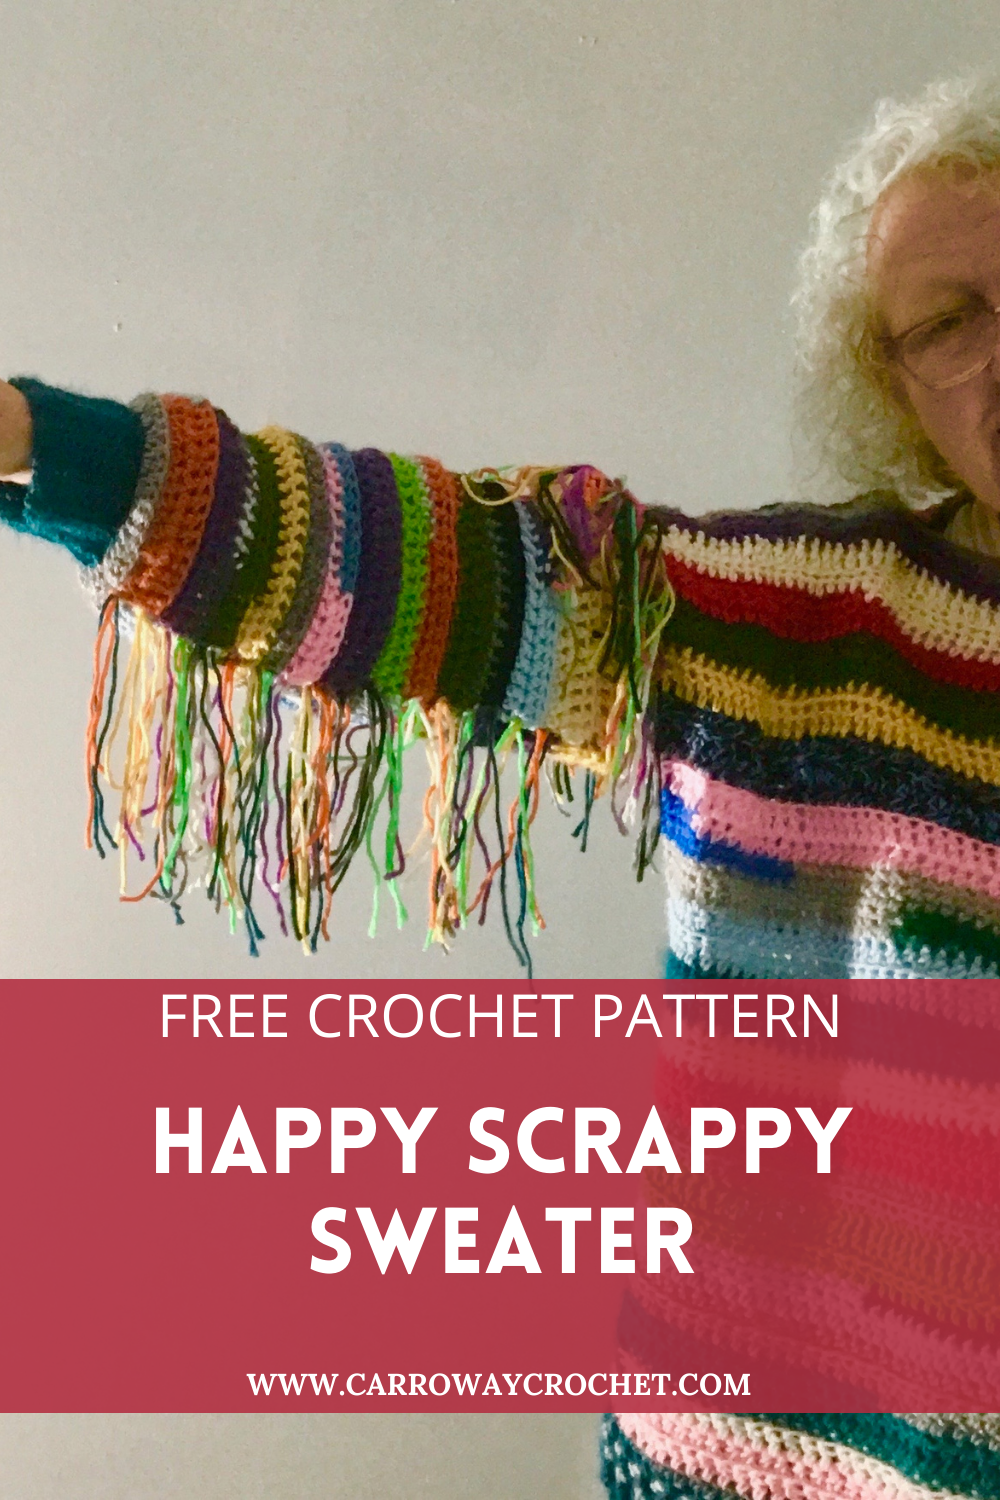
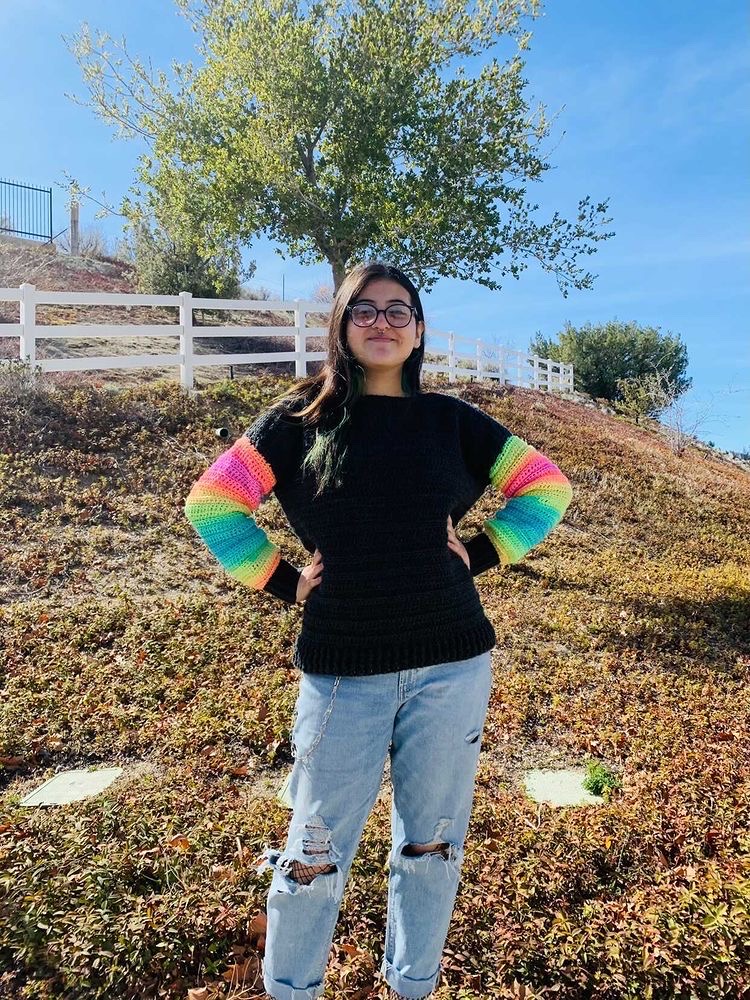
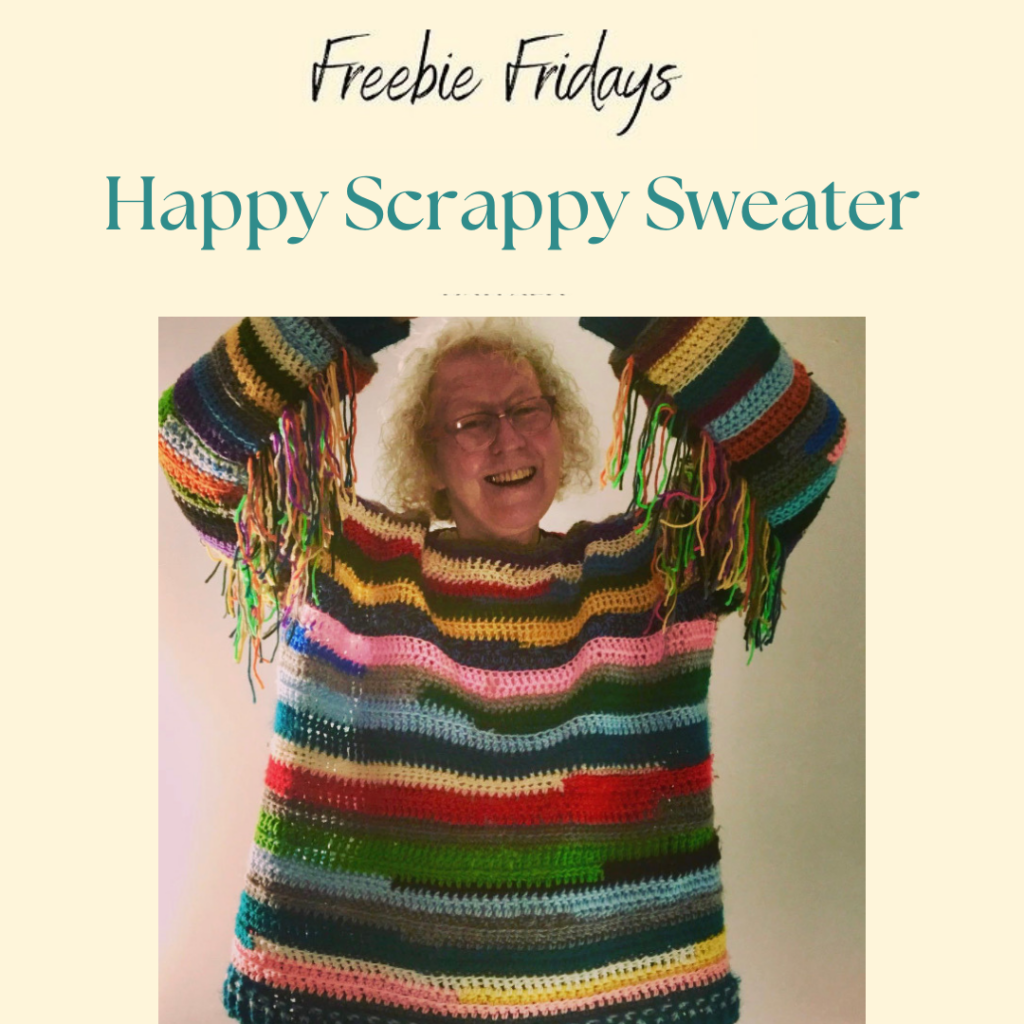
The Happy Scrappy Sweater.

Here is a great sweater project for using up your stash of yarn. I call it the Happy Scrappy Sweater. I designed the Happy Scrappy Sweater with new makers in mind, keeping it really simple for you while adding in some texture with some back loop only rows.
I am so excited to bring you the Happy Scrappy Sweater Pattern.
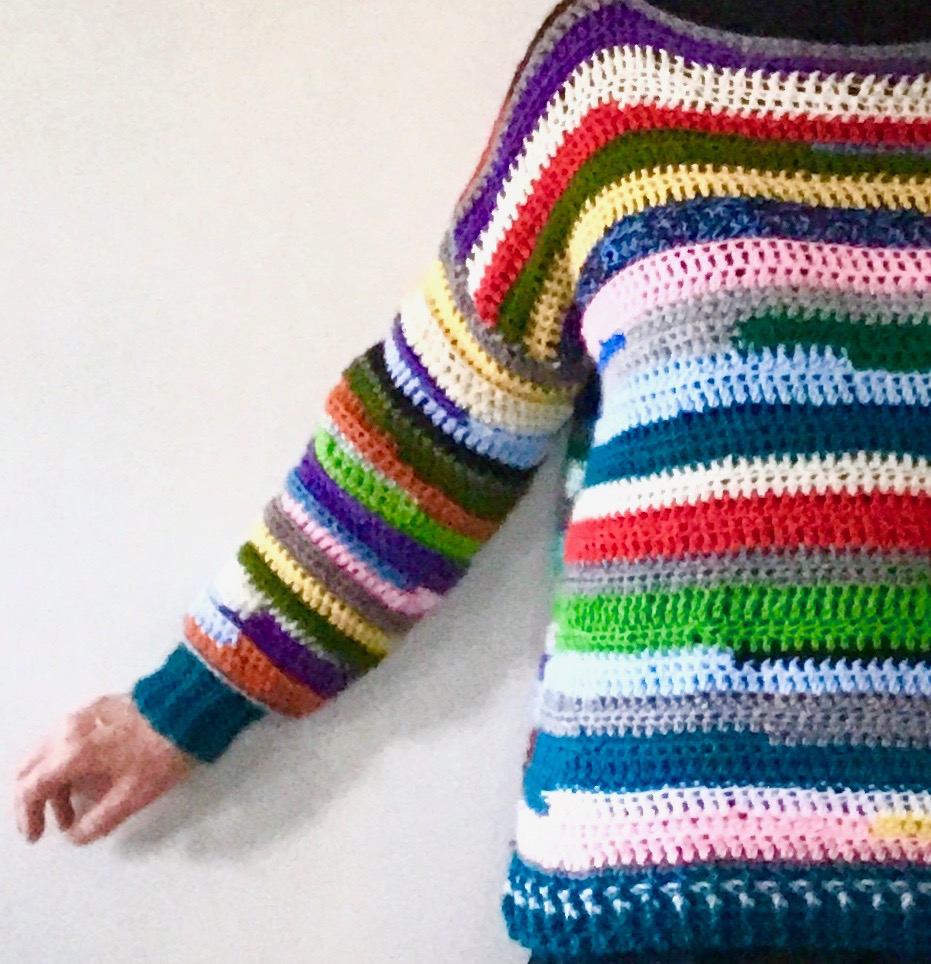
The Happy Scrappy Sweater Pattern is beginner friendly as it uses some of the first stitches you learn for crocheting, the single crochet, the half double crochet and the double crochet stitch. I added nine rows where you do some of these stitches into the back loop only, and this adds a beautiful texture and added interest as you make your project.
Once you have made your Happy Scrappy Sweater you will be so comfy wearing it around the house and out and about.
**This post contains affiliate links. If you make a purchase using some of my links I may receive a small commission at no extra cost to you.**
Sign up for my Newsletter
Get the latest info on free patterns and fun blog hops. Sign up here.
Join Me on Facebook.
Follow me on Facebook for lots of great crochet news and all the latest videos and free patterns coming from Carroway Crochet.
And Join our Carroway Crochet Group.
Get the latest updates on free patterns and new designs and also share your crochet projects with our Carroway Crochet Community on Facebook. You will also get the updates on new blog hops I host or new pattern releases.

About the Happy Scrappy Sweater.
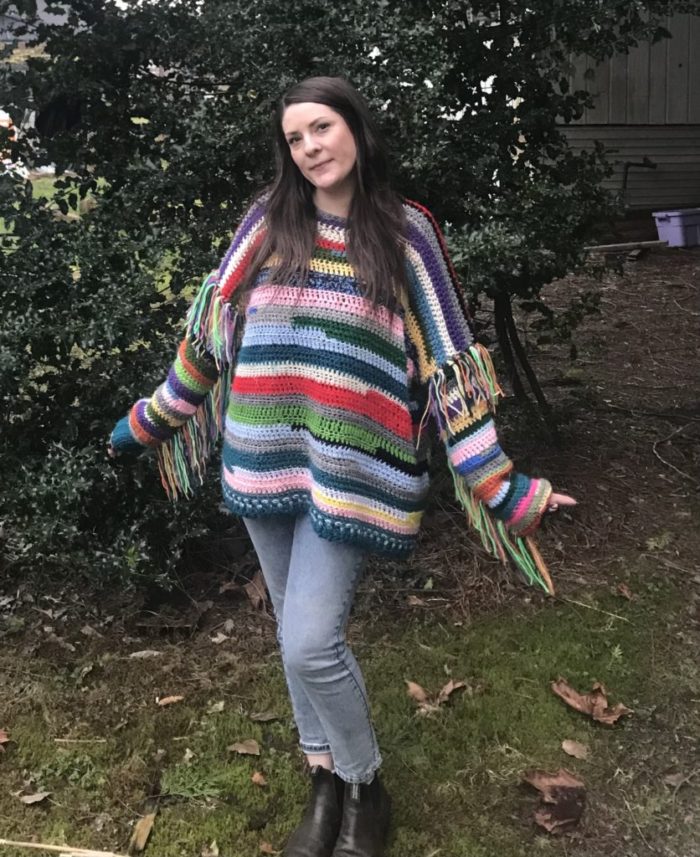
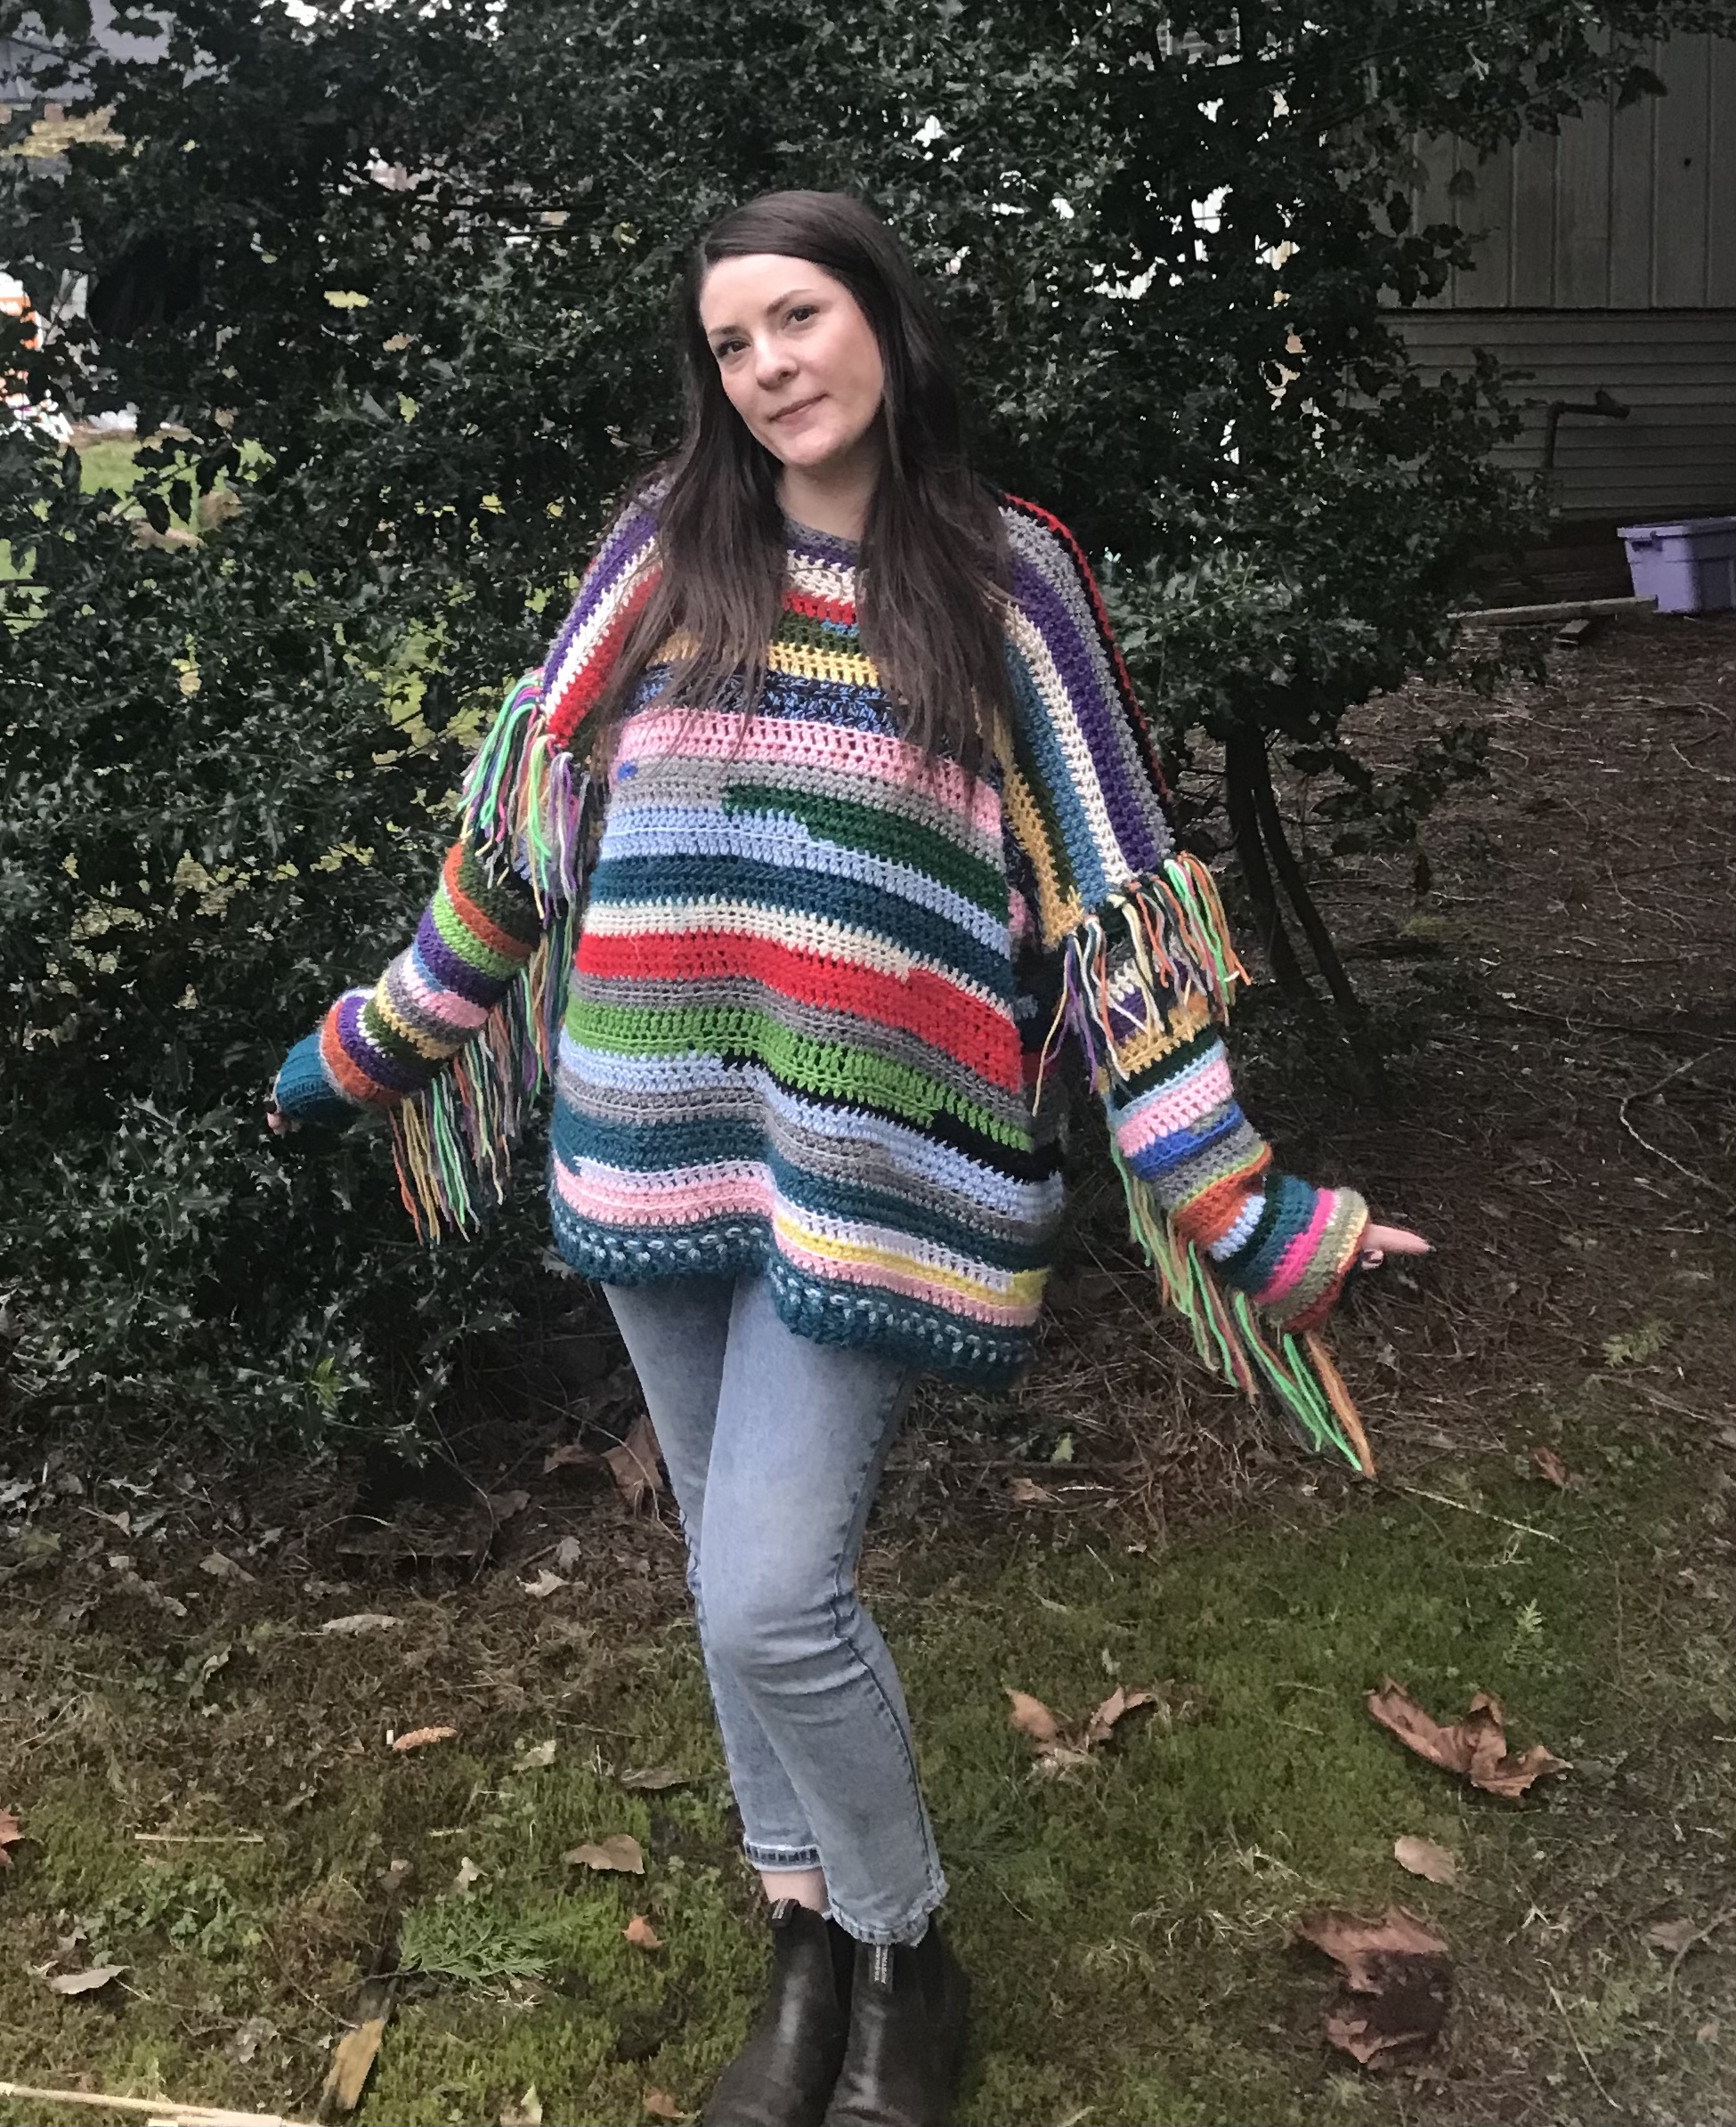
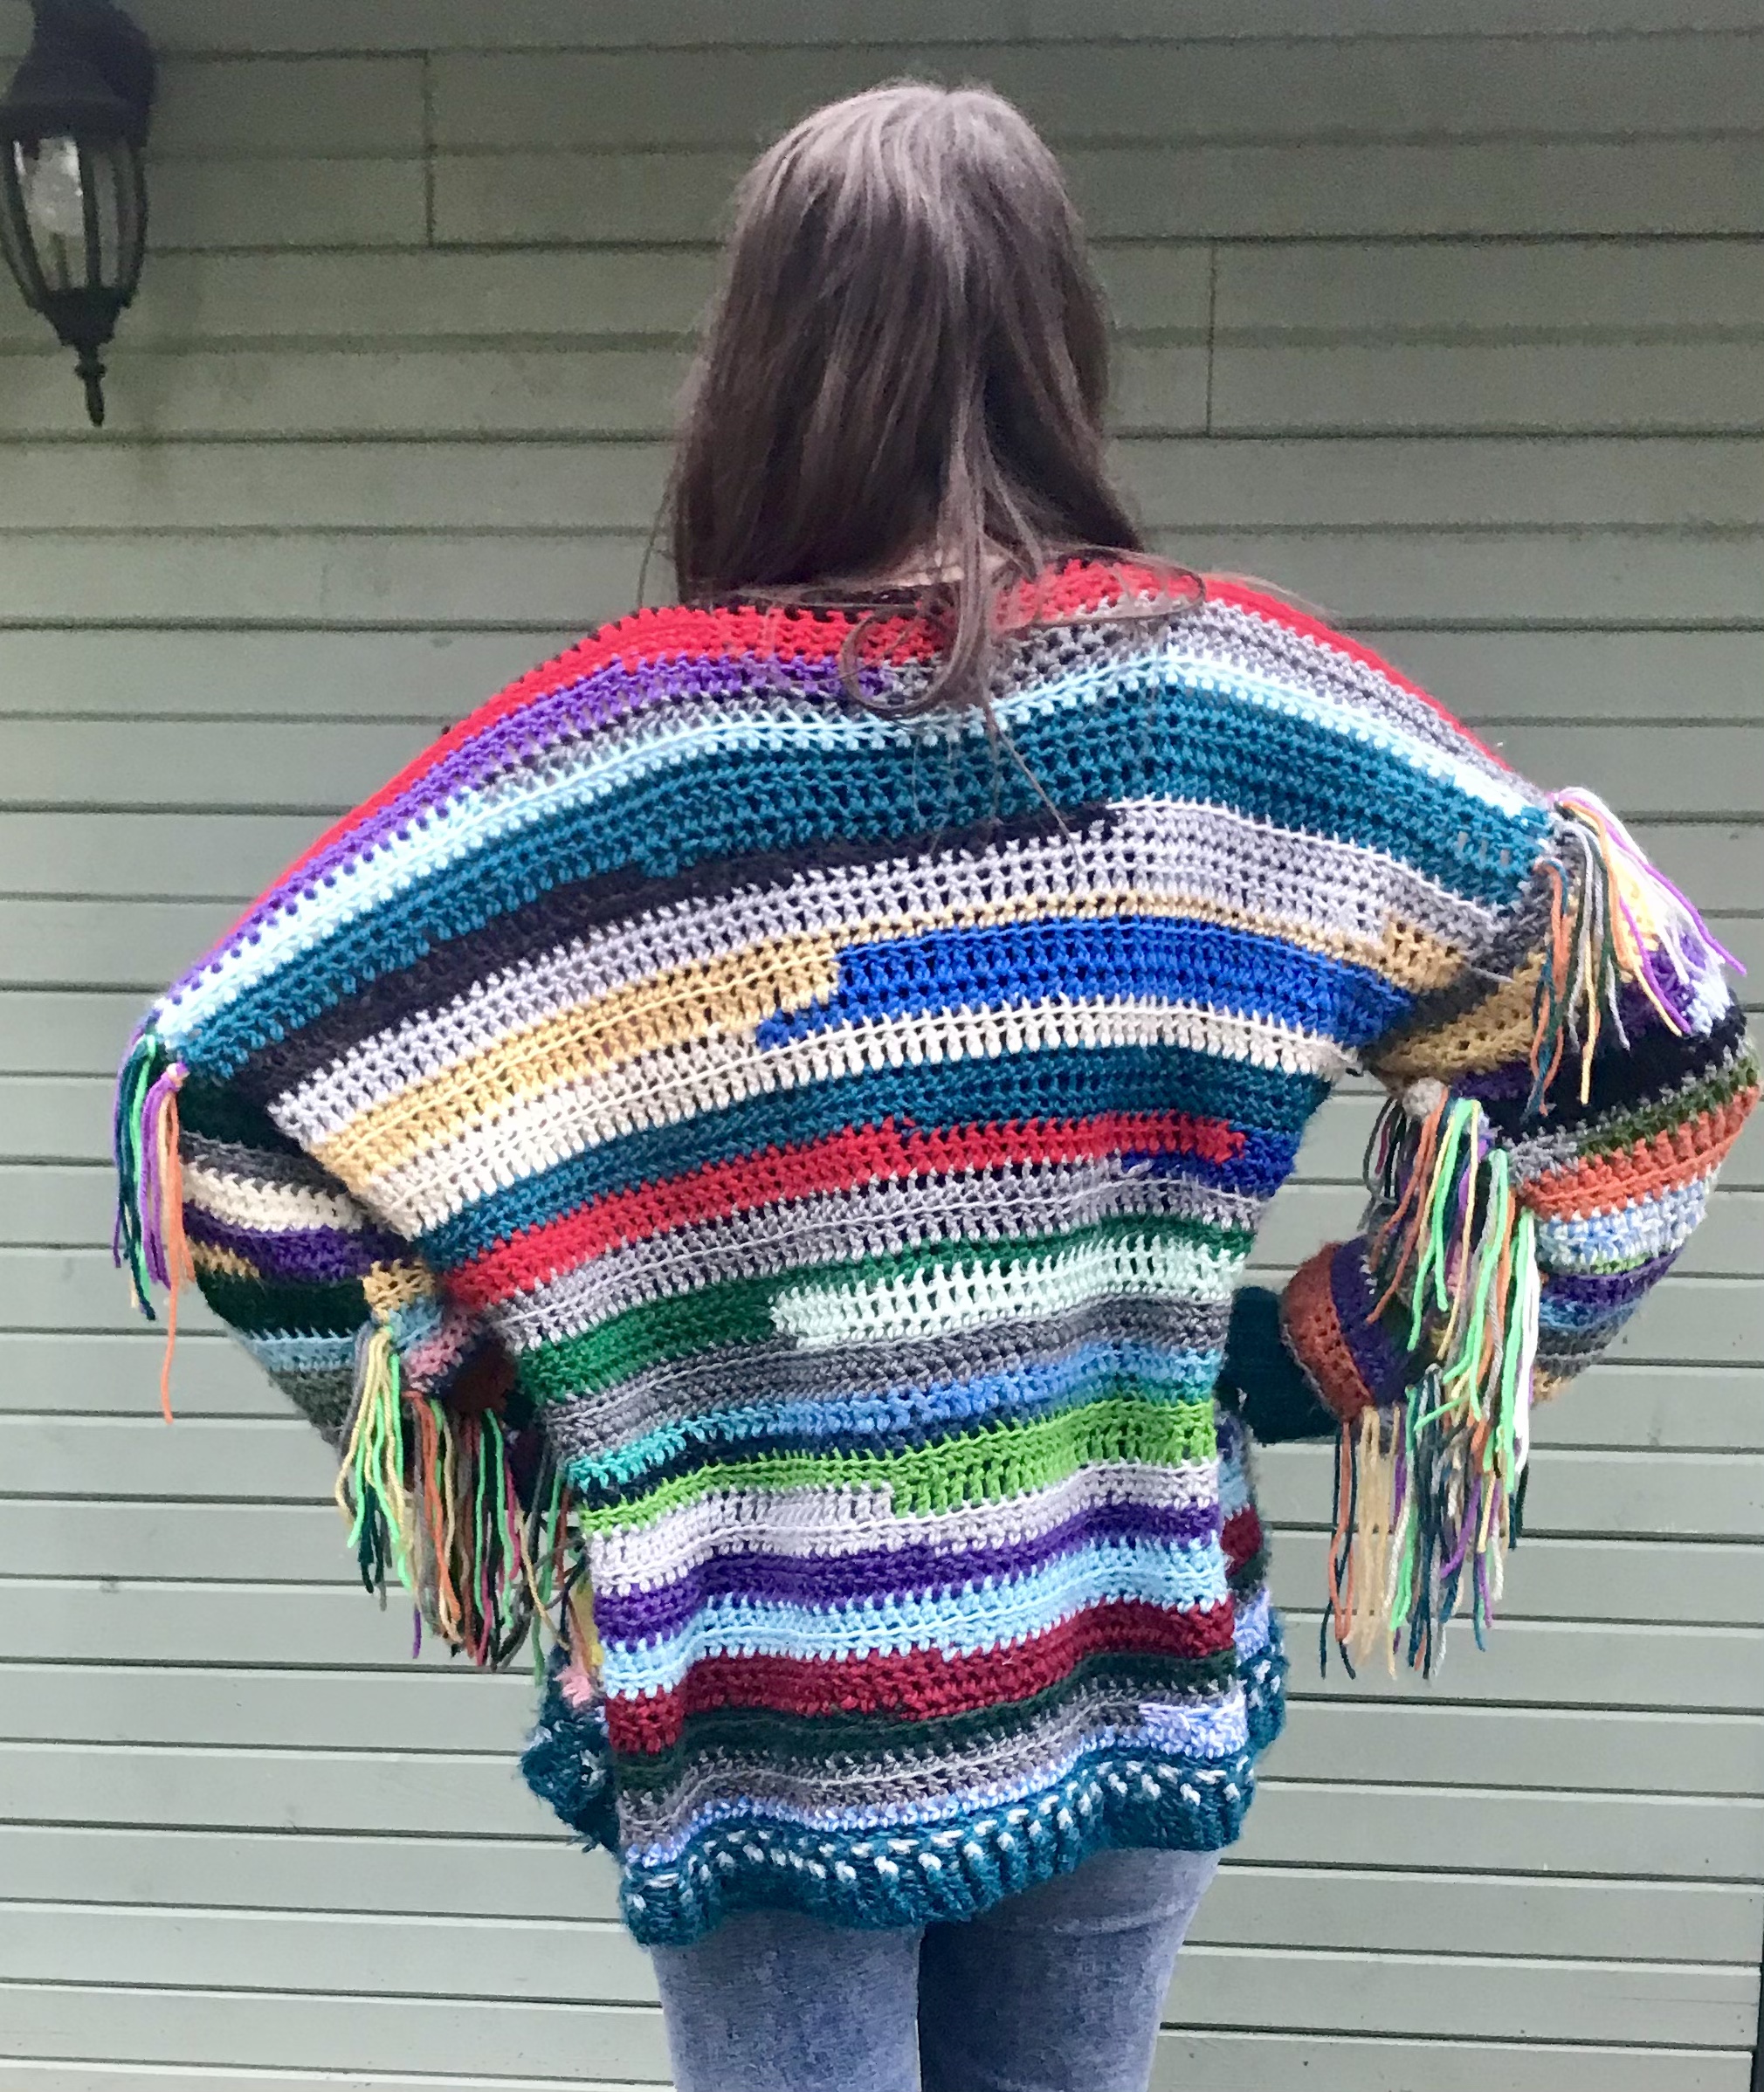
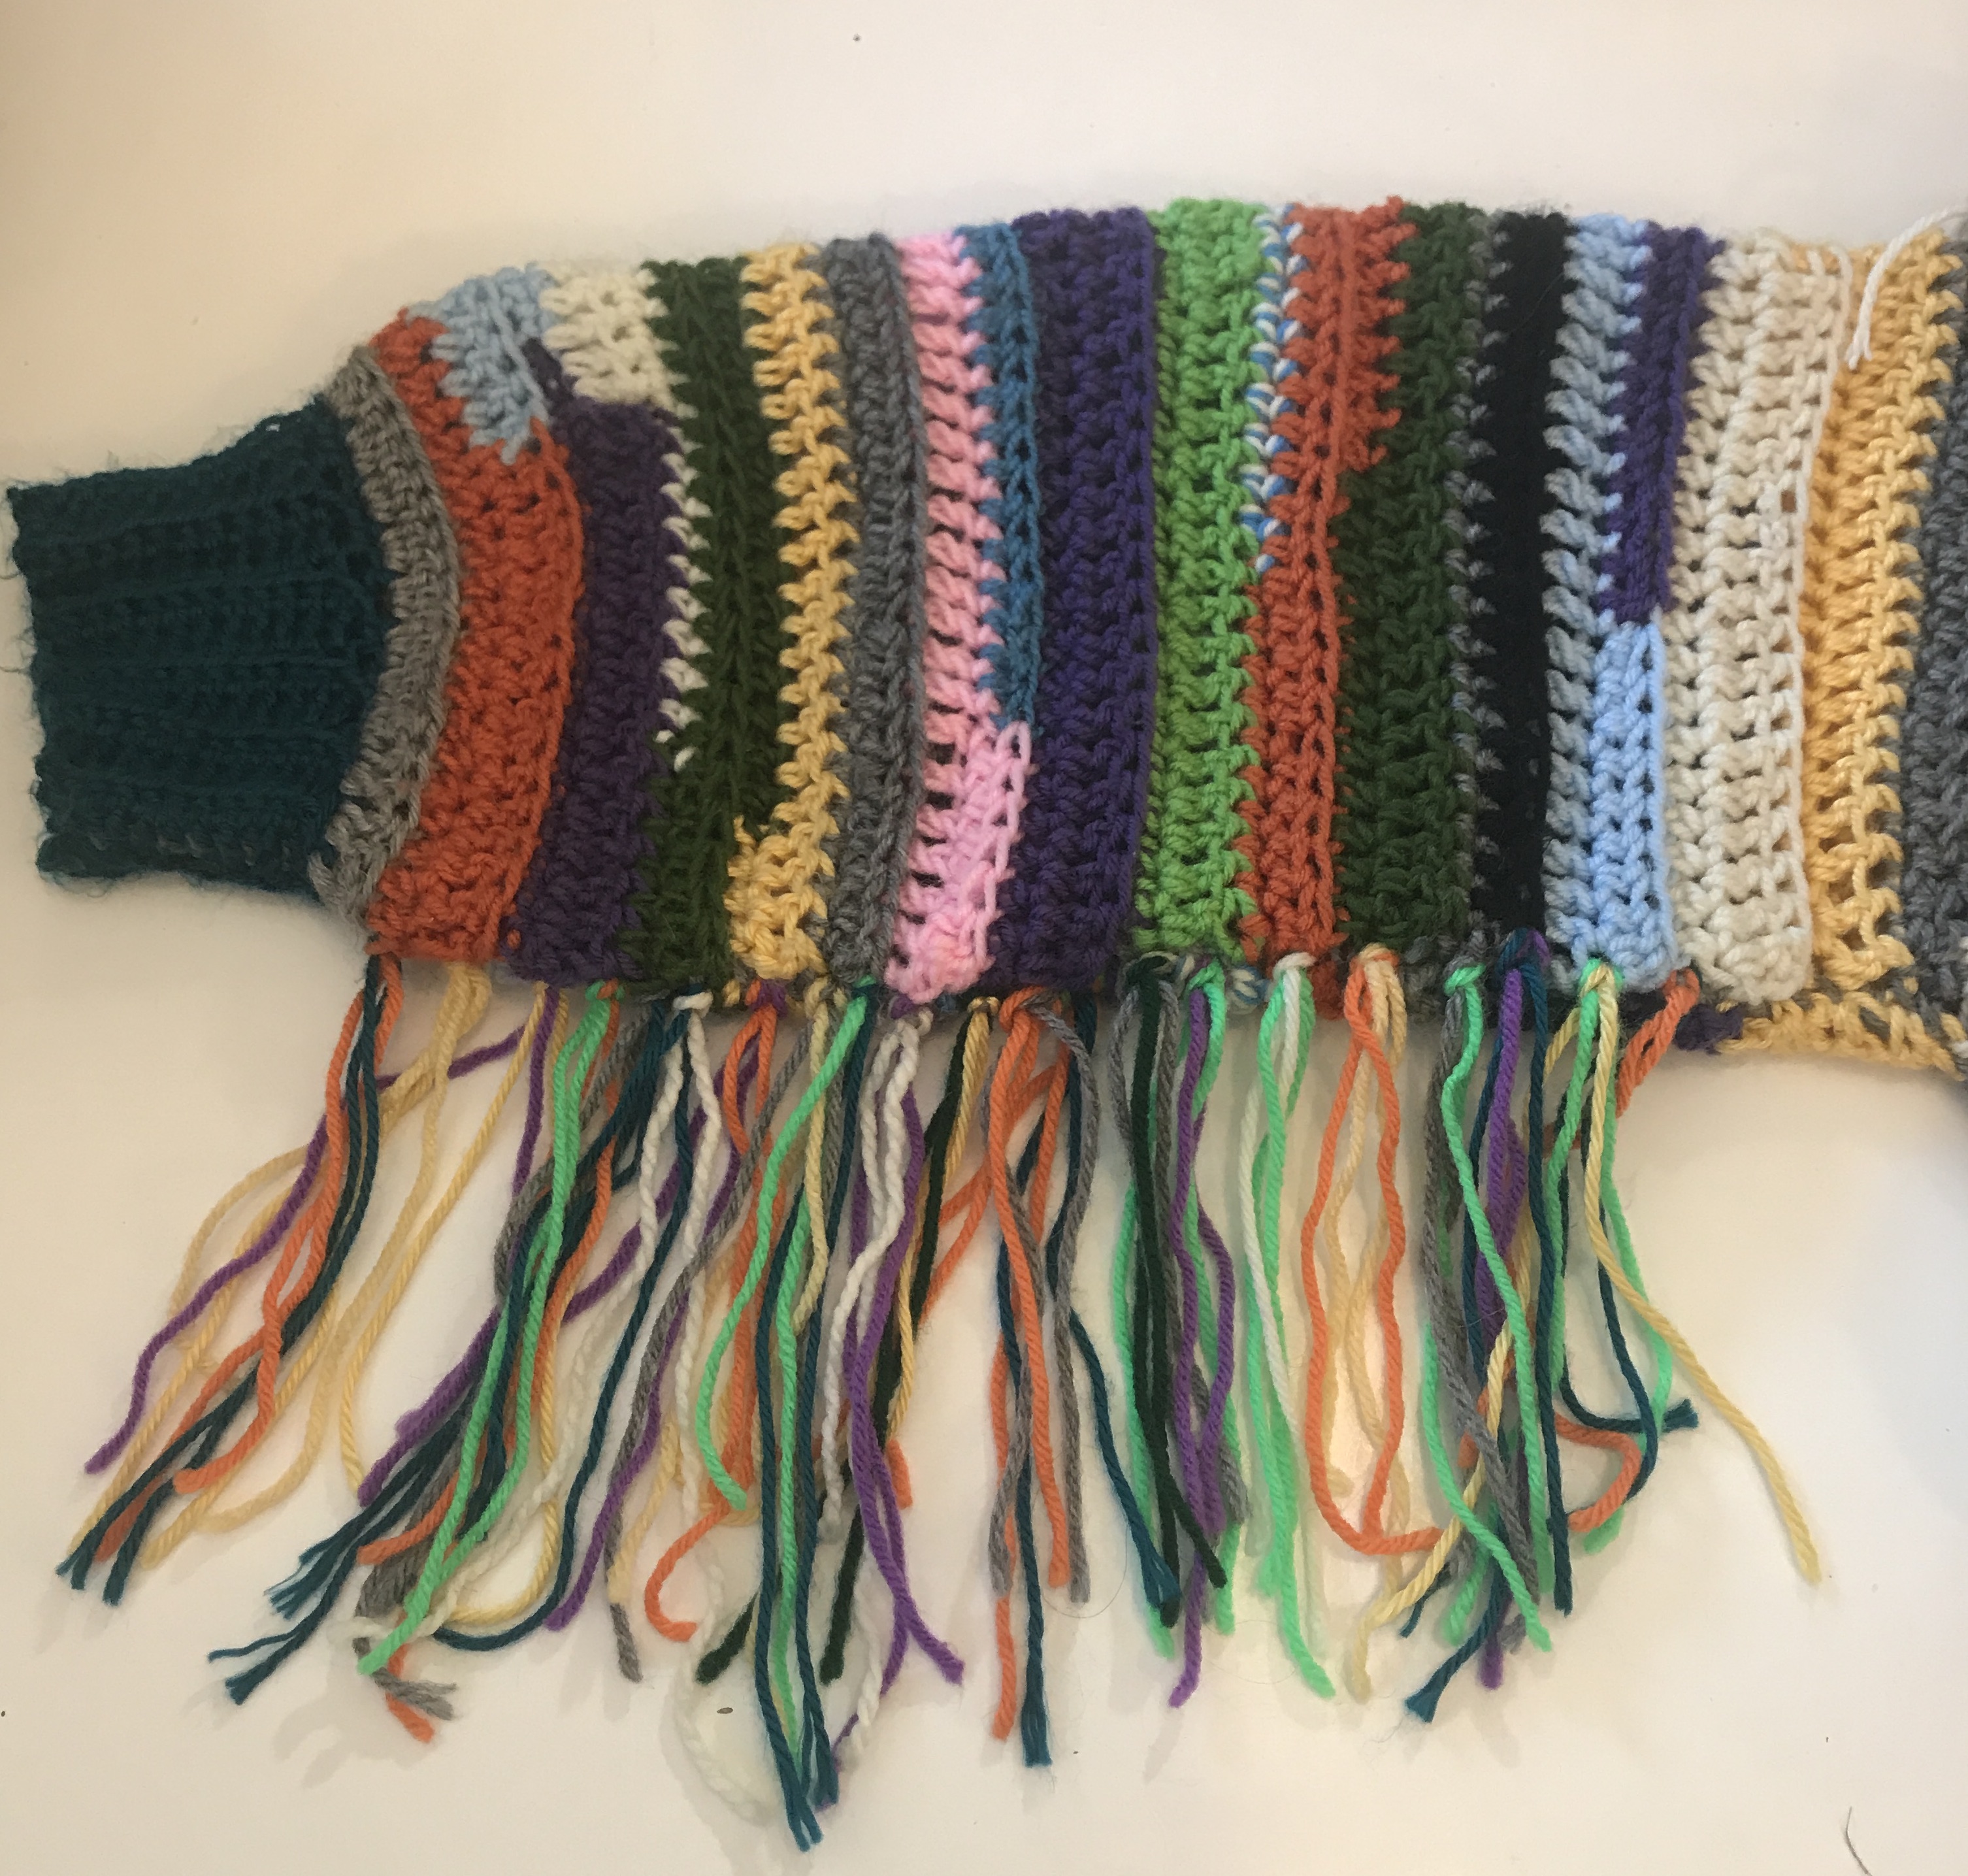
I am so happy to share this fun Happy Scrappy Sweater pattern with you as I feel it is versatile crochet sweater project. Depending on the yarn you choose, it can be a bright and funky fun top to lift your spirits when you put it on. Or you can choose more classic or neutral colours and make a sweater that is more your style and fits your comfort zone. This sweater can be the sweater of many colours or just featuring one solid colour. You decide on your yarn and get busy crocheteting and before you know it you have another beautiful handmade garment in your crochet wardrobe. Once you discover how easy it is to make this sweater you might want to make it in all the variations.
The Happy Scrappy Sweater is made with two rectangles for the body. The sleeves are simple and the pattern instructions have clear directions on how to put the sleeves in and assemble your sweater. The style of the sweater is a drop shoulder, which is a very popular style right now.
Don’t Forget to Pin This For Later.

Are you a Visual Learner.
Check out my Video on How to Crochet a Happy Hippy Sweater.
Here is the left handed tutorial for you.
The Happy Scrappy Sweater Pattern Comes in All The Sizes.
The other great thing about the Happy Scrappy Sweater pattern is it comes in so many sizes, XS, S, M, L, XL, 2X, 3X, 4X and 5X. So no one is left out.
There are also tips on how you can make it as long or as short as you want.

Let me tell you what I love about the Happy Scrappy Sweater Pattern.
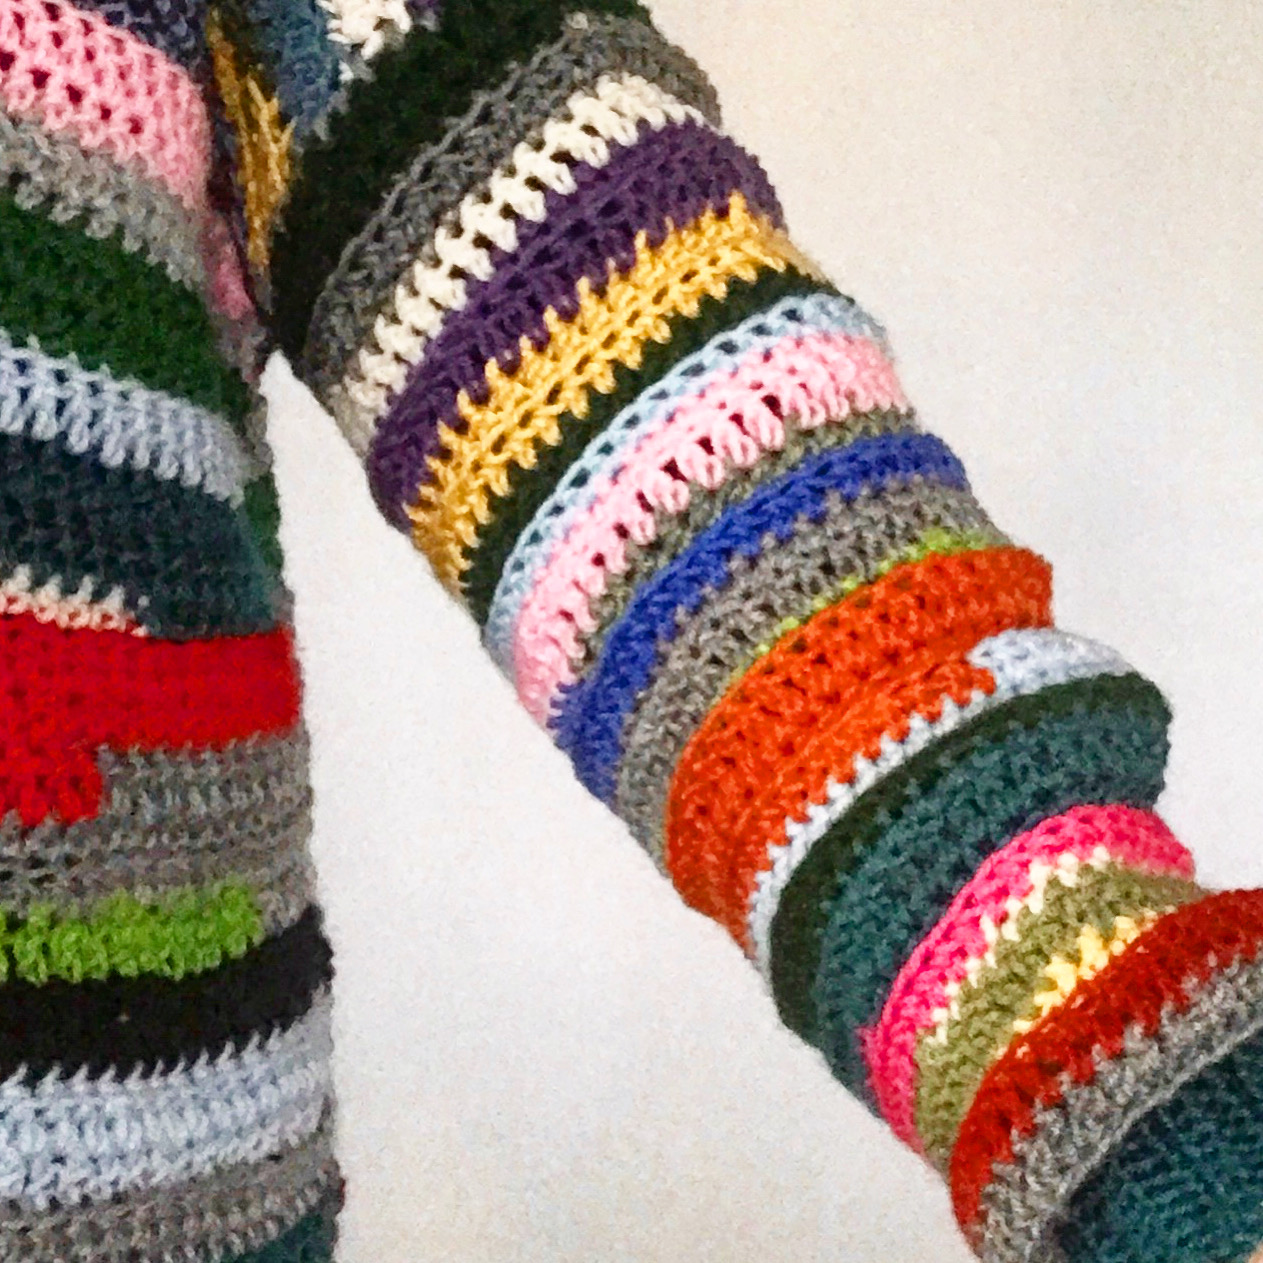
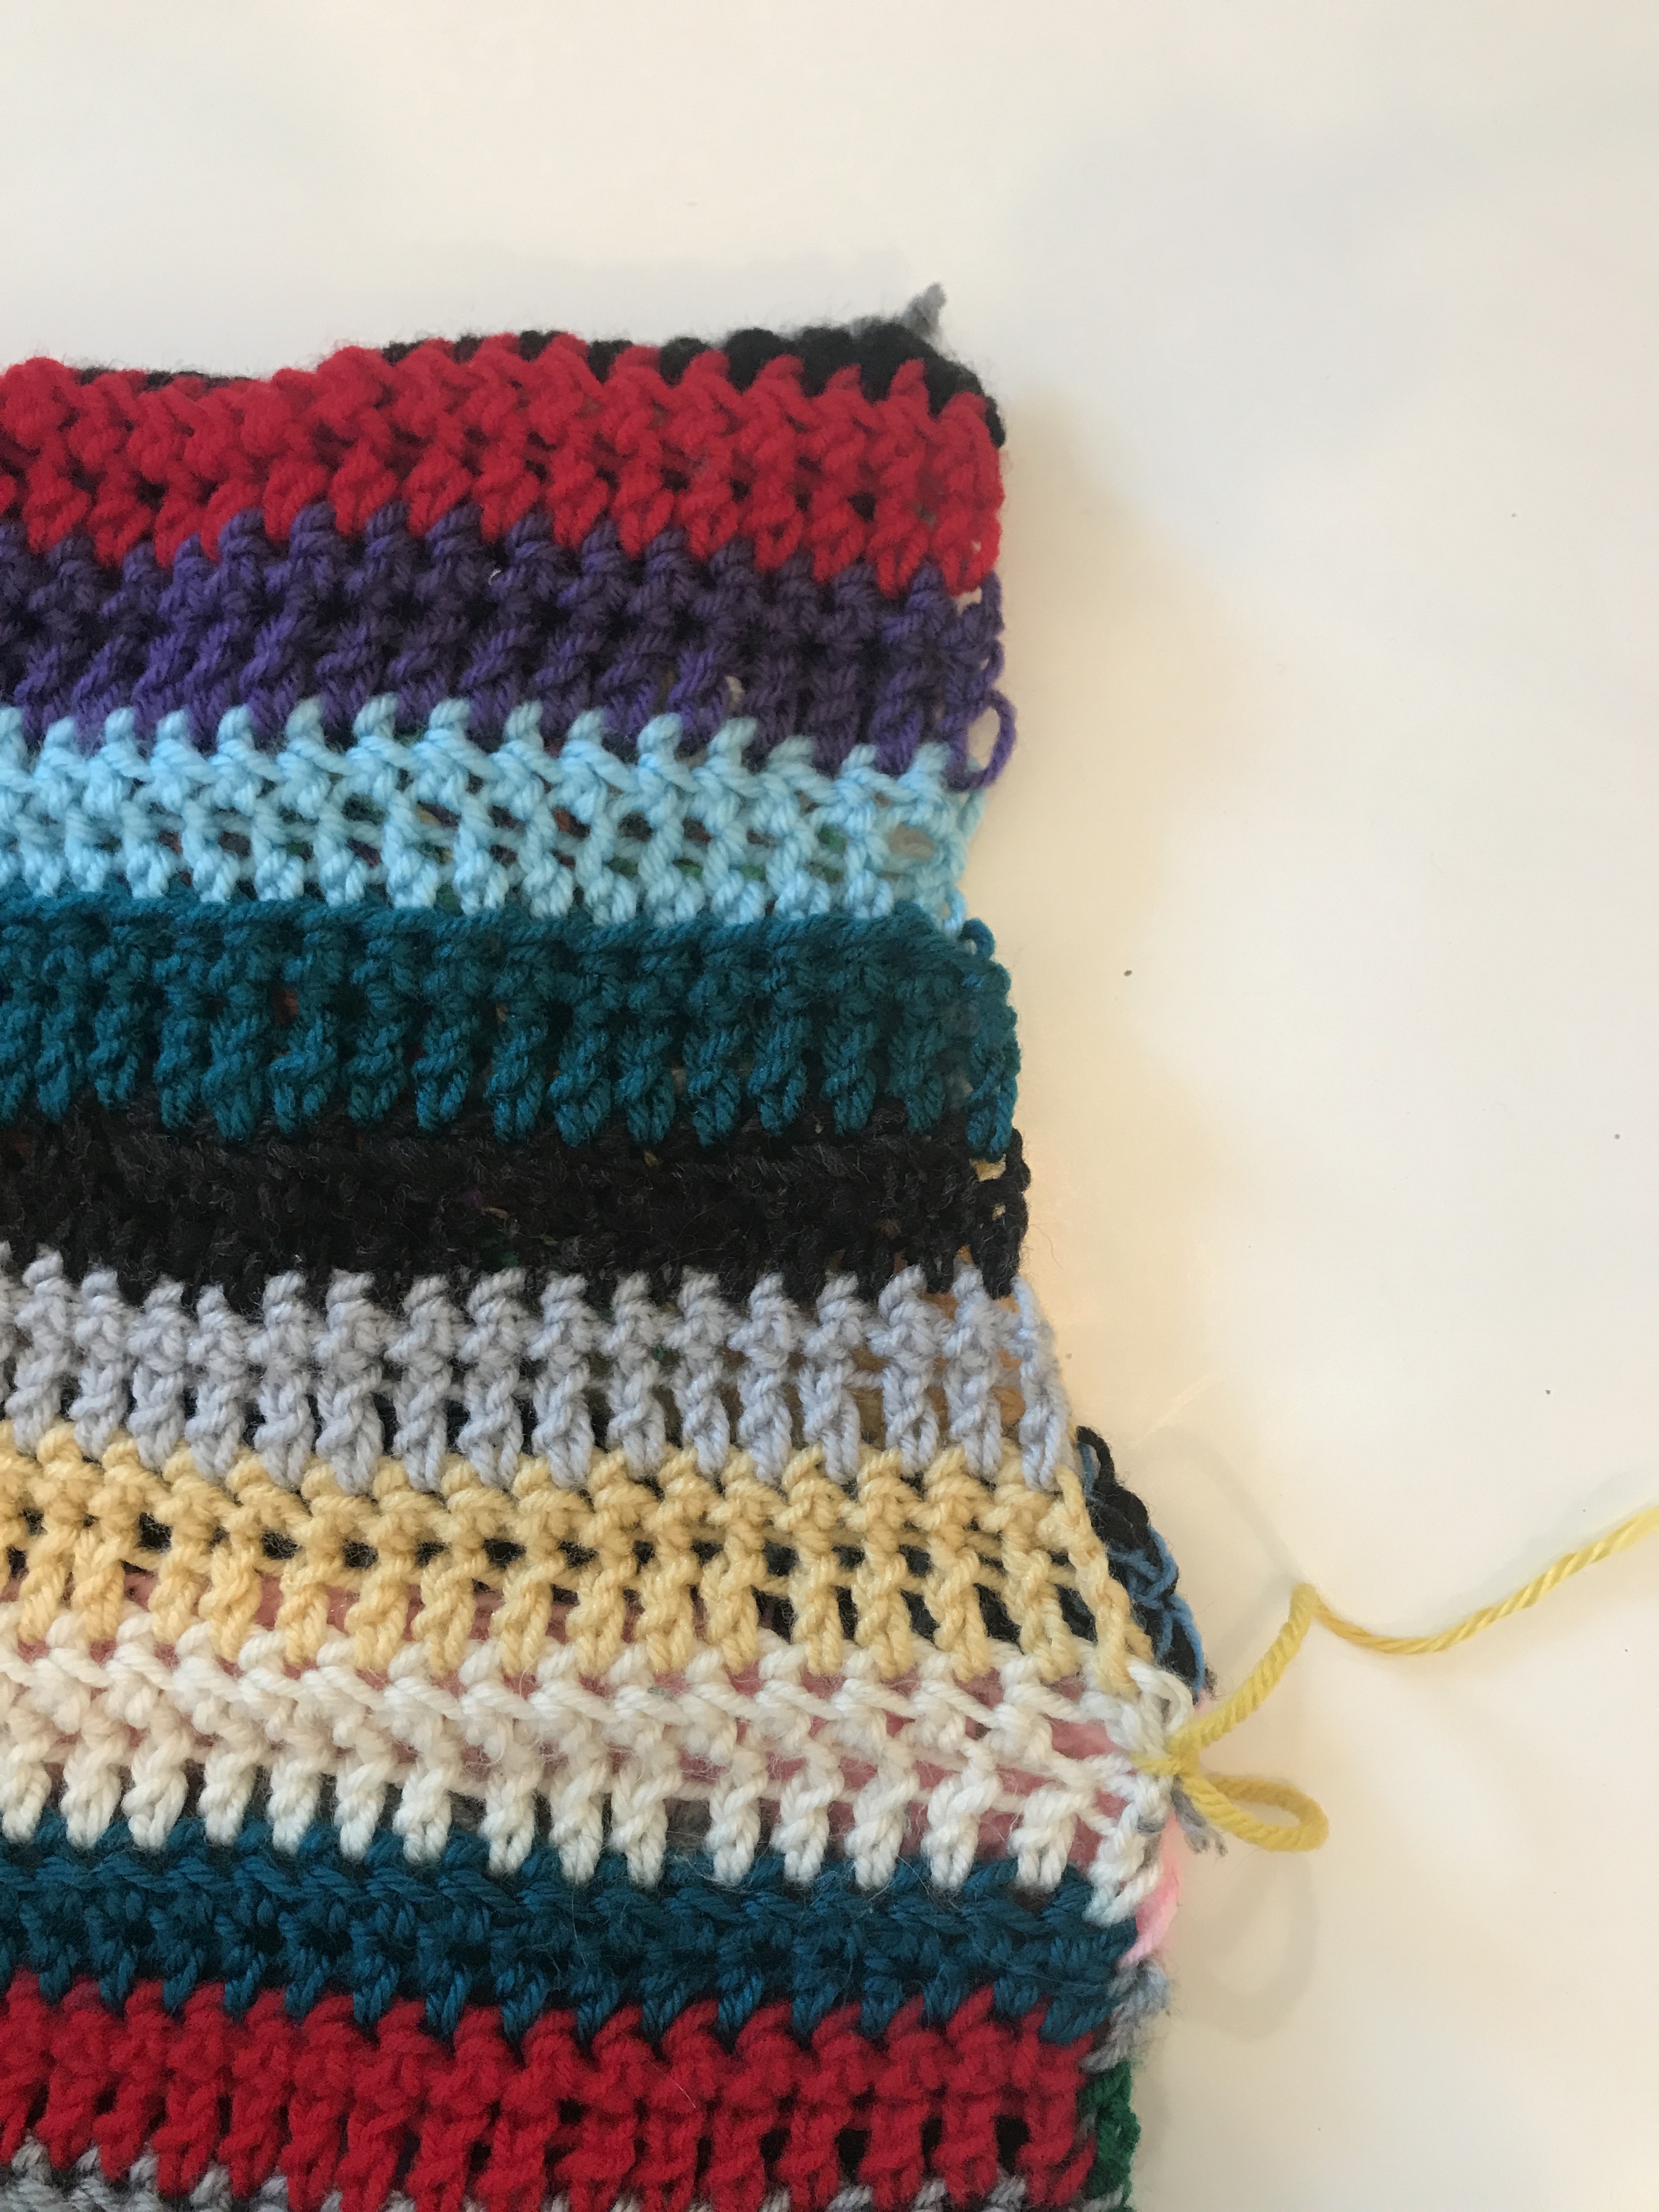
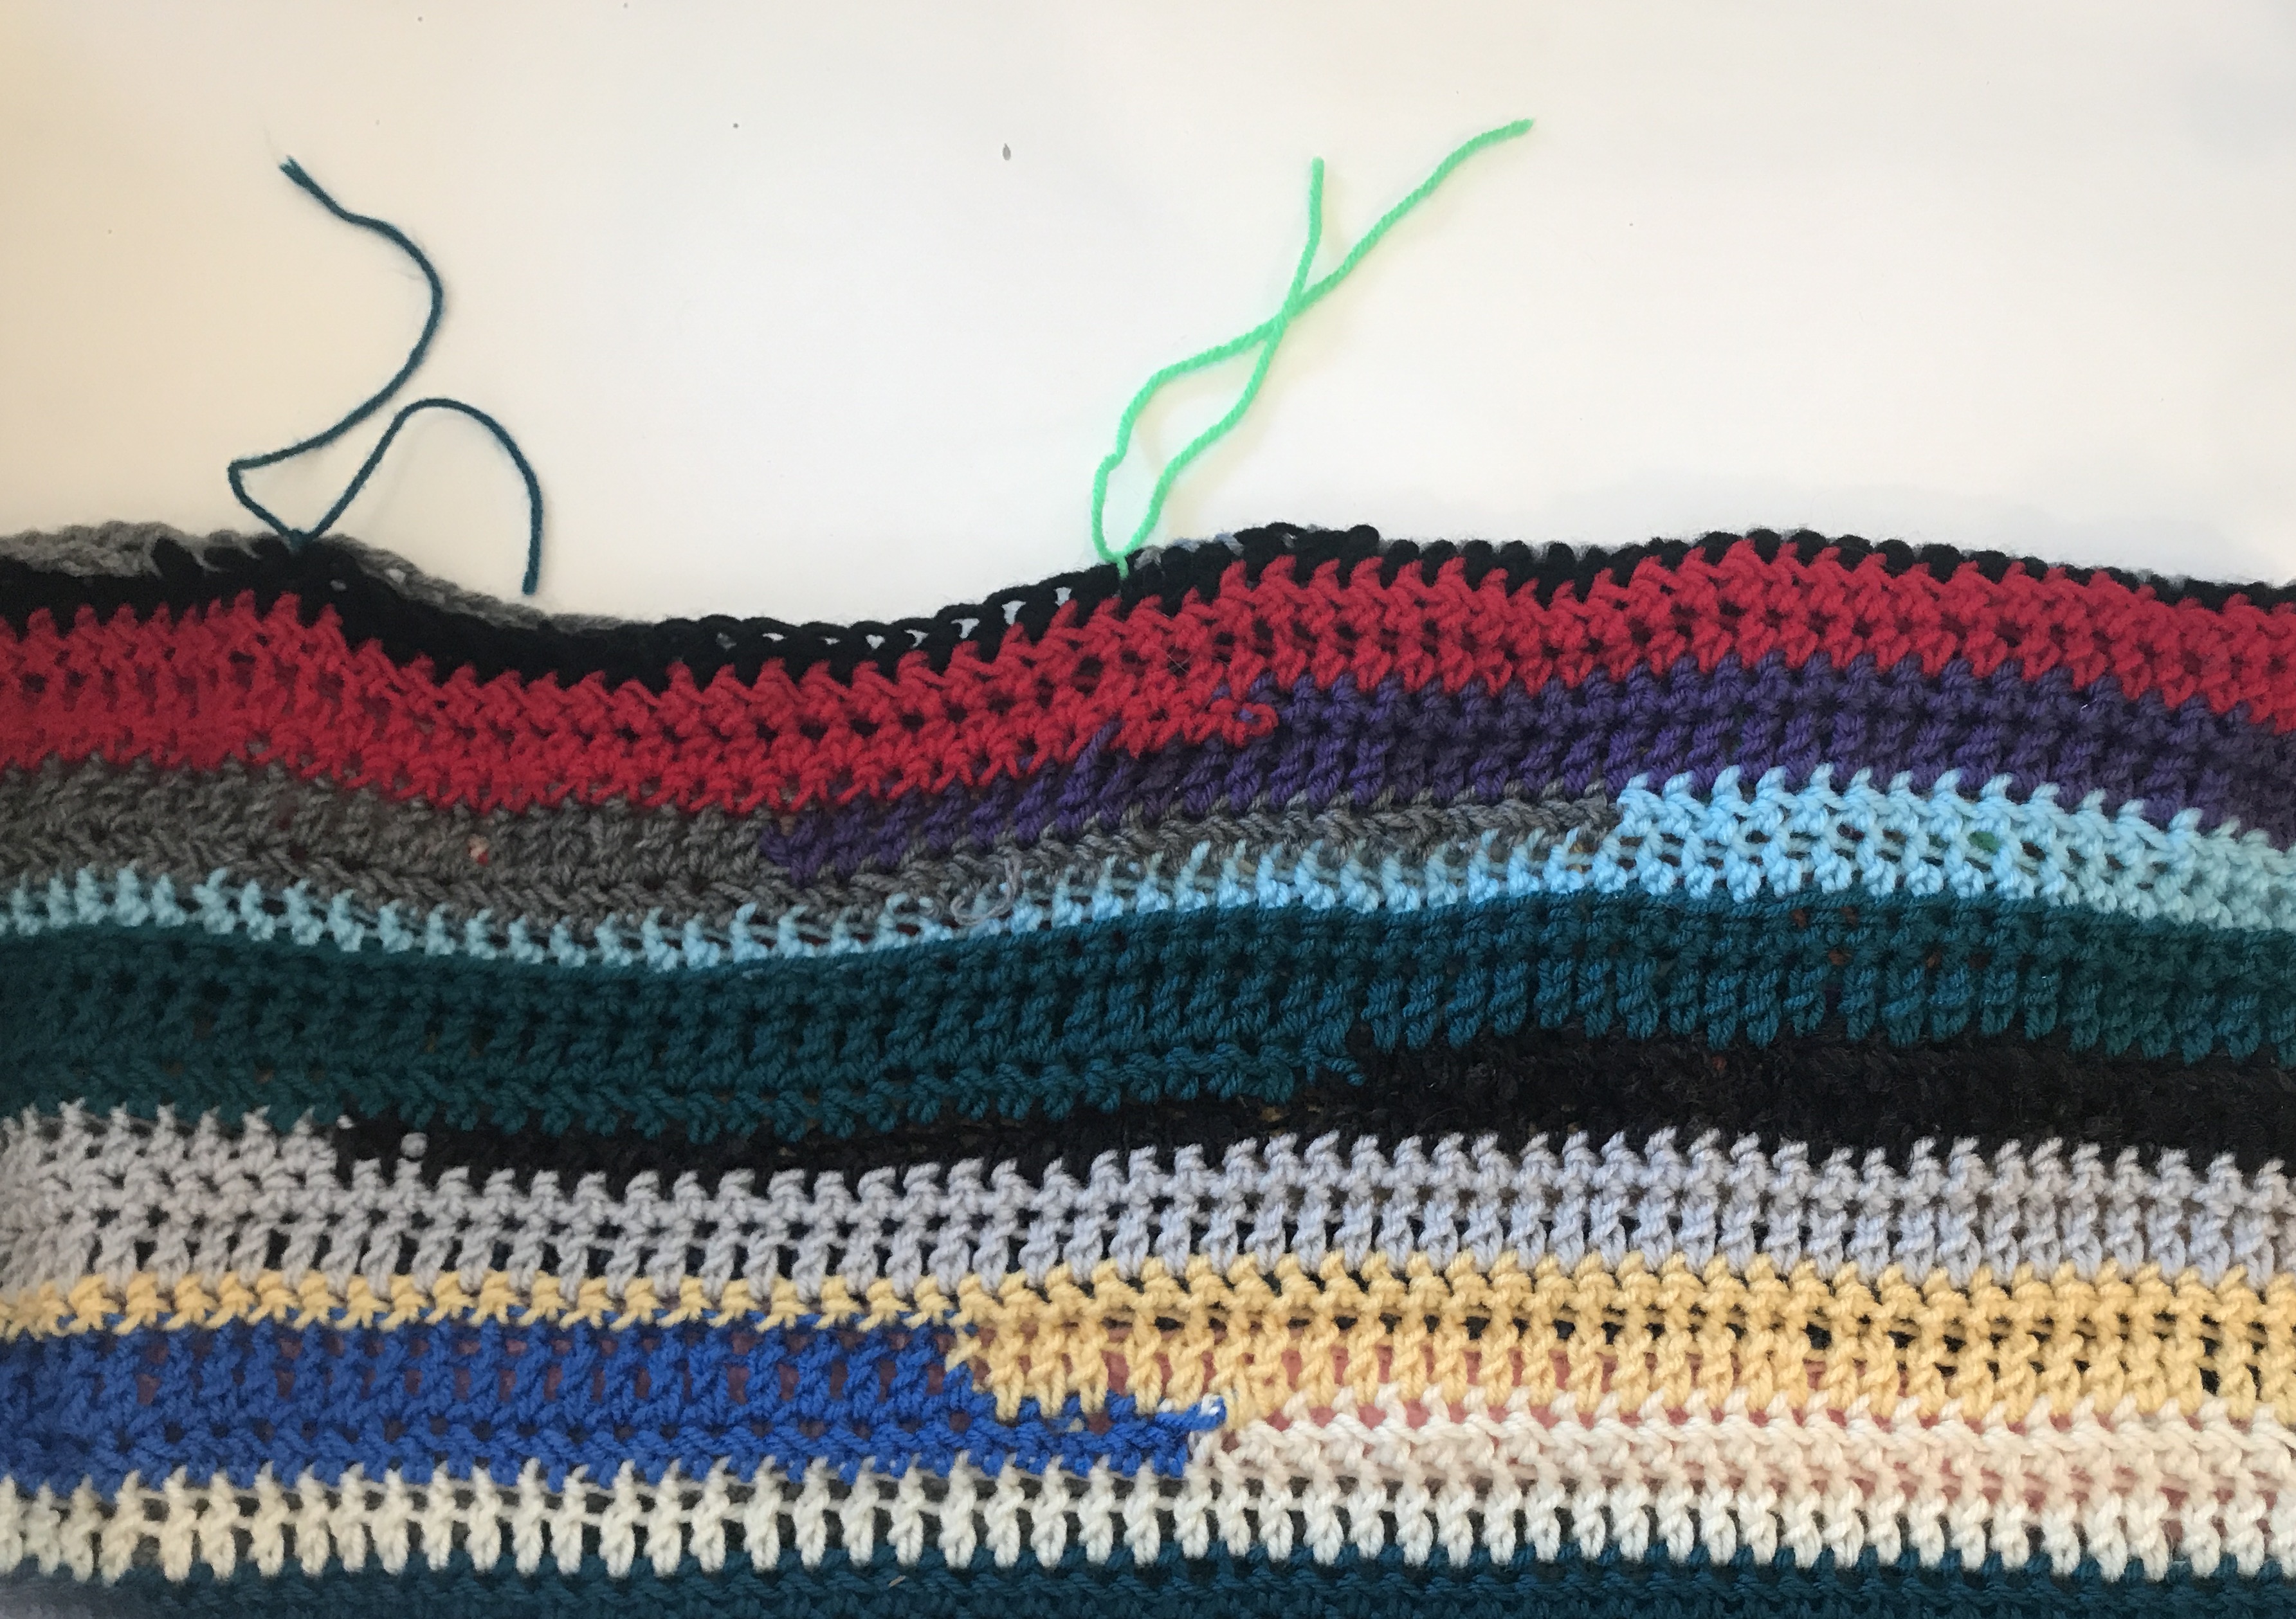
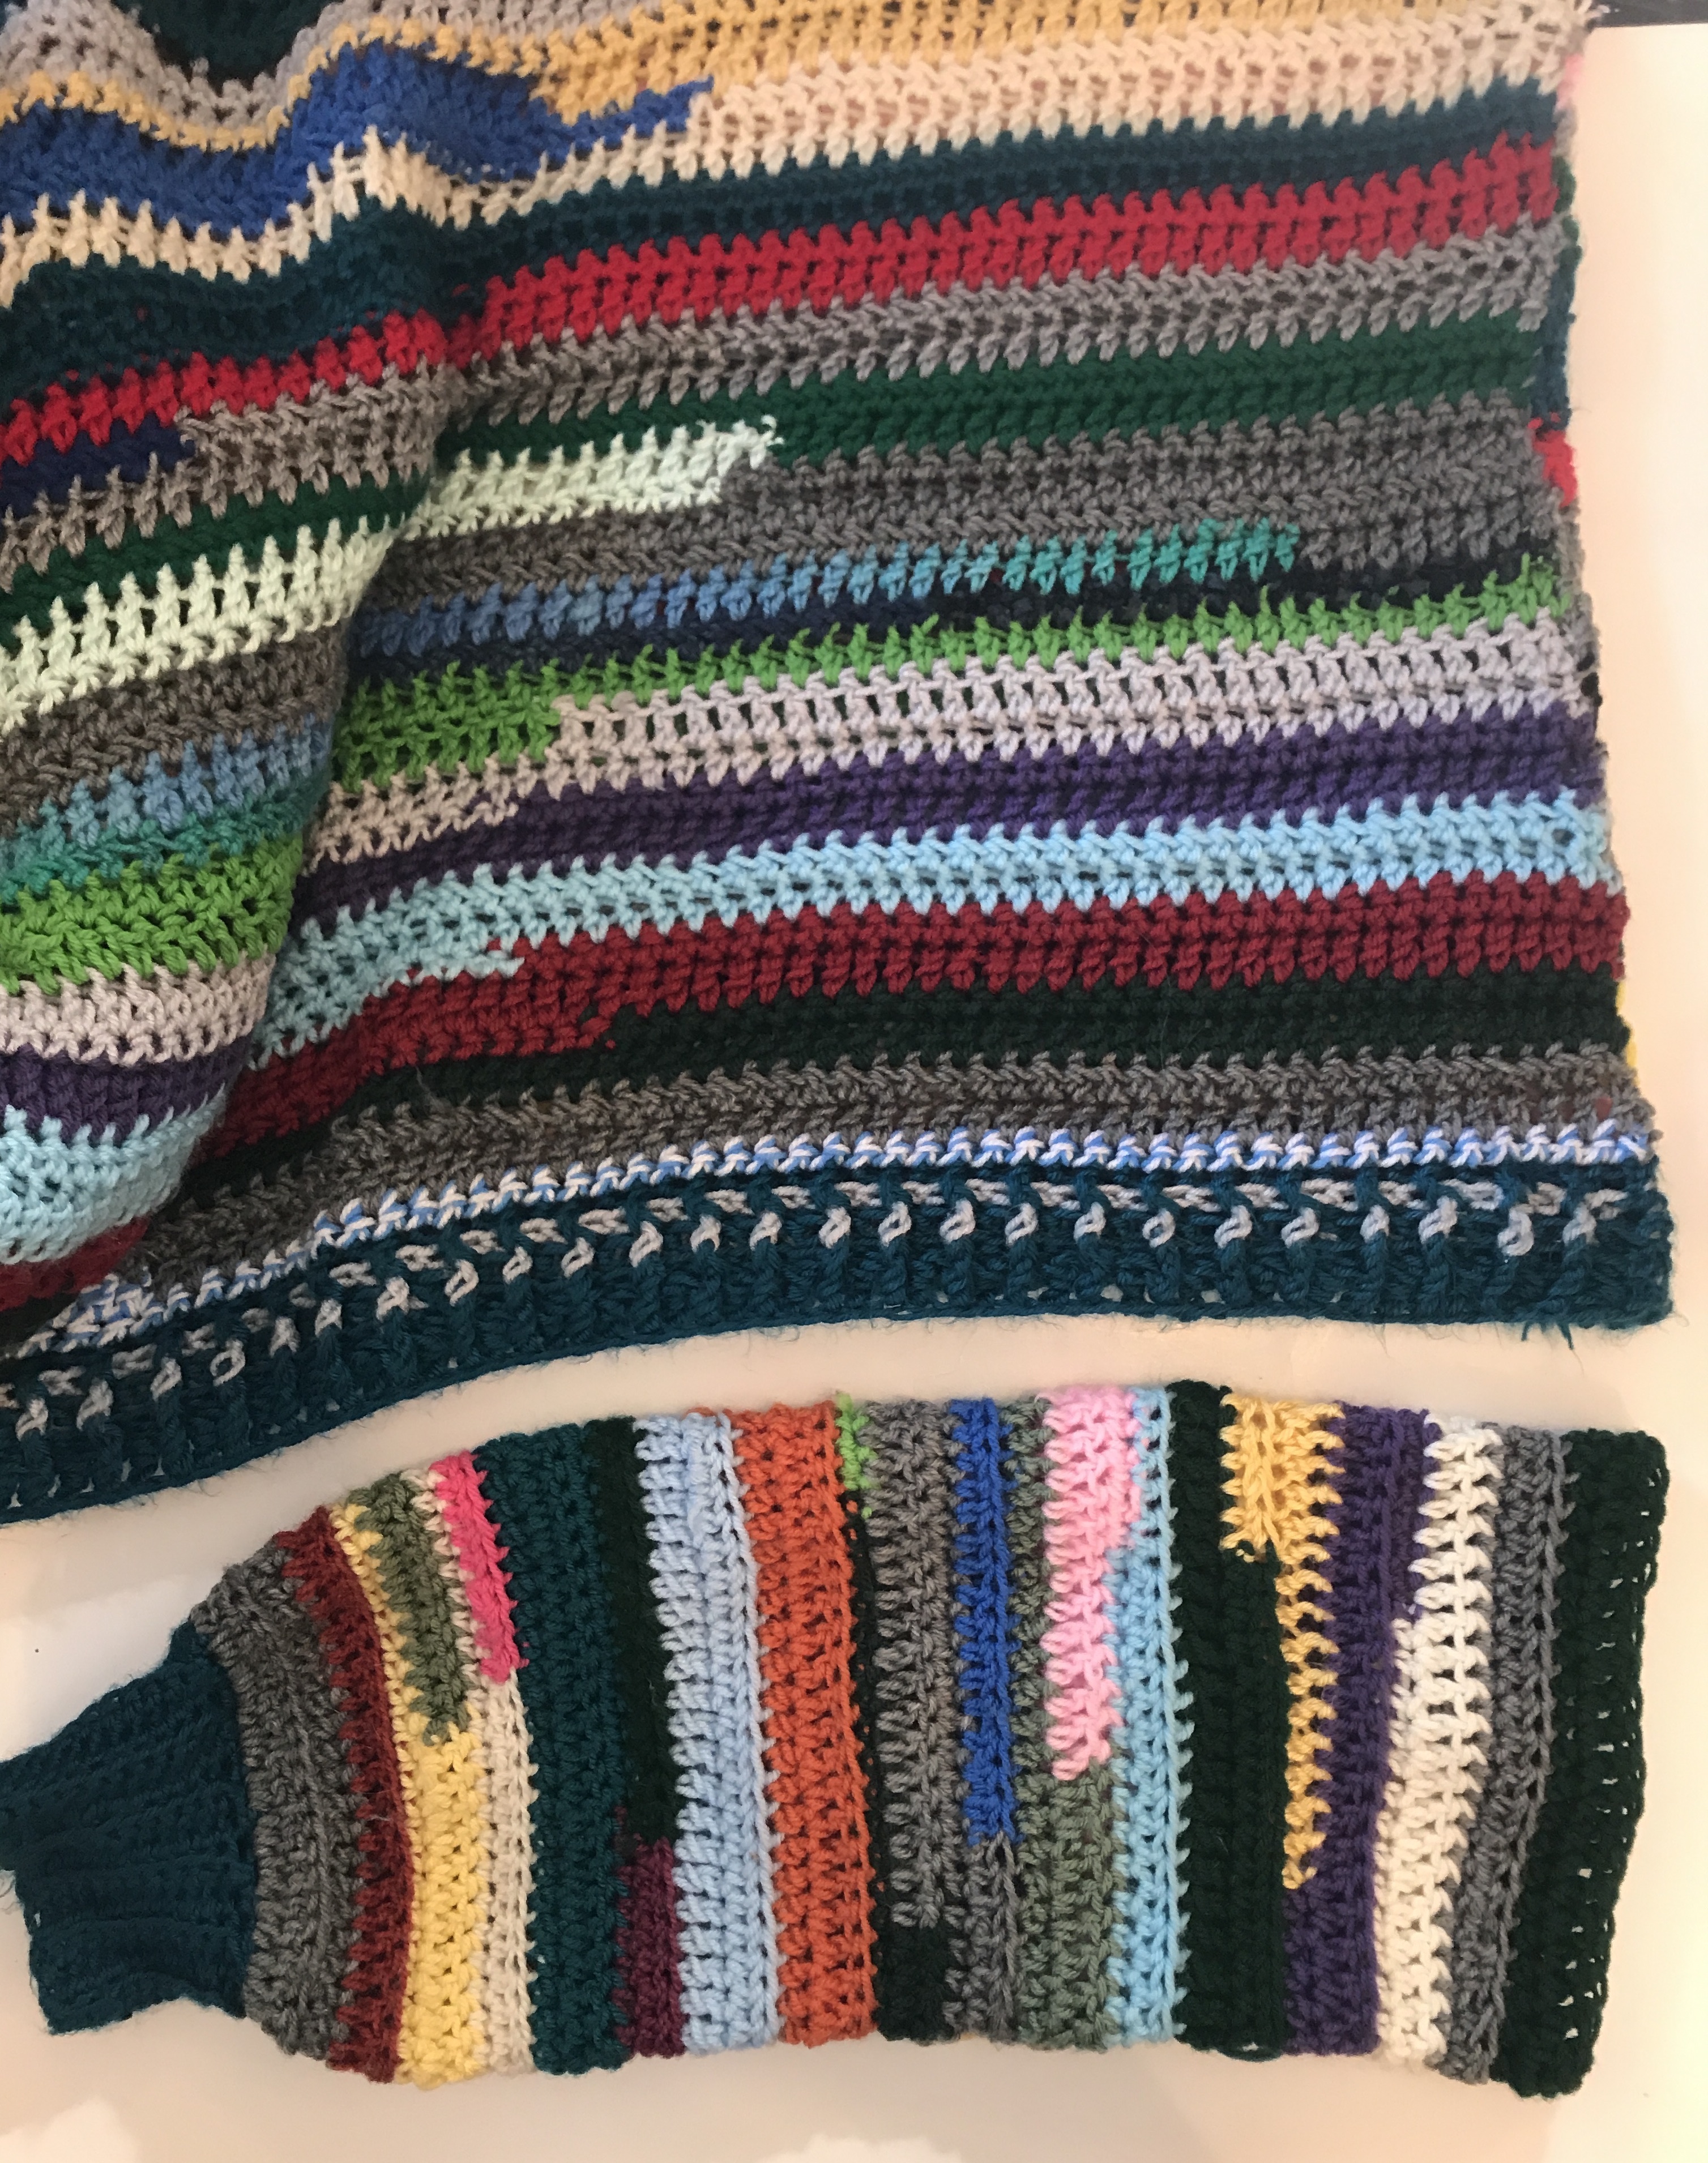
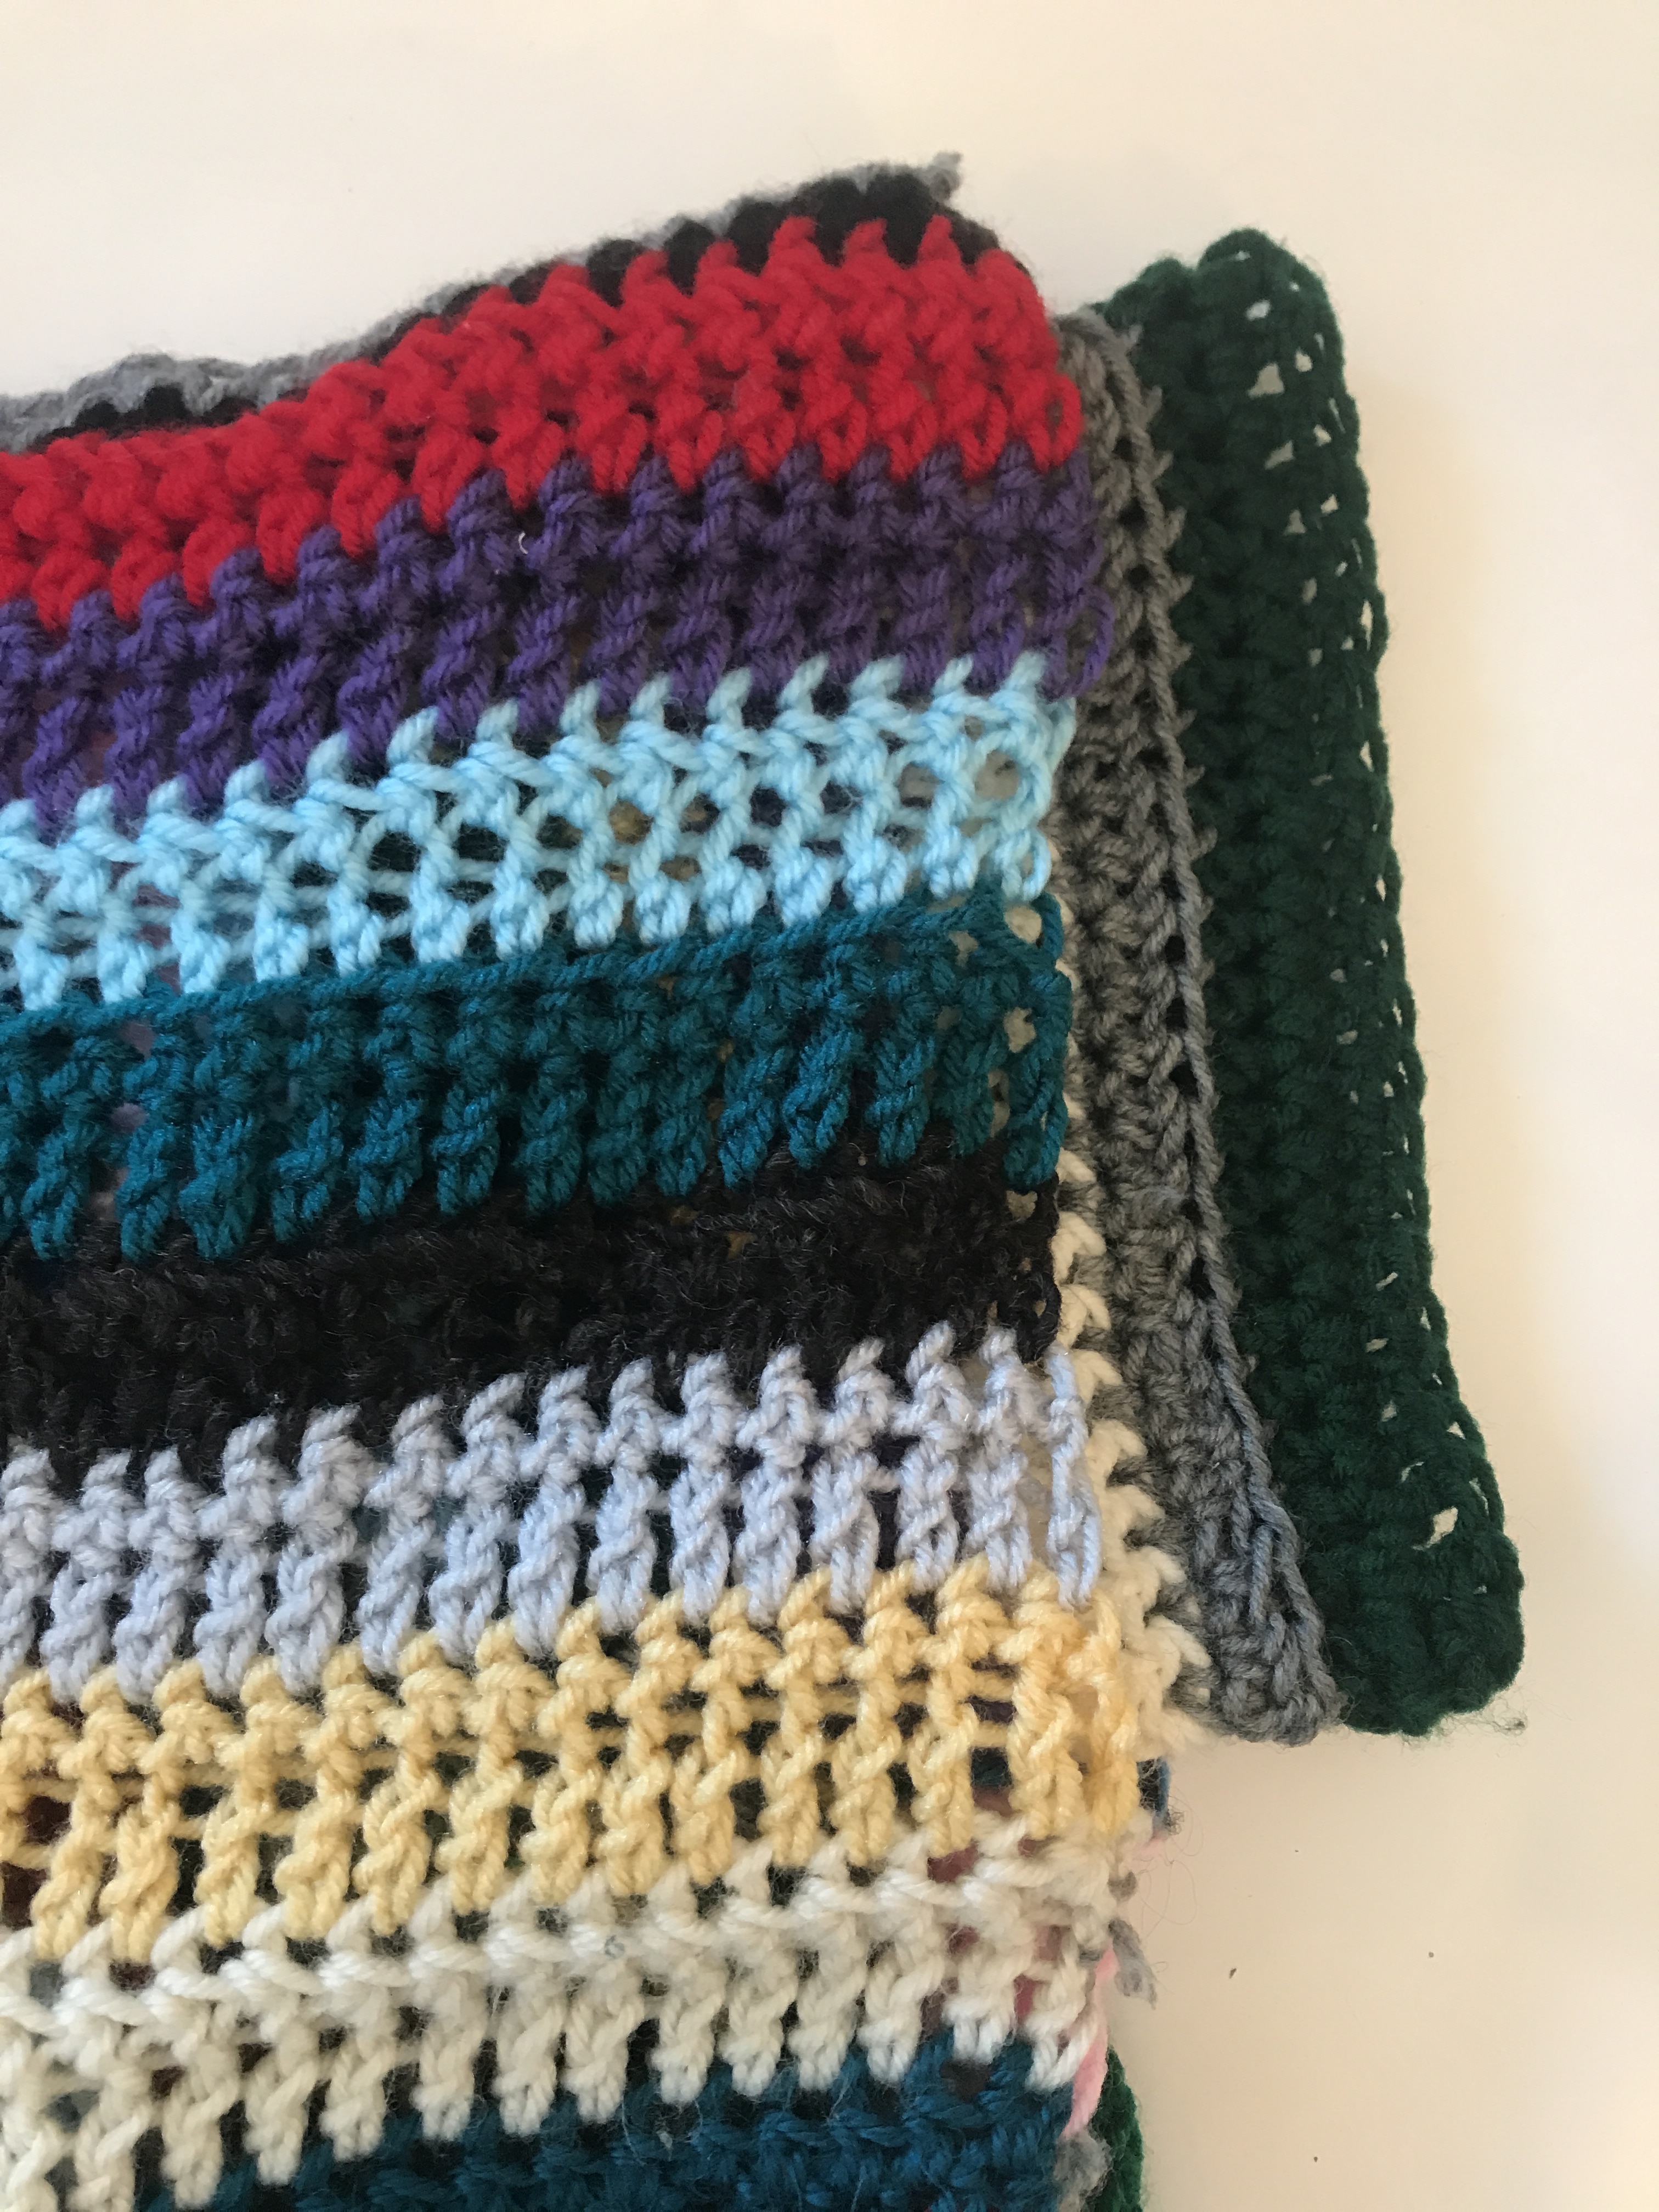
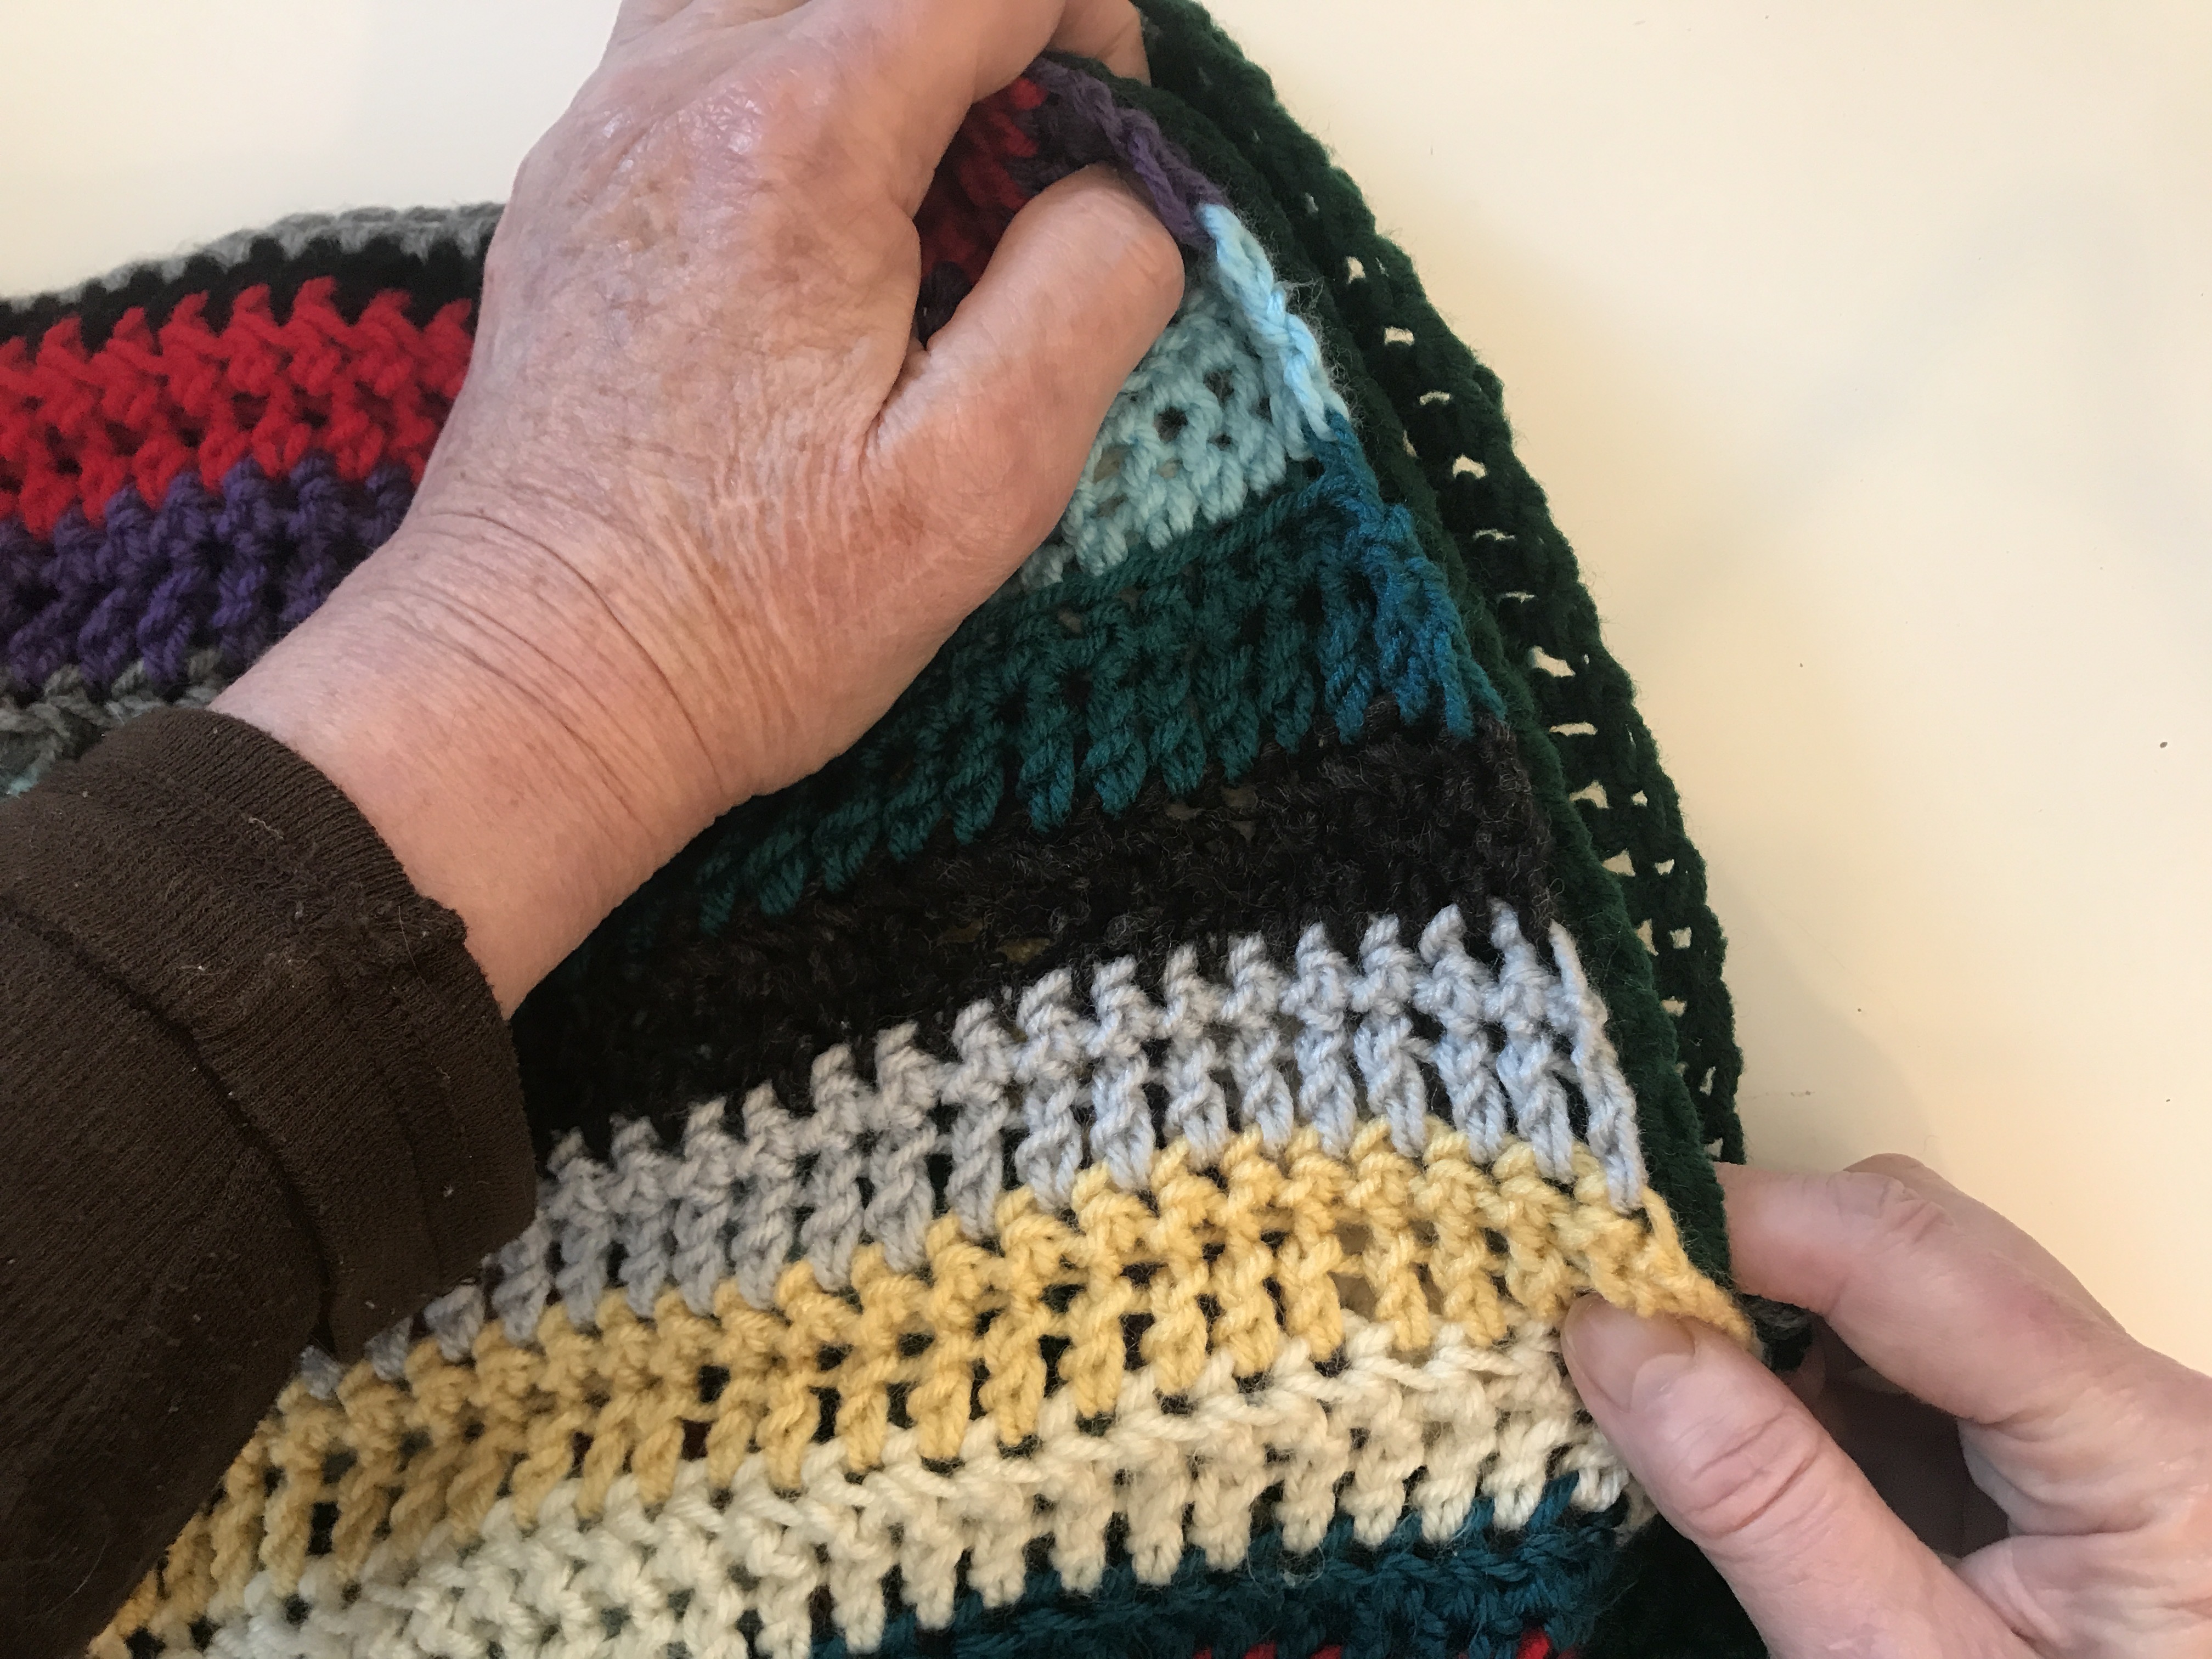
First, I personally love colour, as you may well know if you follow me and my design journey. I started out wanting to create a design that could use up those scraps of left over yarn. But I wanted to change up the idea of plain stripes , so for my first sweater I chose to change colours part way across the row as this created a lot of visual interest.
Secondly I love the texture that is created by making certain rows with back loop only stitches.
Thirdly I also switched up the stitches between single crochet, half double crochet and double crochet, and this added an extra element to the design.
Last of all I added fringes to mine and I just love them. I know fringes aren’t for everyone and of course adding fringes is completely optional.

Don’t forget to pin this post for later.
If you love adding to your crochet wardrobe you might like my Super Simple Sweater pattern and my Happy Hippy Sweater as well.
If you prefer to have the pattern in front of you instead of on the screen you can get the ad free pdf .
Get the Pattern on Etsy.

Purchase the Super Simple Sweater Pattern on Ravelry.

The Happy Scrappy Sweater Pattern
Pattern by Pam Carr ©2020
Introducing the Happy Scrappy Sweater which is made with the double crochet stitch, the half double crochet stitch and the single crochet stitch. You are welcome to play around with colours as you make your sweater. I would love to see lots of inspired colourways and palettes in this top.
Supplies you will need:
Yarn: worsted weight yarn (4) The sweater in the pictures uses Red Heart Super Saver and some other worsted weight yarns from my stash. This sweater is designed to use up your stash. You can use any worsted weight yarn. (4)
XS/S: approximately 750. yds,
Medium: approximately 900 yds,
Large: 1,092 yds.,
XL: approximately 1,300,
2X. 3/4X: approximately 1480 yds,
5x: approximately 1560yds
Hooks: Size K/10.5 – 6.5mm, For body of sweater
Size H/8 – 5.00mm hook, For sleeves
Size I/9 – 5.5mm
Size J/10 – 5.75mm For sleeves
Notions: Scissors, tapestry needle.
Gauge: 10 dc – 4 dc rows (approx.) = 4” (10 cm) with a K/10.5 – 6.5mm hook
Feel free to go up or down a hook size to get the correct gauge.
Abbreviations (uses US conventions)
-
Ch = chain
-
st = stitch
-
sc = single crochet
-
dc = double crochet
-
hdc = half double crochet
-
blo = back loop only
-
sl st = slip stitch
-
Sp = spac
This pattern uses US terminology.
The US and UK crochet terms are different, but they use the same terms to describe different stitches. Here is a simple conversion chart for anyone in the UK.
USDouble Crochet (dc)Single Crochet (sc)Half Double Crochet (hdc) |
UKTreble crochet (trc)Double Crochet (dc)Half treble crochet (htr) |
Special Stitches for this Pattern.
At the bottom of the front and back panel the ribbing at the bottom is created with alternating fpdc and bpdc stitches.
Here are the written instructions for how to do the FPDC or front post double crochet.
Yarn over, insert hook from the front side of the work to back and then to front again, around the post of the indicated stitch on the previous row; yarn over and pull up a loop (3 loops on hook), yarn over and draw through two loops, (2 loops on hook), yarn over and draw through two loops, (1 loop on hook).
And for the BPDC or back post double crochet.
Yarn over, insert hook from the back side of the work to front and to back again around the post of the indicated stitch on the previous row; yarn over and pull up a loop (3 loops on hook), yarn over and draw through two loops (2 loops on hook), yarn over and draw through two loops (1 loop on hook)
A tip to remember when working this ribbed brim.
When you work 1 front post double crochet (FPDC) around the post of the double crochet in the row below, this stitch is raised on the surface of the fabric facing you. Always make sure that the post stitches are raised to the same side in each successive row. Keep an eye on the ribs and remember: If the stitch you’re working is raised to the front, work a front post stitch; if the stitch is raised to the back, work a back post stitch.
Back Loop Only BLO
This appears after sc or dc or hdc to indicate that you do the specified stitch into the back loop only of the previous stitch. I have a video on how to find the back loop on my youtube channel. https://www.youtube.com/watch?v=pQhzE70Ov-U&t=85s
Sizes:
*This is sized big but if you like the super oversized look make the pattern for two sizes larger than your regular size.
To fit bust measurement
XS/S: 28”-34” [71-86.5]
Medium: 36-38″ [91.5-96.5 cm]
Large: 40-42″ [101.5-106.5 cm]
XL: 44-46″ [112-117 cm]
2X: 48-54″ [122-137 cm]
3/4 X: 52” [58” [132-147 cm]
5X: 60-62” [152-157cm]
NOTE: If you want to customize your sweater hold up the front panel to you and stop at the length you would like your sweater to be.
Finished size for the front and back panel.
Size |
Width |
Length |
Arm Drop |
Sleeve length |
XS |
24” |
26.5” |
8” |
17” |
S /M |
26” |
27” |
8.5” |
18” |
L/ XL |
28” |
27.5” |
9.5” |
20” |
2X/3X |
30” |
28.5” |
11” |
21” |
4X/5X |
32” |
29” |
12” |
23” |
Instructions:
NOTE:
I changed colours often to create thinner stripes but if you wanted larger blocks of colour that is totally up to you. I changed colours part way through the rows to create interest. You might want to have clean stripes starting and ending your colours at the edges.
The colours mentioned here are the ones I used from my stash and you are encouraged to change colours whenever it suits you.
The Front and Back:
This top is made with two rectangular pieces which form the back and front of the garment.
Do not count the turning ch as a stitch.
Using a K hook and Teal yarn Chain 61, (66, 71, 76, 81)
Row 1: dc into second ch from the hook and dc across, turn work 60 (65, 70, 75, 80)
Row 2: Ch 2, *FPDC in first stitch, BPDC in next st* Repeat between * and * to the end of the row. Turn work. 60 (65, 70, 75, 80)
Row 3: Ch 2, *FPDC in first stitch, BPDC in next st* Repeat between * and * to the end of the row. Turn work. 60 (65, 70, 75, 80)
Change to off white.
Row 4: Ch 2, *FPDC in first stitch, BPDC in next st* Repeat between * and * to the end of the row. Turn work. 60 (65, 70, 75, 80)
Change to teal.
Row 5: Ch 2, *FPDC in first stitch, BPDC in next st* Repeat between * and * to the end of the row. Turn work. 60 (65, 70, 75, 80)
Change to blue mix colour.
Row 6: Ch, sc into the first stitch and into each stitch across. Turn work. 60 (65, 70, 75, 80)
Change to grey part way across this next row.
Row 7: Ch2, dc into the first stitch and into each stitch across. Turn work. 60 (65, 70, 75, 80)
Row 8: Ch1, hdcblo across to the end. Turn work. 60 (65, 70, 75, 80)
Change to darker teal.
Row 9: Ch2, dc into the first stitch and into each stitch across. Turn work. 60 (65, 70, 75, 80)
Change to red part way across this next row.
Row 10: Ch1, scblo across to the end. Turn work. 60 (65, 70, 75, 80)
Row 11: Ch2, dc into the first stitch and into each stitch across. Turn work. 60 (65, 70, 75, 80)
Change to blue part way across this next row.
Row 12: Ch1, sc into the first stitch and into each stitch across. Turn work. 60 (65, 70, 75, 80)
Row 13: Ch1, hdc into the first stitch and into each stitch across. Turn work. 60 (65, 70, 75, 80)
Row 14: Ch1, hdcblo across to the end. Turn work. 60 (65, 70, 75, 80)
Change to purple.
Row 15: Ch2, dc into the first stitch and into each stitch across. Turn work. 60 (65, 70, 75, 80)
Change to light grey part way across this next row.
Row 16: Ch1, sc into the first stitch and into each stitch across. Turn work. 60 (65, 70, 75, 80)
Row 17: Ch1, hdc into the first stitch and into each stitch across. Turn work. 60 (65, 70, 75, 80)
Change to lime green part way across this next row.
Row 18: Ch2, dcblo into the first stitch and into each stitch across. Turn work. 60 (65, 70, 75, 80)
Row 19: Ch1, hdc into the first stitch and into each stitch across. Turn work. 60 (65, 70, 75, 80)
Change to variegated stash yarn.
Row 20: Ch1, hdcblo into the first stitch and into each stitch across. Turn work. 60 (65, 70, 75, 80)
Row 21: Ch2, dc into the first stitch and into each stitch across. Turn work. 60 (65, 70, 75, 80)
Change to dark grey.
Row 22: Ch1, hdc into the first stitch and into each stitch across. Turn work. 60 (65, 70, 75, 80)
Row 23: Ch1, hdc into the first stitch and into each stitch across. Turn work. 60 (65, 70, 75, 80)
Change to mint green part way across this next row.
Row 24: Ch1, scblo across to the end. Turn work. 60 (65, 70, 75, 80)
Change to forest green part way across this next row.
Row 25: Ch2, dc into the first stitch and into each stitch across. Turn work. 60 (65, 70, 75, 80)
Row 26: Ch1, hdc into the first stitch and into each stitch across. Turn work. 60 (65, 70, 75, 80)
Change to grey.
Row 27: Ch2, dc into the first stitch and into each stitch across. Turn work. 60 (65, 70, 75, 80)
Change to royal blue part way across this next row.
Row 28: Ch2, dcblo into the first stitch and into each stitch across. Turn work. 60 (65, 70, 75, 80)
Change to red part way across this next row.
Row 29: Ch2, dc into the first stitch and into each stitch across. Turn work. 60 (65, 70, 75, 80)
Change to teal part way across this next row.
Row 30: Ch1, sc into the first stitch and into each stitch across. Turn work. 60 (65, 70, 75, 80)
Row 31: Ch1, hdc into the first stitch and into each stitch across. Turn work. 60 (65, 70, 75, 80)
Row 32: Ch1, hdc into the first stitch and into each stitch across. Turn work. 60 (65, 70, 75, 80)
Change to ivory.
Row 33: Ch2, dc into the first stitch and into each stitch across. Turn work. 60 (65, 70, 75, 80)
Change to bright blue part way across this next row.
Row 34: Ch1, hdcblo across to the end. Turn work. 60 (65, 70, 75, 80)
Change to yellow part way across this next row.
Row 35: Ch2, dc into the first stitch and into each stitch across. Turn work. 60 (65, 70, 75, 80)
Row 36: Ch1, scblo across to the end. Turn work. 60 (65, 70, 75, 80)
Change to light gray part way across this next row.
Row 37: Ch2, dc into the first stitch and into each stitch across. Turn work. 60 (65, 70, 75, 80)
Row 38: Ch1, sc into the first stitch and into each stitch across. Turn work. 60 (65, 70, 75, 80)
Change to black part way across this next row.
Row 39: Ch1, hdc into the first stitch and into each stitch across. Turn work. 60 (65, 70, 75, 80)
Change to teal part way across this next row.
Row 40: Ch1, hdcblo across to the end. Turn work. 60 (65, 70, 75, 80)
Row 41: Ch2, dc into the first stitch and into each stitch across. Turn work. 60 (65, 70, 75, 80)
Row 42: Ch1, sc into the first stitch and into each stitch across. Turn work. 60 (65, 70, 75, 80)
Change to light blue.
Row 43: Ch1, hdc into the first stitch and into each stitch across. Turn work. 60 (65, 70, 75, 80)
Change to grey part way across this next row.
Row 44: Ch2, dcblo into the first stitch and into each stitch across. Turn work. 60 (65, 70, 75, 80)
Change to purple part way across this next row.
Row 45: Ch1, hdc into the first stitch and into each stitch across. Turn work. 60 (65, 70, 75, 80)

For the Extra Small size.
Change to black and chain 1, sc into the first stitch and into each stitch across.
Fasten off and weave in the ends.
*For sizes S/M, L/ XL, 2XL/3XL, 4 XL/5XL, continue on with these instructions
Change to red part way across this next row.
Row 46: Ch1, Sc into the first stitch and into each stitch across. Turn work. 60 (65, 70, 75, 80)
For the Small/ Medium size.
Change to black and chain 1, sc into the first stitch and into each stitch across.
Fasten off and weave in the ends.
*For sizes L/ XL, 2XL/3XL, 4 XL/5XL, continue on with these instructions
Row 47: Ch1, hdc into the first stitch and into each stitch across. Turn work. 60 (65, 70, 75, 80)
Row 48: Ch1, hdcblo into the first stitch and into each stitch across. Turn work. 60 (65, 70, 75, 80)
For the Large/Extra Large size.
Change to black and chain 1, sc into the first stitch and into each stitch across.
Fasten off and weave in the ends.
For the sizes 2XL/3XL, 4 XL/5XL, continue on with these instructions
Change to teal.
Row 49: Ch2, dc into the first stitch and into each stitch across. Turn work. 60 (65, 70, 75, 80)
For the 2XL/3XL size.
Change to black and chain 1, sc into the first stitch and into each stitch across.
Fasten off and weave in the ends.
*For sizes 4 XL/5XL, continue on with these instructions
Row 50: Ch1, hdcblo into the first stitch and into each stitch across. Turn work. 60 (65, 70, 75, 80)
For the 4XL/5XL size.
Change to black and chain 1, sc into the first stitch and into each stitch across.
Fasten off and weave in the ends.
If you want a longer sweater then just add more rows to customize it to your needs. Remember to finish off with a row of SC in black at the top.
Sleeves.
*If you want super long sleeves you can add some extra rows.
While making the sleeves we will be starting with an H hook and changing to an I hook and then the J Hook and then a K hook as we work our way up the sleeve.
The sleeves are worked flat and seamed. They are not worked in the round.
Cuff:
With an H-5.00mm hook and teal yarn.
Ch 13, (13, 13, 15, 15)
Row 1: Sc into the second ch from the hook, and single crochet into each st. across. Turn work, 12 (12, 12, 14, 14)
Row 2: Ch1, scblo into first st and into each st across. Turn work. 12 (12, 12, 14, 14)
Rows 3 – 18 (20, 22, 24, 24): Ch1, scblo into first st and into each st across. 12 (12, 12, 14, 14)
Turn work so you are working across the top of the cuff.
You are now working up the sleeve.
Row 1: Ch1, make 1 sc into the top of each row across, 18 (20, 22, 24, 24)
Change to an I hook.
Change to grey.
Row 2: Ch 2, make 2 dc into the first stitch, and 2 dc into each stitch across. 36 (40, 44, 48, 48)
Row 3: Ch1, hdcblo across to the end. Turn work. 36 (40, 44, 48, 48)
Change to darker teal.
Row 4: Ch2, dc into the first stitch and into each stitch across. Turn work. 36 (40, 44, 48, 48)
Change to red part way across this next row.
Row 5: Ch1, scblo across to the end. Turn work. 36 (40, 44, 48, 48)
Here is where you change to an J- 5.75 hook if you are doing the XS/S, Medium, Large and XL sizes.
Row 6: Ch2, dc into the first stitch and into each stitch across. Turn work. 36 (40, 44, 48, 48)
Change to blue part way across this next row.
Row 7: Ch1, sc into the first stitch and into each stitch across. Turn work. 36 (40, 44, 48, 48)
Row 8: Ch1, hdc into the first stitch and into each stitch across. Turn work. 36 (40, 44, 48, 48)
Here is where you change to an J- 5.75 hook if you are doing the 2X/3X, 4X/5X sizes.
Row 9: Ch1, hdcblo across to the end. Turn work. 36 (40, 44, 48, 48)
Change to purple.
Row 10: Ch2, dc into the first stitch and into each stitch across. Turn work. 36 (40, 44, 48, 48)
Change to light grey part way across this next row.
Row 11: Ch1, sc into the first stitch and into each stitch across. Turn work. 36 (40, 44, 48, 48)
Row 12: Ch1, hdc into the first stitch and into each stitch across. Turn work. 36 (40, 44, 48, 48)
Change to lime green part way across this next row.
Row 13: Ch2, dcblo into the first stitch and into each stitch across. Turn work. 36 (40, 44, 48, 48)
Row 14: Ch1, hdc into the first stitch and into each stitch across. Turn work. 36 (40, 44, 48, 48)
Row 15: Ch1, hdcblo across to the end. Turn work. 36 (40, 44, 48, 48)
Change to darker teal.
Row 16: Ch2, dc into the first stitch and into each stitch across. Turn work. 36 (40, 44, 48, 48)
Change to red part way across this next row.
Row 17: Ch1, scblo across to the end. Turn work. 36 (40, 44, 48, 48)
Row 18: Ch2, dc into the first stitch and into each stitch across. Turn work. 36 (40, 44, 48, 48)
Change to blue part way across this next row.
Row 19: Ch1, sc into the first stitch and into each stitch across. Turn work. 36 (40, 44, 48, 48)
Here is where you change to an K-6.5mm hook if you are doing the XS/S, Medium, Large and XL sizes.
Row 20: Ch1, hdc into the first stitch and into each stitch across. Turn work. 36 (40, 44, 48, 48)
Row 21: Ch1, hdcblo across to the end. Turn work. 36 (40, 44, 48, 48)
Change to purple.
Row 22: Ch2, dc into the first stitch and into each stitch across. Turn work. 36 (40, 44, 48, 48)
Change to light grey part way across this next row.
Row 23: Ch1, sc into the first stitch and into each stitch across. Turn work. 36 (40, 44, 48, 48)
Row 24: Ch1, hdc into the first stitch and into each stitch across. Turn work. 36 (40, 44, 48, 48)
Here is where you change to an K-6.5mm hook if you are doing the 2X/3X, 4X/5X sizes.
Change to lime green part way across this next row.
Row 25: Ch2, dcblo into the first stitch and into each stitch across. Turn work. 36 (40, 44, 48, 48)
Row 26: Ch1, hdc into the first stitch and into each stitch across. Turn work. 36 (40, 44, 48, 48)
Row 27: Ch1, hdcblo across to the end. Turn work. 36 (40, 44, 48, 48)
Change to darker teal.
Row 28: Ch2, dc into the first stitch and into each stitch across. Turn work. 636 (40, 44, 48, 48)
Change to red part way across this next row.
Row 29: Ch1, scblo across to the end. Turn work. 36 (40, 44, 48, 48)
For XS stop here.
Ch1, sc across to end.
Fasten off and weave in the ends.
Row 30: Ch2, dc into the first stitch and into each stitch across. Turn work. 36 (40, 44, 48, 48)
For S/M stop here.
Ch1, sc across to end.
Fasten off and weave in the ends.
Change to blue part way across this next row.
Row 31: Ch1, sc into the first stitch and into each stitch across. Turn work. 36 (40, 44, 48, 48)
Row 32: Ch1, hdc into the first stitch and into each stitch across. Turn work. 36 (40, 44, 48, 48)
Row 33: Ch1, hdcblo across to the end. Turn work. 36 (40, 44, 48, 48)
Change to purple.
Row 34: Ch2, dc into the first stitch and into each stitch across. Turn work. 36 (40, 44, 48, 48)
Change to light grey part way across this next row.
Row 35: Ch1, sc into the first stitch and into each stitch across. Turn work. 36 (40, 44, 48, 48)
Row 36: Ch1, hdc into the first stitch and into each stitch across. Turn work. 36 (40, 44, 48, 48)
For L/XL stop here.
Ch1, sc across to end.
Fasten off and weave in the ends.
Change to lime green part way across this next row.
Row 37: Ch2, dcblo into the first stitch and into each stitch across. Turn work. 36 (40, 44, 48, 48)
Row 38: Ch1, hdc into the first stitch and into each stitch across. Turn work. 36 (40, 44, 48, 48)
For 2X/3X stop here.
Ch1, sc across to end.
Fasten off and weave in the ends.
Row 39: Ch1, hdcblo across to the end. Turn work. 36 (40, 44, 48, 48)
Change to darker teal.
Row 40: Ch2, dc into the first stitch and into each stitch across. Turn work. 36 (40, 44, 48, 48)
Change to red part way across this next row.
Row 41: Ch1, scblo across to the end. Turn work. 36 (40, 44, 48, 48)
Row 42: Ch2, dc into the first stitch and into each stitch across. Turn work. 36 (40, 44, 48, 48)
For 4X/5X stop here.
Ch1, sc across to end.
Fasten off and weave in the ends.
Construction.
Sewing together the front and back panels.
Place one panel with the right side facing up and lay the second panel on top of it with the right side facing down. (right sides together).
Side seams.
Measure down 7.5-8” (8.5”, 9.5”, 10”. 10.5”, 12”. 12.5”) from the top on each side sweater and mark with stitch markers or a short piece of yarn. This top opening will be where you attach the sleeves later.
Note: This measurement is a guide and you can adjust it to fit your sleeve if you need to.
Use pins or stitch markers to join the back and front as you go down the side seams matching up the stitch sections until you get to the bottom edge of the panels.
Using the whip stitch or your preferred method, of sewing, start at the bottom and sew the back and the front sides together. Make sure you are matching the stitch sections at you go. Stop when you get to the stitch marker at the bottom of the arm hole.
Finish off and weave in the ends.
Do the same on the other side of the sweater.
Finish off and weave in the ends.
Shoulders.
Measure in from each side 6” (7”, 7.5”, 8”, 9”, 9.5”, 10.5”) and place stitch markers to mark where the shoulders are to be sewn on either side of the neck space.
Note: This measurement is adjustable to fit your body type and how big you want the opening to be. Each body type is different. After sewing the shoulders, try it on and see how you like the fit.
Using yarn that best matches the top of the panels, whip stitch across the shoulder to the neck opening, being sure to match the stitches from either side along the top of the panels.
Stop when you reach the neck opening and make a few extra stitches to secure the opening. Fasten off and weave in the ends.
Repeat for the other shoulder.
Fasten off and weave in the ends.
Sleeves.
Fold a sleeve with the right sides together and whip stitch up the seam from the wrist to the top of the sleeve. Be careful to match the rows as you sew the seam.
Finish off and weave in the ends.
Repeat for the second sleeve.
Putting in the Sleeves.
Turn the sweater so that the right side are facing each other as it lays flat. The wrong side is facing outwards. Lay it flat on a surface with the shoulders and neck at the top.
Turn one sleeve so that the right sides are facing outwards.
Turn the sleeve so the top opening is facing to the right side and the seam is at the bottom. The cuff is on the left side.
This is how the sweater body and sleeve look in preparation for fitting the sleeve.
Open the bottom of the sweater and slide the sleeve up to the right arm hole opening.

Position it so the underarm sleeve seam matches up with the side seam on the left of the sweater and the top of the sleeve matches up with the shoulder seam of the sweater. Fasten in place with stitch markers or pins.
Using yarn, start at the underarm seam and whip stitch the arm to the body of the sweater.
Fasten off and weave in the ends.
Now take the other arm making sure the right sides are facing outwards. Turn the sleeve so the top opening is facing to the left side and the seam is at the bottom. The cuff is on the right side.
Open the bottom of the sweater and slide the sleeve up to the left arm hole opening.
Position it so the underarm sleeve seam matches up with the side seam on the right of the sweater and the top of the sleeve matches up with the shoulder seam of the sweater. Fasten in place with stitch markers or pins.
Using your yarn and yarn needle, start at the underarm seam and whip stitch the arm to the body of the sweater.
Fasten off and weave in the ends.
Turn the sweater inside out and you can admire your Happy Scrappy Sweater.
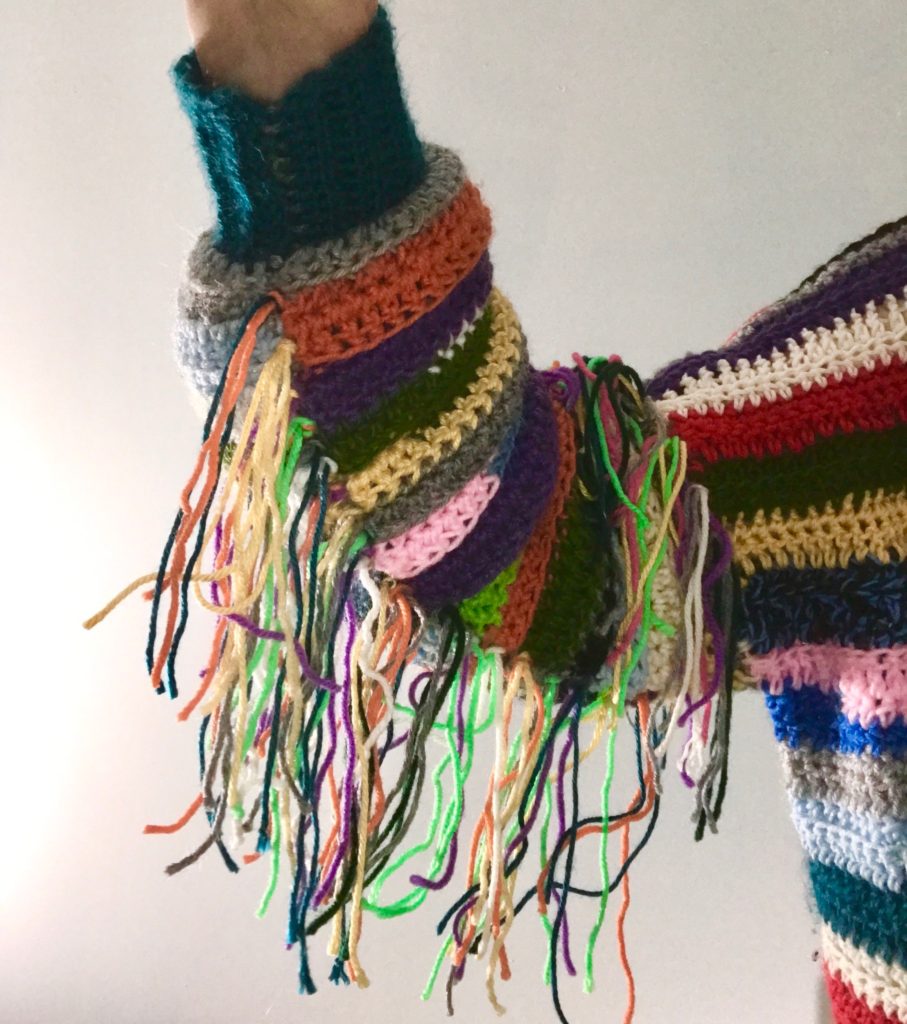
Fringes:
I thought it would be fun to add some fringes to this sweater. This is of course, completely optional.
Shoulder Fringes.
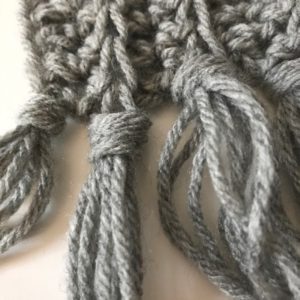
For the fringe to be approximately 6” long, cut strands of yarn that are 12” long.
For the drop shoulder fringe, each fringe has three, 12” strands of yarn, which are folded, (put the ends together and create the loop that can be threaded into the bottom of the shawl and then knotted on.) This creates a 6 stranded fringe.
I use a crochet hook to pull the loops through and then thread the long fringe through the loop and pull tight to create the knot.
Insert your crochet hook up and through stitches on the seam where the arm joins the body of the sweater, do this with the right side of the work facing you.
Grab the loop created by folding the strands of yarn. Use a hook that is big enough to hook the yarn and pull through the loop.
Always pull the fringe loop through from the same direction so the knots all match
.
Enlarge the loop you have pulled down so it is big enough to bring the long strands down and thread them through this loop.
Pull the loop tight and move on to the next fringe.
I started my shoulder fringes at the point where the shoulder seam was and worked out in both directions from there. You can add as many fringes as you like.
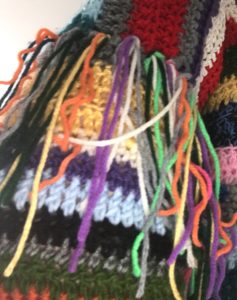
Arm Fringes.
Cut the arm fringes in the same way as the shoulder fringes. They are also 12” strands.
For the arms I used two strands of yarn to make a four stranded fringe once it is folded in half. This makes a less dense fringe.
Where to put the arm fringes.
I placed my arm fringes along the seam at the bottom of the sleeve. I started adding fringes about 3-4 inches down from the underarm join.
I carried my fringes down to the cuff as seen in the picture.
These fringes are so much fun and I love mine. They are not for everyone and the sweater looks fantastic without the fringes.
I hope you have fun with your Happy Scrappy Sweater and please keep checking back for my new patterns.
If you have any questions or need help with the patterns, please email me at carrowaycrochet@outlook.com, and Iʼll be glad to help you
Friday’s Freebie.
Here is today’s Friday’s Freebie Pattern for you.
This pattern is free for Friday January 30th and Sunday Feb 1st.
How to Get Your Friday’s Freebie PDF download.
Click on the image below and it will take you to the pattern listing on Ravelry.
Next click on ‘Buy Now”
At the checkout enter the coupon code FREEBIE26
Click on the apply coupon code.
DOWNLOAD YOUR FREE PATTERN.
Other Patterns You May Like.
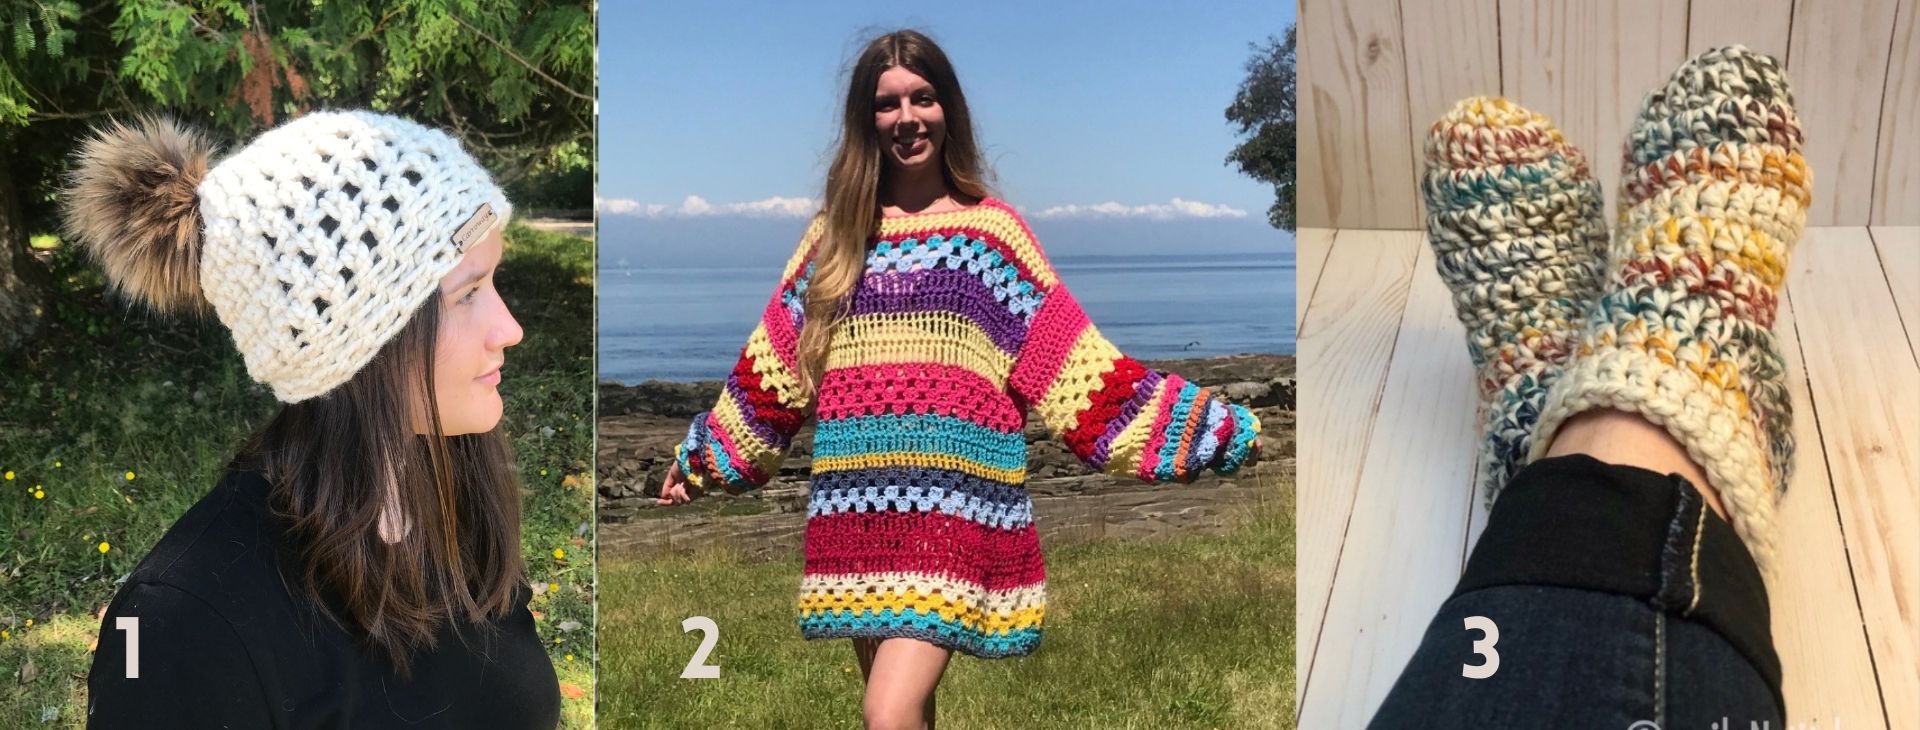
1. The Freedom Beanie.
2. The Happy Hippy Sweater
3. The Warmest Feet Ever Slipper Socks.
More Places to Find Crochet Free Patterns:
If you love crochet, you can find over a thousand free crochet patterns including some for crop tops and bralettes over at All Free Crochet
I am honoured to have my free crochet bralette pattern, the Earth Mother Bralette Pattern added to the All Free Crochet site.
It is a great resource for crochet lovers and I am proud to also have my Take Me Outside Infinity Scarf Pattern posted over on the All Free Crochet Site.
 It is a great resource for crochet lovers and I am proud to also have my
Selling items made from my patterns?
You are more than welcome to sell items made from my pattern. Please do share my link and tag and help promote it on social media. Thank you.
If you have any questions or need help with the patterns, please email me at carrowaycrochet@outlook.com, and Iʼll be glad to help you.
Thank you again for trying my pattern, I hope you enjoy it! Please share pictures of your completed items on Instagram and Facebook. Tag them @carrowaycrochet #carrowaycrochet on Instagram.
Find other patterns by Carroway Crochet in my Etsy Shop and on Ravelry.
Let’s Share and Connect!
Thank you for trying my free crochet sweater pattern, I hope you enjoyed it! Please share pictures of your completed Happy Scrappy Sweater on Instagram and Facebook. Tag them @carrowaycrochet #carrowaycrochet and #happyscrappysweater on Instagram.
Thank you so much for visiting me here at Carroway Crochet .
Find other patterns by Carroway Crochet in my Etsy Shop and on Ravelry.
Other places you can find me are:
YouTube
X
TikTok
Ravelry
This design, written work and images are a copyright of
©CarrowayCrochet and may not be copied or reproduced in any way.
You have permission to sell finished products made from this pattern, but please leave a link to my blog, www.carrowaycrochet.com in your product listing specifying that I am the designer of this pattern.
Thank you.
Please follow and like us:
One thought on “The Happy Scrappy Sweater.”
Comments are closed.