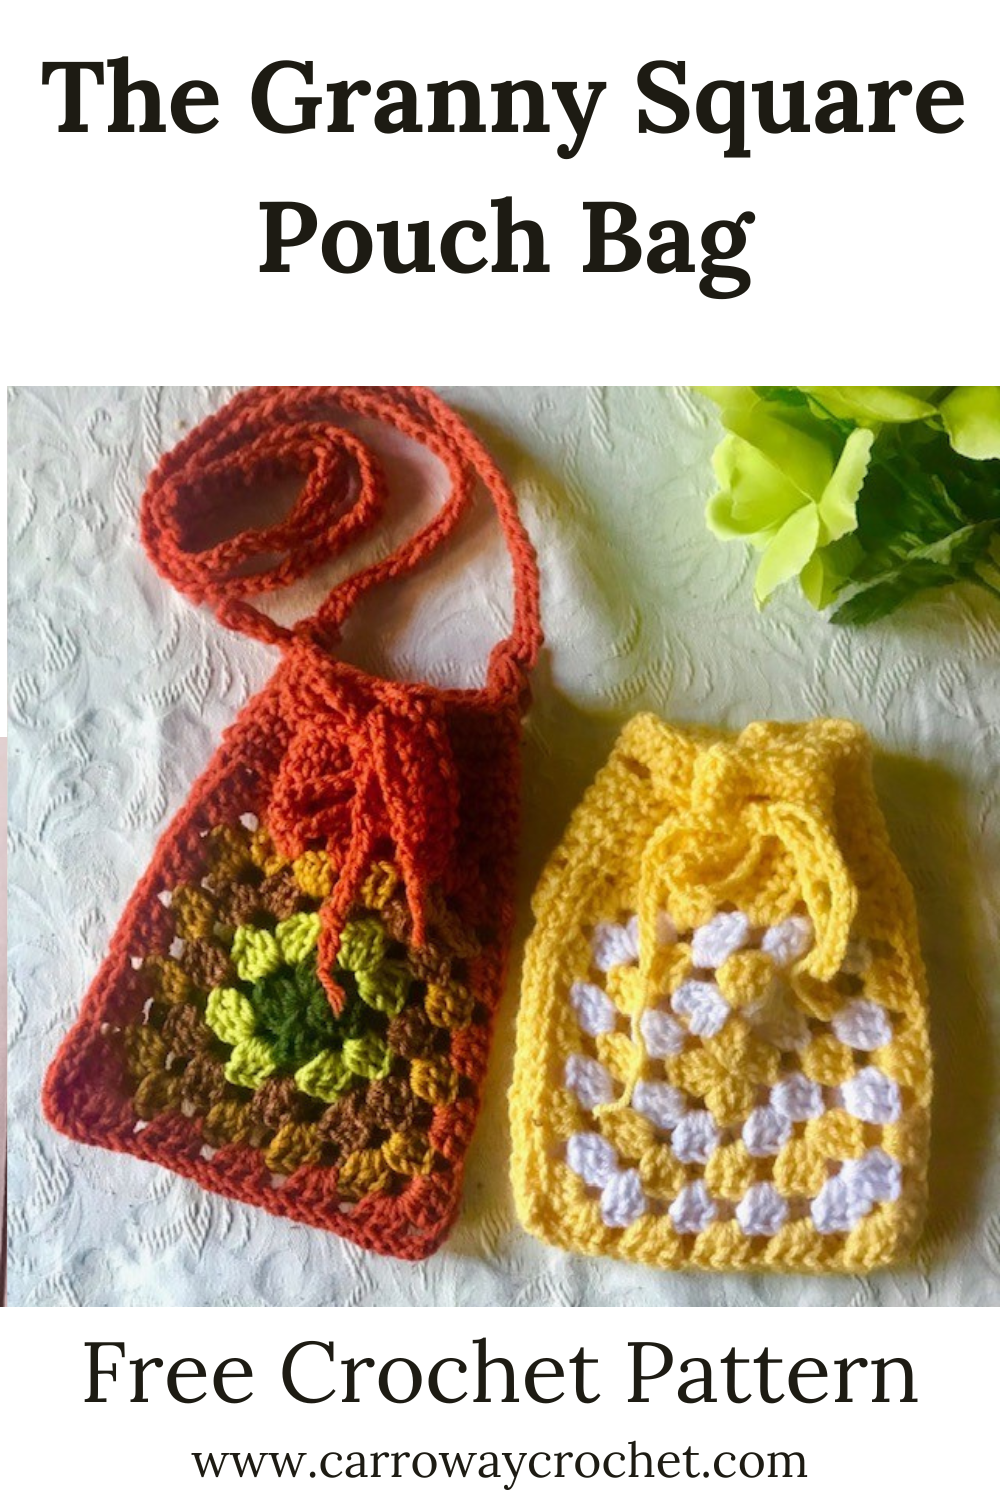
How to Crochet a Granny Square Pouch Bag

How to Crochet a “Granny Square Pouch Bag”
Have you ever wondered how to crochet a granny square pouch bag?
You need look no further. Here is a great tutorial on How to Crochet a Granny Square bag. This bag is a pouch style bag that you can add an removable strap to. The Granny Square Pouch Bag is clutch style bag but by adding the strap it doubles as a cross body bag. This free granny square pouch bag pattern is a great way to learn how to crochet a granny square pouch bag.
Why Learn How to Crochet a Granny Square Pouch Bag.
Learning how to crochet a granny square pouch bag is lots of fun. It can start you on your journey into the world of the granny square. This allows you to make so many cute boho styled items, blankets, so many home decor items, garments, and there are endless possibilities when it comes to granny square bags.
This boho inspired pouch bag is perfect for spring and summer days on the beach and for magical festival experiences. This small pouch bag has a draw string to pull the top closed and you have the option to add a strap if you would like one.
Learning how to crochet this granny square pouch bag means you can make yourself a cute bag that is just the right size for carrying your phone and sunglasses, your suntan lotion and other accessories.
The Granny Square Pouch Bag is so handy for short or long shopping trips as it will accommodate your change purse and all your cards. You can make it with your choice of worsted weight yarn, either acrylic or cotton, just look for the number (4) on the yarn label. You can also line this bag if you choose to.
I absolutely love granny squares and as spring approaches I have been exploring some ideas on how to use granny squares in fun and useful ways.
The traditional granny square pattern is one you can use for many things. My Granny Square Bucket Hat uses this square pattern.
I decided to make my pouch with worsted weight (4) yarn, or Aran in the UK, I felt this was the perfect yarn for this small bag as it helps it hold its shape.
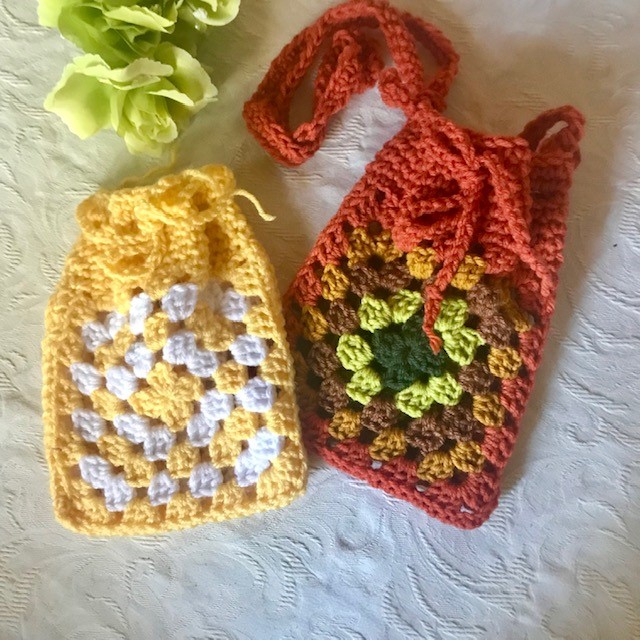
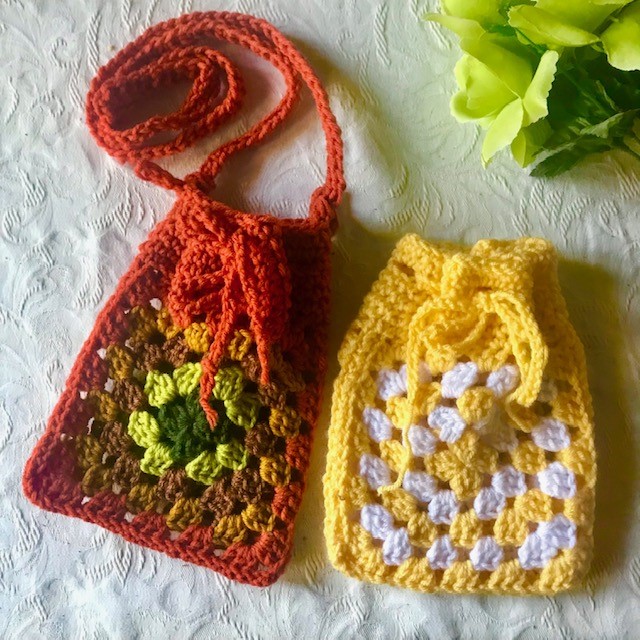
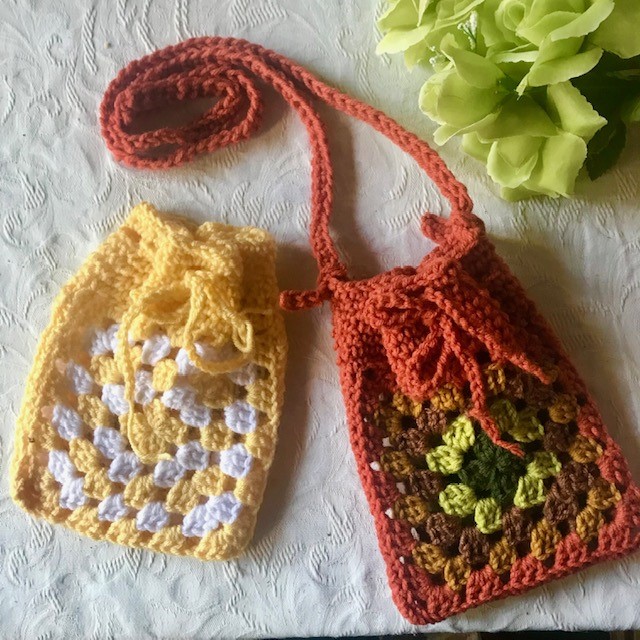
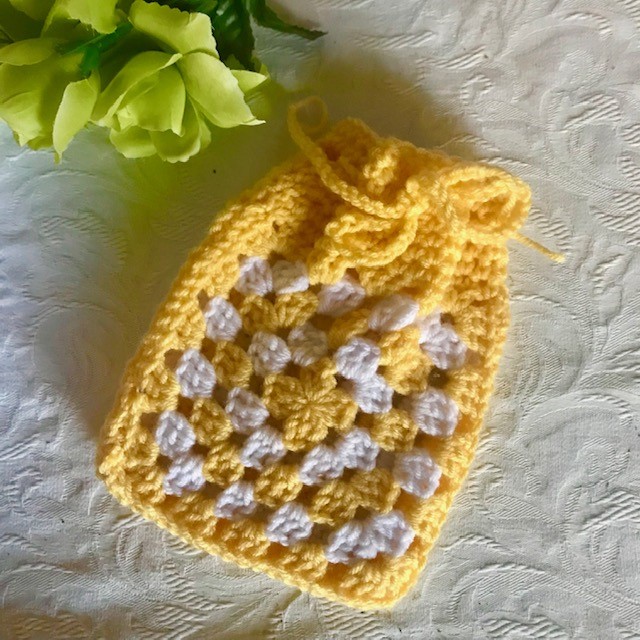
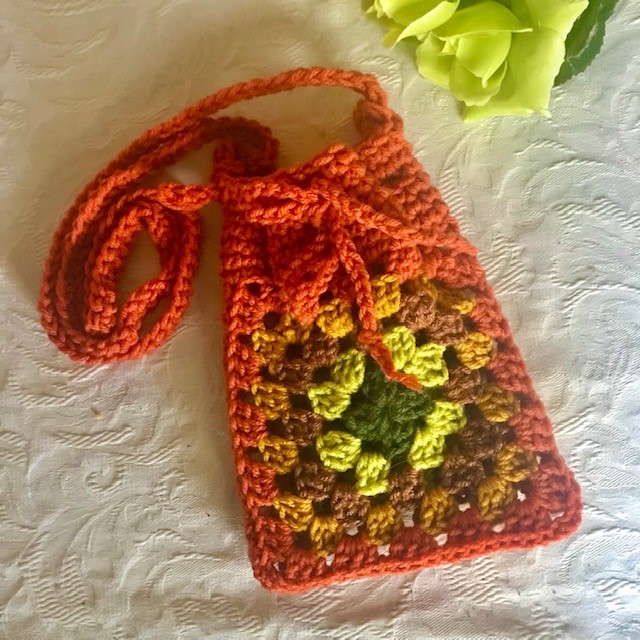
I chose two colour combinations for my prototype Pouch Bags. The first pouch I made was with yelow and white and I loved it. Then I thought I would try it with more autumnal colours and changed colours with each round. I am really happy with how both of the pouch bags turned out.
**This post contains affiliate links. If you make a purchase using some of my links I may receive a small commission at no extra cost to you.**
Sign up for my Email List for Free Patterns and all my Crochet News.
Please follow me on Facebook.
Get the latest updates on free patterns and new designs as well as videos and crochet news on my facebook page. You will also get the updates on new blog hops I host or new pattern releases.
There is also a Facebook Group for the Carroway Crochet Community.
If you like to share your latest projects and be a part of our crochet community you can also join my Facebook Group.

About the Granny Square Pattern.
When you are learning how to crochet a granny square pouch bag the first thing you need to know is how to make a granny square.
The Granny Square is made from the middle out, starting with a small loop or the magic circle.
This is a traditional granny square design and the squares are made using a (4) worsted weight yarn in the US and Canada or Aran yarn in the UK. You will also need an H hook, (5mm).
This square uses alternating colours for each round of the square and the main colour is used for the top of the bag and the strap, if you choose to make one. 

Are you a Visual Learner.
Check out my video showing you How To Make A Daisy Square Bag.
Here is the Left Handed version
Pin for Later
If you like crochet bags you might be interested in checking out my Feelin’ Fine Fringe Bag or my Clutch Bag pattern. There is also a great pattern for the Daisy Square Bag you will love.
If you prefer to have the Granny Square Pouch Bag pattern in front of you instead of on the screen you can get the ad free pdf .
Purchase the Daisy Square Blanket Square Pattern on Ravelry.


The Granny Square Pouch Bag Free Pattern
Pattern by Pam Carr ©2023
Learn how to crochet a granny square pouch bag
This simple granny square pouch bag is so sweet and handy as a way to carry your phone and small items when you need something with a trendy feel. I even have a strap option for you if you would like to add one for an over the shoulder look.
When you learn how to crochet a granny square pouch bag with two granny squares you will see how easy it is to do. One granny square for each side of the body of the bag. I then created the top of the bag with single crochet stitches and created spaces to run the chain through to gather and close the top of the bag.
The Granny Square Pouch Bags seen above show how you can change the look of the bag by your colour choices. The yellow bag uses just two colours while the second bag uses customized colours. I chose an earth tone palette. You can have a multi coloured version and even add stripes of colour to the upper part of the bag if you like. The sky is the limit.
Size:
Finished Bag Size: 6” wide and 8” tall. The strap is 50” long approx.
Supplies you will need:
Yarn: Two skeins of worsted weight yarn in contrasting colours for a two coloured granny square pouch. If you want a multi-coloured granny square pouch you can choose colours from your stash.
Hook: size, H/8-5.00mm
Notions: Tapestry needle and scissors.
Gauge: 3 (clusters of 3dc plus ch1) – 8 granny stripe rows = 4” (10 cm)
Abbreviations (uses US conventions)
-
Ch = chain
-
st = stitch
-
sc = single crochet
-
dc = double crochet.
-
Hdc = half double crochet
-
Sl St = slip stitch
-
Rnd – round
This pattern uses US terminology. The US and UK crochet terms are different, but they use the same terms to describe different stitches. Here is a simple conversion chart for anyone in the UK.
US
|
UK
|
My YouTube channel, www.youtube.com/CarrowayCrochet, is a great resource for video tutorials for:
-
How to make a slip knot
-
how to single crochet.
-
how to double crochet.
Instructions:
This bag is made from two granny squares.
The two granny squares are joined on three sides to make up the body of the bag.
Granny Square Instructions.:
Make two squares.
Chain 4. Insert your hook into the first chain stitch and join with a slip stitch to create a small loop.
Round 1. Ch3, (this counts as the first dc st of your first cluster of 3dc. Make 2 more dc into the centre ring/loop. This completes the first cluster, ch3, make 3 dc into the centre ring, (this is your second cluster, ch3, make 3dc into the centre ring, (this is your third cluster), ch3, make 3 dc into the centre ring, (this is your fourth cluster, ch3, Join with a sl st to the top of the first ch3.
Change colour.
Join yarn to a ch3 corner space.
Round 2: Ch 3, (this acts as the first dc of your new cluster), make 2 more dc into the same corner sp, (this is half of the first corner to be completed at the end of the round. ) ch1, Make 3dc, ch3, 3dc into the next corner sp, (this is the second corner) ch1, make 3dc, ch3, 3dc into the next corner space, (this is your third corner) ch1, make 3dc, ch3, 3dc into the next corner space, (this is your fourth corner) ch1 , we now complete the first corner, make 3dc, ch3 and join to the top of the first ch3 with a sl st.
Change colour.
Join yarn to a ch3 corner space.
Round 3: Ch 3, (this acts as the first dc of your new cluster), make 2 more dc into the same corner sp, (this is half of the first corner to be completed at the end of the round. ) ch1, Make 3dc into the ch1 sp from the previous row,( it is between two dc clusters,) ch1, 3dc, ch3, 3dc into the next corner sp,(this is the second corner) ch1, 3dc into the ch1 sp from the previous row, ch1, make 3dc, ch3, 3dc into the next corner space,(this is your third corner) ch1, 3dc into the ch1 sp from the previous row, ch1, make 3dc, ch3, 3dc into the next corner space,(this is your fourth corner) ch1, 3dc into the ch1 sp from the previous row ch1 , we now complete the first corner, make 3dc, ch3 and join to the top of the first ch3 with a sl st.
Change colour.
Join yarn to a ch3 corner space
Round 4: Ch 3, (this acts as the first dc of your new cluster), make 2 more dc into the same corner sp, (this is half of the first corner to be completed at the end of the round. ) ch1, Make 3dc into the ch1 sp from the previous row ,( it is between two dc clusters,) ch1, make 3dc into the next ch1 space, ch1, Make 3dc, ch3, 3dc into the next corner sp,(this is the second corner) ch1, 3dc into the ch1 sp from the previous row, ch1, 3dc into the next ch1 sp, ch1, make 3dc, ch3, 3dc into the next corner space,(this is your third corner) ch1, 3dc into the ch1 sp from the previous row, ch1, 3dc into the next ch1 sp, ch1, make 3dc, ch3, 3dc into the next corner space, (this is your fourth corner) ch1, 3dc into the ch1 sp from the previous row ch1 , 3dc into the ch1 sp, ch1, we now complete the first corner, make 3dc, ch3 and join to the top of the first ch3 with a sl st.
Change colour.
Join yarn to a ch3 corner space.
Round 5: Ch 3, (this acts as the first dc of your new cluster), make 2 more dc into the same corner sp, (this is half of the first corner to be completed at the end of the round. ) ch1, Make 3dc into the ch1 sp from the previous row ,( it is between two dc clusters,) ch1, make 3dc into the next ch1 space, ch1, make 3dc into the next ch1 space, ch1, Make 3dc, ch3, 3dc into the next corner sp,(this is the second corner) ch1, 3dc into the ch1 sp from the previous row, ch1, 3dc into the next ch1 sp, ch1, make 3dc into the next ch1 space, ch1, make 3dc, ch3, 3dc into the next corner space,(this is your third corner) ch1, 3dc into the ch1 sp from the previous row, ch1, 3dc into the next ch1 sp, ch1, make 3dc into the next ch1 space, ch1, make 3dc, ch3, 3dc into the next corner space, (this is your fourth corner) ch1, 3dc into the ch1 sp from the previous row ch1 , 3dc into the ch1 sp, ch1, make 3dc into the next ch1 space, ch1, we now complete the first corner, make 3dc, ch3 and join to the top of the first ch3 with a sl st.
Fasten of and weave in all the ends.
Make one more granny square for the back of your bag.
Construction:
The Body of the Bag
Place the two squares together with the wrong sides facing and starting in one corner, whip stitch (sew) them together along one side, matching the stitches. Whip stitch along the bottom and then up the other side, stopping at the top edge. Remember to match the stitches as you go. This forms the body of the bag.
Now we will work on the top of the bag. This will be working in the round.
Attach the main colour to one top corner of the granny bag,
Round 1: Ch1, sc into each stitch or ch1 sp across the top of the front granny square and then across the top of the back granny square. Join with a sl st into the top of the ch1.
Round 2-4: Ch1, sc into the first st and into each stitch around the top of the bag, join with a sl st to the top of the ch1.
The Hole for Threading the Chain Tie through:
Round 5: Ch1, sc into each of the next 3 st, ch2, sk 2 st, *sc into each of the next 3 st, ch2, sk the next 2 st* Repeat between the * and the * around to the end. Join with a sl st to the top of the ch1.
Round 6: ch1, sc into each of the next 3 st, make 2sc into the ch2 sp, *sc into the next 3 st, 2sc into the ch2 sp* Repeat between * and* around to the end. Join to the top of the ch1 with a sl st.
Round 7: ch1, sc into the first st and each st around to the end. Join to the top of the ch1 with a sl st.
Fasten off and weave in the ends.
The Pouch Tie.
Chain 80 with the main colour for the tie. Fasten off and tie a knot in either end to secure them.
Thread this chain through the spaces in Round 5 starting in the middle of the front of the bag.
The Strap (optional)
Ch 140. You can make your strap shorter of longer to customize your strap.
Row 1: Sc into the 2nd ch from the hook and sc into each stitch across.
Fasten off and weave in the ends.
Attach the strap to either side of the bag. I chose to thread my strap through a hole in the crochet stitches at each side of the bag and tie a single knot. This allows the strap to be easily removed if you want to use the bag as a pouch with no straps. (see the photos on the next page).
You may also choose to stitch the strap onto the bag and make it a permanent feature.
I hope you loved learning how to crochet a granny square pouch bag.
If you have any questions about how to crochet a granny square pouch bag or need help with the patterns, please email me at carrowaycrochet@outlook.com, and Iʼll be glad to help you.
OTHER FREE CROCHET PATTERNS YOU MIGHT LOVE!
More Places to Find Crochet Free Patterns:
If you love crochet, you can find over a thousand free crochet patterns including some for crop tops and bralettes over at All Free Crochet
I am honoured to have my free crochet bralette pattern, the Earth Mother Bralette Pattern added to the All Free Crochet site.
It is a great resource for crochet lovers and I am proud to also have my Take Me Outside Infinity Scarf Pattern posted over on the All Free Crochet Site.
 It is a great resource for crochet lovers and I am proud to also have my
Selling items made from my patterns?
You are more than welcome to se items made from my pattern. Please do share my link and tag and help promote it on social media. Thank you.
If you have any questions or need help with the patterns, please email me at carrowaycrochet@outlook.com, and Iʼll be glad to help you.
Find other patterns by Carroway Crochet in my Etsy Shop and on Ravelry.
Let’s Share and Connect!
Thank you so much for visiting me here at Carroway Crochet .
Find other patterns by Carroway Crochet in my Etsy Shop and on Ravelry.
Other places you can find me are:
Ravelry
TikTok
This design, written work and images are a copyright of
©CarrowayCrochet and may not be copied or reproduced in any way.
You have permission to sell finished products made from this pattern, but please leave a link to my blog, www.carrowaycrochet.com in your product listing specifying that I am the designer of this pattern.
Thank you.
Please follow and like us:
2 thoughts on “How to Crochet a Granny Square Pouch Bag”
Comments are closed.